Zinno 535is 87
-
- Posts: 323
- Joined: Apr 18, 2014 10:31 AM
- Location: Chandler, Arizona
Zinno 535is 87
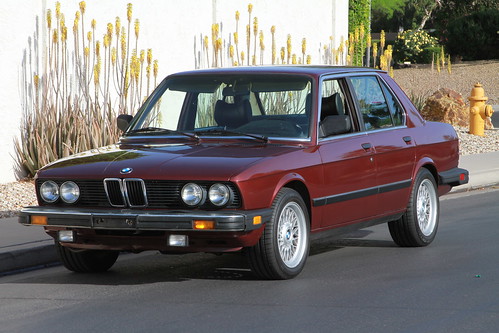
Finally, a long overdue thread of my 1987 535is Zinnoberrot / Schwarz, 07/1987.
After some personal encounters with a couple of amazing Zinnos in San Diego at the 2016 St. Paddy's Day gathering, I decided to aggressively pursue owning one myself. It was my first time attending and came back inspired and in love with this color, specially with the Schwarz interior.
In order for the above to be possible I unfortunately had to let go of my 84 528e Burgundrot
In retrospect I should have kept it, it was in really great shape and it would have made a nice DD; oh well... of course it sold rather quickly.
Here's the ad: http://www.mye28.com/viewtopic.php?f=14 ... 1#p1372628
Given my lack of knowledge/skill, I was hoping to find something in decent shape that didn't need a great deal of immediate attention. Well after a few months, I'll admit it, I started getting a little desperate and decided to go "check out" a Zinno that lacked historical maintenance documentation and needed some immediate TLC (yeah, "check out" with a one way airline ticket lol).
I flew in on a Saturday morning in July of 2016 and after inspection and tough negotiation the PO and I came to an agreement at around 6pm. Based on the overall assessment during the inspection the car showed to be road worthy (relatively lol), nevertheless I had set my mind to driving it back to Phoenix. I had driven my e28 Burgundrot & a '76 2002 before from the Bay Area with nice experiences so I was really looking forward to doing it again. I started heading back to AZ immediately after the purchase.
Filling up before hitting the road
Somewhere outside San Jose
After about 8 hours on the road, I stopped at a Rest Area 3 hours away from Phoenix; it must have been around 2am. I took a 3 hour nap and kept going.
Before leaving the Rest Area
At this point I was very excited to be close to home and chances were I was not going to have any issues getting there based on how the car had behaved.
As expected, I made it home fine and needless to say, I was very pleased with the purchase. Aside from the front tires wobbling when slaming on the brakes (which I knew not to do), no AC and some play in the shifting mechanism the car drove and felt relatively well.
At home after a long journey.
During the following weeks I started working on the more cosmetic stuff. Alex from Vaughn Motor Works worked on a few things here and there including the AC.
Stuff I attacked immediately:
Changed the wheels, I bought some Continental DSW 06 tires for the rims I won during the raffle at St. Paddy's Day 2016
Please ignore the white box on top... its the infamous "oil gauge" I also won that year but happily donated it for the following year's raffle.
Btw, it was rewarding to see it go to its proud new owner in 2017...
Installed new gears in the odometer
changed some center console parts and cleaned everything in and out. Got rid of a shit load of audio cables and the cheapo sound system it had in it. I also pulled out a mic that was sticking out from the A pillar, a phone cable among other unnecessary crap.
One of the most annoying things I found was this funky old alarm system that for all I know its a glorified kill switch.
Found a ton of coins... nice to get some money back from the PO, lol
I upgraded the brakes on the back. Of course since this was my first set of caliper upgrade, I went with red paint
before (this is where the "relatively" road worthy comes into play)
after
I bought the brake lines from Garagistic and the calipers are from a 750il
My plans were to do the brake upgrade to the front wheels as well (which I have ready to go) but noticed the rotors and pads still had plenty of life so I decided to turn the rotors and leave them alone for now. Btw, of course I purged/changed the brake fluid in the process. What came out was really nasty
The overall plan is to end up with a nice and solid e28 example. I like them unmolested I have never been a custom guy, maybe because I am barely learning the basics...
Anyway, I definitely have more updates to post, I'll leave it at this for now. Once I get my pictures and details organized I will continue to report out the progress.
After some personal encounters with a couple of amazing Zinnos in San Diego at the 2016 St. Paddy's Day gathering, I decided to aggressively pursue owning one myself. It was my first time attending and came back inspired and in love with this color, specially with the Schwarz interior.
In order for the above to be possible I unfortunately had to let go of my 84 528e Burgundrot
In retrospect I should have kept it, it was in really great shape and it would have made a nice DD; oh well... of course it sold rather quickly.
Here's the ad: http://www.mye28.com/viewtopic.php?f=14 ... 1#p1372628
Given my lack of knowledge/skill, I was hoping to find something in decent shape that didn't need a great deal of immediate attention. Well after a few months, I'll admit it, I started getting a little desperate and decided to go "check out" a Zinno that lacked historical maintenance documentation and needed some immediate TLC (yeah, "check out" with a one way airline ticket lol).
I flew in on a Saturday morning in July of 2016 and after inspection and tough negotiation the PO and I came to an agreement at around 6pm. Based on the overall assessment during the inspection the car showed to be road worthy (relatively lol), nevertheless I had set my mind to driving it back to Phoenix. I had driven my e28 Burgundrot & a '76 2002 before from the Bay Area with nice experiences so I was really looking forward to doing it again. I started heading back to AZ immediately after the purchase.
Filling up before hitting the road
Somewhere outside San Jose
After about 8 hours on the road, I stopped at a Rest Area 3 hours away from Phoenix; it must have been around 2am. I took a 3 hour nap and kept going.
Before leaving the Rest Area
At this point I was very excited to be close to home and chances were I was not going to have any issues getting there based on how the car had behaved.
As expected, I made it home fine and needless to say, I was very pleased with the purchase. Aside from the front tires wobbling when slaming on the brakes (which I knew not to do), no AC and some play in the shifting mechanism the car drove and felt relatively well.
At home after a long journey.
During the following weeks I started working on the more cosmetic stuff. Alex from Vaughn Motor Works worked on a few things here and there including the AC.
Stuff I attacked immediately:
Changed the wheels, I bought some Continental DSW 06 tires for the rims I won during the raffle at St. Paddy's Day 2016
Please ignore the white box on top... its the infamous "oil gauge" I also won that year but happily donated it for the following year's raffle.
Btw, it was rewarding to see it go to its proud new owner in 2017...
Installed new gears in the odometer
changed some center console parts and cleaned everything in and out. Got rid of a shit load of audio cables and the cheapo sound system it had in it. I also pulled out a mic that was sticking out from the A pillar, a phone cable among other unnecessary crap.
One of the most annoying things I found was this funky old alarm system that for all I know its a glorified kill switch.
Found a ton of coins... nice to get some money back from the PO, lol
I upgraded the brakes on the back. Of course since this was my first set of caliper upgrade, I went with red paint
before (this is where the "relatively" road worthy comes into play)
after
I bought the brake lines from Garagistic and the calipers are from a 750il
My plans were to do the brake upgrade to the front wheels as well (which I have ready to go) but noticed the rotors and pads still had plenty of life so I decided to turn the rotors and leave them alone for now. Btw, of course I purged/changed the brake fluid in the process. What came out was really nasty
The overall plan is to end up with a nice and solid e28 example. I like them unmolested I have never been a custom guy, maybe because I am barely learning the basics...
Anyway, I definitely have more updates to post, I'll leave it at this for now. Once I get my pictures and details organized I will continue to report out the progress.
Last edited by Sapotorito on Apr 08, 2018 10:19 PM, edited 1 time in total.
Re: Zinno 535is 87
Nice. Glad to see this. Looking forward to more updates on it. Missed you this year in San Diego!
Re: Zinno 535is 87
Thanks for the updates- nice work! Zinno is my favorite color for an E28 with front and rear spoilers...
I actually really like the look of those 14" mesh wheels that you bought the car with.
Also, be careful with your brake upgrade-- you now have improper brake bias, shifted significantly to the rear. ABS will kick on before the wheels lock up, but still your fronts are way undersized for proper balance. The balance is even a bit rear-biased on the M5 with SLS and a rear mounted battery (and the larger M5 front calipers/rotors).
-
- Posts: 5052
- Joined: Feb 12, 2006 12:00 PM
- Location: Don't waste my motherf***in' time!
- Contact:
Re: Zinno 535is 87
Great updates, keep them coming. Nice color combo
-
- Posts: 323
- Joined: Apr 18, 2014 10:31 AM
- Location: Chandler, Arizona
Re: Zinno 535is 87
Thank you guys! And yes Chris, it really sucked missing the gathering this year...
btw,
btw,
I do appreciate the input, I currently have the car on jack stands and its not being driven but I will definitely keep this in mind so I do the upgrade on the front before driven again, I didn't know this was an issue but it makes a lot of sense. And I totally agree with you on the 14s the car came with. I definitely plan on keeping them so I can put them back at one point.tschultz wrote: I actually really like the look of those 14" mesh wheels that you bought the car with.
Also, be careful with your brake upgrade-- you now have improper brake bias, shifted significantly to the rear. ABS will kick on before the wheels lock up, but still your fronts are way undersized for proper balance. The balance is even a bit rear-biased on the M5 with SLS and a rear mounted battery (and the larger M5 front calipers/rotors).
-
- Posts: 103
- Joined: Jun 30, 2015 4:45 PM
- Location: Phoenixville, PA
Re: Zinno 535is 87
Hey, I did a brake upgrade a year or so ago and this came in handy:
http://www.m535i.org/main.html
Click on FAQ > E28 FAQ > Brakes
Tons of information in there about what works/ what doesn't and budget considerations. I also found a spreadsheet that someone had made where you can plug in the rotor sizes and it will calculate braking force and subsequently bias. I may have found it on this forum, but can't remember off the top of my head.
-
- Posts: 323
- Joined: Apr 18, 2014 10:31 AM
- Location: Chandler, Arizona
Re: Zinno 535is 87
Thanks for sharing... saved to favs now.
So the next thing I tackled was replacing the dashboard, mine was horrid.
I found one in great shape in Latvia, it only had a 1/2 inch crack towards the back. Unfortunately they didn't pack the thing well enough so it got here with more cracks than expected. Original crack highlighted with circle and arrows point to new cracks.
The seller and I came to a fair agreement and i ended up keeping the dash. In the end this dash looked way better than mine and at that point I had already prepped the car for this replacement.
Here's some pictures I took during replacement
old vs "new"
replacement installed
Aside from other minor fixes here and there, my main focus right now is the entire rear suspension. I will post my progress soon.
Last edited by Sapotorito on Apr 15, 2018 10:28 PM, edited 1 time in total.
Re: Zinno 535is 87
You just missed your golden opportunity to replace your heater core and resistor. I think I got my dash from the same Latvia source. Good guy. No cracks and was wrapped well enough to drop off of a building. Sorry, yours didn't arrive the same.
-
- Posts: 323
- Joined: Apr 18, 2014 10:31 AM
- Location: Chandler, Arizona
Re: Zinno 535is 87
thanks dsmith, now I knowdsmith wrote:You just missed your golden opportunity to replace your heater core and resistor. I think I got my dash from the same Latvia source. Good guy. No cracks and was wrapped well enough to drop off of a building. Sorry, yours didn't arrive the same.
I might have the opportunity again in the future since current cracks will get worse eventually and I might want to swap it again at one point.
I guess you live and learn. That is the plan in this whole process of course; so I do appreciate the input.
Re: Zinno 535is 87
Lot's of win in this post. Congrats!
-
- Posts: 323
- Joined: Apr 18, 2014 10:31 AM
- Location: Chandler, Arizona
Re: Zinno 535is 87
Thanks guys
So in the last couple of months things have been moving along slow but steady as it relates to the rear suspension project.
After removing the exhaust and drive shaft, I brought down the subframe altogether.
I must say, up until this point the process went pretty smooth; no output shaft bolt heads broken or anything like that.
As I moved forward, what set me back was removing the subframe and trailing arm bushings. Of course the main reason for this was the lack of proper tools. I read a few threads and found some ideas as to how to pull this off without the required tool so I started with the subframe bushings.
Well, after a few unsuccessful attempts, I was able to pull them out.
This is what was used, yes that's a faucet water line weight
Removed bushings
in the middle of this, my garage door opener stopped working so I had fix it over the car on jack stands... it was interesting.
Luckily I had a few ladders to work with…
The trailing arm bushings were another story, removing them was very hard to say the least. After trying a few home made tools…
and no luck, I decided to go with the bushing burning method.
Of course I had to be extremely careful when using the saw to remove the bushing metal from the trailing arm housing, I was a little nervous doing this but in the end, aside from a minor scratch, no damage was done to the trailing arm. In retrospect, I should have invested time and money in getting the right tool for this; I am sure it would have been well worth it.
As I learned the above lesson, I prepared accordingly to remove the wheel bearings, needless to say, it was a hassle free process.
Full disclosure, it was not until after I had disassembled, mixed and put everything back together again with new kits that I learned that you cannot mix bearings/parts of the output shafts. Can I get away with this or is it really not acceptable/smart?
I sent the below to get sand blasted/powder coated
Before
After (with the reassembled output shafts)
Cleaning the undercarriage is my next step and after that, in the next few weekends, the plan is to start putting things back together. By this time I should have received the parts i ordered from Schmiedmann and Pelican.
In the meantime, does anyone know if you can get these new?
Feel free to chime in and let me know about things I could have done better, if I am missing something, etc.. as mentioned before, I am totally new at this and the plan is to enjoy the process but at the same time learn from the feedback received. Please keep it coming!
So in the last couple of months things have been moving along slow but steady as it relates to the rear suspension project.
After removing the exhaust and drive shaft, I brought down the subframe altogether.
I must say, up until this point the process went pretty smooth; no output shaft bolt heads broken or anything like that.
As I moved forward, what set me back was removing the subframe and trailing arm bushings. Of course the main reason for this was the lack of proper tools. I read a few threads and found some ideas as to how to pull this off without the required tool so I started with the subframe bushings.
Well, after a few unsuccessful attempts, I was able to pull them out.
This is what was used, yes that's a faucet water line weight
Removed bushings
in the middle of this, my garage door opener stopped working so I had fix it over the car on jack stands... it was interesting.
Luckily I had a few ladders to work with…
The trailing arm bushings were another story, removing them was very hard to say the least. After trying a few home made tools…
and no luck, I decided to go with the bushing burning method.
Of course I had to be extremely careful when using the saw to remove the bushing metal from the trailing arm housing, I was a little nervous doing this but in the end, aside from a minor scratch, no damage was done to the trailing arm. In retrospect, I should have invested time and money in getting the right tool for this; I am sure it would have been well worth it.
As I learned the above lesson, I prepared accordingly to remove the wheel bearings, needless to say, it was a hassle free process.
Full disclosure, it was not until after I had disassembled, mixed and put everything back together again with new kits that I learned that you cannot mix bearings/parts of the output shafts. Can I get away with this or is it really not acceptable/smart?
I sent the below to get sand blasted/powder coated
Before
After (with the reassembled output shafts)
Cleaning the undercarriage is my next step and after that, in the next few weekends, the plan is to start putting things back together. By this time I should have received the parts i ordered from Schmiedmann and Pelican.
In the meantime, does anyone know if you can get these new?
Feel free to chime in and let me know about things I could have done better, if I am missing something, etc.. as mentioned before, I am totally new at this and the plan is to enjoy the process but at the same time learn from the feedback received. Please keep it coming!
-
- Posts: 103
- Joined: Jun 30, 2015 4:45 PM
- Location: Phoenixville, PA
Re: Zinno 535is 87
There is so much similarity to what I'm going through in this thread it's scary! My 2 year old garage door opener stopped working last week and my car is off the ground.
How bad was the dash replacement? I've been dreading doing that (have had a crack-free dash in my basement for the last 3 years), but thanks dsmith for the pointer - will need to go research those jobs a bit too.
-
- Posts: 323
- Joined: Apr 18, 2014 10:31 AM
- Location: Chandler, Arizona
Re: Zinno 535is 87
Good luck on your garage door opener
And swapping the dash was not an easy job but at the same time it’s very doable... I managed to do it alone so that should tell you something.
Btw, you should do a build thread to see your progress
And swapping the dash was not an easy job but at the same time it’s very doable... I managed to do it alone so that should tell you something.
Btw, you should do a build thread to see your progress
-
- Posts: 323
- Joined: Apr 18, 2014 10:31 AM
- Location: Chandler, Arizona
Re: Zinno 535is 87
Finally, after a couple of setbacks I was able to assemble everything back together.
I started by cleaning the undercarriage
Trailing arm bushings and wheel bearings being put in place.
When it came time to install the pulse generators, I noticed they didn’t fit quite right and realized Schmiedmann had sent the wrong ones. I sent these back and apparently they didn't have the correct ones in stock. I ended up getting a credit. Looked for the pair elsewhere without luck… I ended up using the old ones in the meantime which didn't look nice given most of the rubber has already cracked and come off in some areas. I tried to keep them together with some electrical tape so I can continue using them while I find the new set.
What also set me back was the fact I disassembled the axle bearings completely Do not do this:
Because you get this: stiff axles!
I went to a junk yard and found a new set of bearings. Cleaned them (without disassembling them) and replaced the stiff ones with this new set.
I had originally painted the upgraded calipers red but decided to go back to how they were originally.
rear calipers right next to the front ones that I have yet to install. Btw, the front ones will also go back to their original texture.
Found a 3.71 LSD, it cleaned up nicely…
Replaced some gear shift mechanism bushings and rubber boot
Replaced the center mount, guibo and resprayed the drive shaft
drive shaft markings aligned
Progress images
When it came time to torque the suspension I couldn't make my kids volunteer to sit while I did this.. but then I realized they didn't weight as much as I needed on the seats so they wouldn't have been of any help anyway
All put together
After purging the brakes, checking fluids and making sure I was not missing anything, I replaced the battery, I had left the old one hooked up and it got completely drained from just sitting there for a year and a half. Luckily it was still under warranty and I got a partial refund. After that the car turned on just as if I had used it yesterday. Took it for a ride around the block and it felt very solid... Its amazing how some minor bushings can make a big difference on the shifting mechanism, it feels very tight.
Soon after I took it to get tested for emissions. I was a little nervous and went thru some tense moments (specially when the guy reved it up trying to meet the set revolution threshold) but in the end it was nice to get the passing slip... btw, its funny to see the technician's faces when they can't find the vin on the dashboard its happened ever since I replaced the dashboard.
BTW, I looked it up and apparently there is not a way to fix negative camber on these? does anyone know if there is a way to minimize it?
Next in line will be to do something similar to the front suspension, make a decent pair of black sports seats using the set I purchased from Ray and mine, adjust the valves and fix a bunch of minor issues it has (ie. lights flicker between high and low beam, interior light switch doesn't work well, one of the door locks doesn't lock automatically, etc.. stuff like that). But before all this I will be taking the car to Alex Vaughn (mechanic) so he can help me get a leak taken care of.
-
- Posts: 5052
- Joined: Feb 12, 2006 12:00 PM
- Location: Don't waste my motherf***in' time!
- Contact:
Re: Zinno 535is 87
Great pictures and thorough work! Looking good.
Re: Zinno 535is 87
Ooooo...clean undercarrige porn!
I just went through the Driveshaft R&R as well as swapping out my CA Exhaust System with my EU Exhaust System (that's a whole other story).
Thread is much winning.
I just went through the Driveshaft R&R as well as swapping out my CA Exhaust System with my EU Exhaust System (that's a whole other story).
Thread is much winning.
Re: Zinno 535is 87
Wow great work. That's how I like to see the undercarriages. They clean up so well! I wish I had been able to see this car on the lift! I'm impressed.
The lights flickering is usually the turn signal stalk.
You can deal with the camber and the related toe but you don't want to hear what you'd need to do to do it given all the work you just completed. I don't think you have an extreme amount from seeing the car the other day.
Looking forward to seeing you and the car in a couple weeks!
Re: Zinno 535is 87
Nicely done. And thanks for sharing with us. It’s not a small amount of work putting detailed post, like this, together.
When I rebuilt my cv axles I managed to mix up one bearing and resulted same stiff axle. Luckily it was only one and wasn’t too hard to shuffle balls around until it all fit nicely.
How did you treat brake calliper? Any coating on it? I’ve wire wheeled some in past and after a few heat cycles, and they started to rust.
-
- Posts: 323
- Joined: Apr 18, 2014 10:31 AM
- Location: Chandler, Arizona
Re: Zinno 535is 87
Thanks a lot guys. its only inspiration from what you guys have done to your cars, honestly!
Chris, of course after the fact I learn I could have used adjustable trailing arm bushings or weld adjustable plates... anyway, I might do that sometime in the future.
Tilt, I did not treat them with anything which might give me the same result you got. But after reading the treatment jhh925 did on his calipers http://www.mye28.com/viewtopic.php?f=7& ... 5#p1482118 I might do the same sooner rather than later while they are still clean. Check it out.
Re: Zinno 535is 87
Yeah, bummer you didn't know this before. If it's any consolation, I didn't know before I did it without too. I highly recommend going the Ireland Engineering route when you get around to it.Sapotorito wrote:Thanks a lot guys. its only inspiration from what you guys have done to your cars, honestly!
Chris, of course after the fact I learn I could have used adjustable trailing arm bushings or weld adjustable plates... anyway, I might do that sometime in the future.
Don't bother with the bushing-based kits.
I very, very much appreciate the work you are doing! Keep posting!
Re: Zinno 535is 87
Yeah, it's a lot of welding and modification to the Rear Subframe.
Look at AKG's setup also. I have this on the M535i.
https://www.akgmotorsport.com/product-c ... on-e12e28/
Look at AKG's setup also. I have this on the M535i.
https://www.akgmotorsport.com/product-c ... on-e12e28/
Re: Zinno 535is 87
Fantastic. I luv watching you guys work your asses off!