I weld
Re: I weld
CJ bought me a CR Spotless water system last year for my birthday. It's da-bomb. Makes washing cars tons easier because there's no need to dry. The water is just hydrogen and oxygen so when it evaporates there's nothing left. It really does work.
I then bought myself this really nice Kranzle pressure washer to go with it. Using a pressure washer reduces the amount of water used making the filter stuff last longer. Plus a pressure washer is a must for a foam gun. This thing is compact but HEAVY.
See where this is going?
I still need some hose fittings to permanently connect the output of the filter to the input of the washer, and I've ordered some quick disconnects. Once they come I'l fabricate a holder for my wands and foam gun (which always tips over and spills!).
Re: I weld
That is wicked cool...
Re: I weld
ElGuappo wrote:That is wicked cool...
Indeed. I'm a bit jelly.
Re: I weld
Y'all may remember this welding cart I got on Amazon.
It sucks.
Even with just one bottle on it, the front casters don't turn, and have flat spotted. It's also tipsy.
I have a project that requires me to do some aluminum welding. This, of course, has required me to purchase a new spool gun as well as procure a tank of pure argon.
The shitty cart will not do, as-is. So...
- I bought new, bigger, rear wheels, widened the track, and added beef.
- I bought new, bigger, front casters and mounted them wider
- I hacked up the tank holder to securely hold two bottles
It ain't purdy (neither are most of my welds) but it does the job.
I have been storing auto glass and some windshields on the floor, leaning against the wall. This is not the way to do it. I already had one brand new OE BMW E28 windshield break because of this. So I bought a glass holder on Amazon and fabricated a bracket.
OAG Windshield Protection Auto Glass Truck Cargo Management Rack (5 Lite Slots Rack)
Now I they are safe and secure and I have more room for my wheel fort.
Minerva, Maytag, and the 911 all snug, ready for bed.
Re: I weld
The windshield rack is a nice idea. Wish it wasn’t so expensive but 4 windshields in their boxes do take up a lot of space, especially since I misjudged the boxes’ ability to make it around the corner into my parts bedroom, so they’re in my living room.
Re: I weld
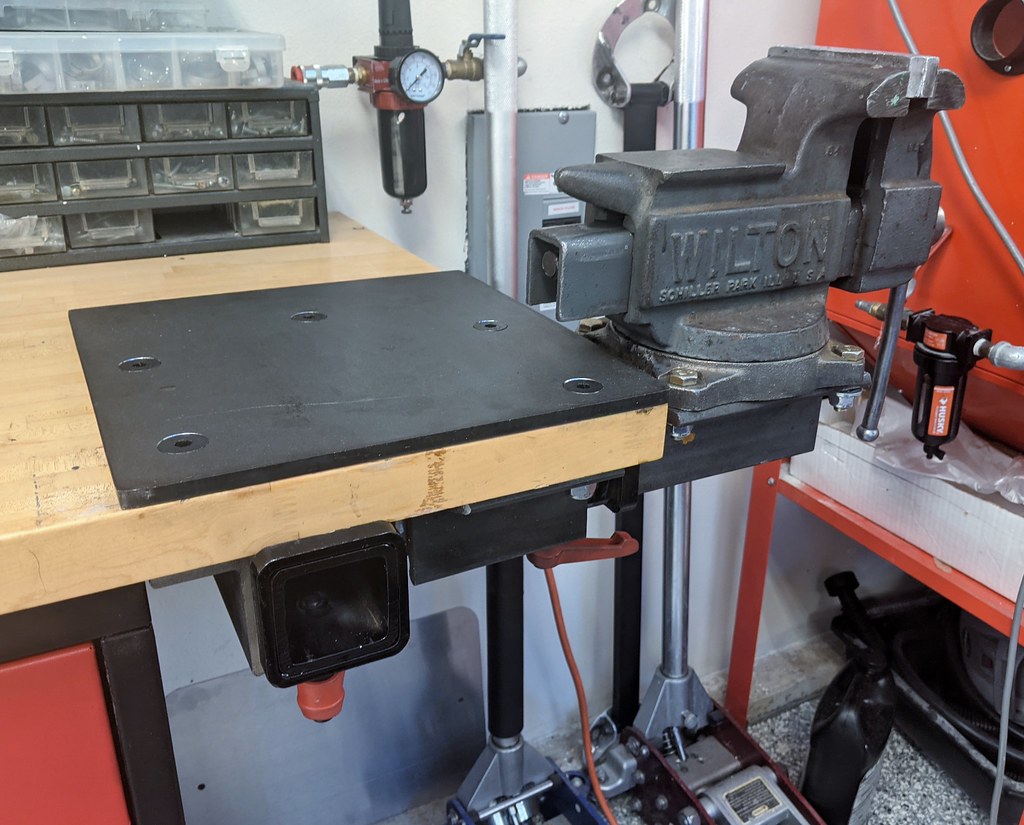
Yesterday I started fabricating the trailer-hitch-receiver mount for my 'new' vise which my daughter bought me for Christmas (belated; she found it last week at an estate sale):
The idea is to mount the vise where my old one was, where my glulam workbench extends over the right side of the bench by about 12".
This old pic shows the layout (the drill press is no longer there):
I am going to mount two 2" hitch-receivers under the overhang. One facing the front and one facing to the right. With this, I'll be able to put my vise in either position (nominally leaving it mounted to the right). I'm also going to dismount my two-wheel grinder from its post and put it on a hitch plate so I can use it in this location or on one of the hitch-receivers I put on my welding cart.
Since the top of the bench has been marred with use and has a bunch of old vise mounting holes in it, I've decided to put a sheet of 3/8" hardened steel on top. Mcmaster-carr sells 12x12" sheets so I bought one. With this, I will have a nice, indestructible, hard surface on this workbench for whacking very hard things without damaging my wood bench further.
The trick is how to mount the hitch-receivers underneath such that there are no fasteners visible up top. To do this I plan on welding bolts to the bottom of the plate and drilling counter-sunk holes big enough for the heads/welds to fit in. Then the hitches will be welded together with brackets (I have a bunch of 3/8" thick angle stuff leftover from the welding cart) with bolt holes.
So far I've got the vise-side of the equation done, fabricating it out of extra 3/8" angle material:
These are just the initial spot welds.
When I was doing the actual welding it was all going great. I was excited that I'd have some really neat welds to show off how my skills have improved. Sadly, on the third weld, I got massive porosity. Instead of backing off and moving to some scrap steel to diagnose, I just kept going at it on the real part. Thus I'm not proud of any of it.
I did finally break off and use some scrap to diagnose... after much consternation, I discovered the set screw that holds the MIG cable into the Miller (where the wire feed mechanism is) was loose and the cable had pulled out, meaning the gas was just exiting there.
The weld on the bottom-right was my final test weld after figuring all this out:
So, no pics of my welds of this will be forthcoming (ugly!), but here's the final product:
Today I should be able to get to finishing the bench side...
-
- Posts: 967
- Joined: Oct 26, 2017 3:36 PM
- Location: Fleming Island FL
Re: I weld
That is slick.
-
- Posts: 78
- Joined: Oct 16, 2020 9:42 AM
- Location: Tampa, FL
Re: I weld
Yeah, the finish is just brilliant! I couldn't have done it better myself.
Re: I weld
I've decided I needed a few upgrades to my garage/workshop...
The first is the welding table. When I finished it in 2017 I had no idea what I was doing as a welder. I'm not much wiser now, but I have learned a few things. And I got some things wrong when I built it.
First, it's way overbuilt. It is too heavy and too long. There's not much I can do about the weight, and I'm ok with the width, but I can tweak the length.
Second, the gaps between the slats drive me nuts. I'm always dropping things between them. And, I'm jealous of the BuildPro-style tables with the grid of 5/8" holes throughout for fixturing.
So I'm going to bring the slats together and drill a massive number of holes.
Third, it's too short. I made it desk height (~29") and my back does not appreciate that. So I'm going to make it taller by about 8-9".
I also want to paint it (red) and I'd like to have a plasma grate I can use for easier plasma cutting.
On making it a bit shorter: by bringing the slats together I will remove about 3" of length off the end with cabinets. I have deleted the hitch receivers on that end as well (details to follow). 3" may not sound like a lot, but it means I can more effectively store the beast more effectively.
Here's the new design:
Note that I have no plan for the area of the top to the left, where the vise/grinder go. I may source another 1/2"x6"x36" plate, I may leave the space empty (makes using the vise easier), or I may put wood there. Still thinking about that.
On the right side, note the plasma grate. It will slide on/off using 2" & 1 3/4" OD square "Telespar" tubing (no interior welds, designed for telescoping) and I'll be able to store it on the side opposite where I hang tools. Here's the design of the plasma grate. it will provide a 36"x18" surface for doing plasma cutting and will sit flush with that top (Ignore that it says the slats will be 24" long; they will be 18").
All the material for this is on-hand and my goal is to build the plasma tray this weekend.
As for making it taller: I've already done it...
After:
I accomplished this by cutting 4 9" lengths of 2x2x1/4" and 4 4x4" 3/16" plates with holes for the wheels. I used the grinder to round the corners.
I'm glad I didn't weld these wheels on:
I was pretty confident the 1/4"+3/16" plates and tubing was going to be stout enough for this application, but I actually tested the first corner by rolling the table up on it after I made it just to be sure (I was also nervous about my welds... I just don't have much experience!).
It is def. stout enough!
For giggles, and because I wanted to practice with much thinner gauge sheet metal I made a little tray. I used my 1/2" planks as a brake since I don't have one. That was fun. I discovered that my Miller 211 is not really capable of welding 24ga sheet metal. I had the settings as low as I could go and even the smallest blip of the trigger caused burn-through (see corners). I'm going to remake this tray using some thicker metal and make it smaller because I did it before I decided on the plasma grate concept; that will now interfere. But I love having this little storage tray for all the tools required for grinders.
Now, what about the top?
First, I now know it was a STUPID idea to weld the heads of the bolts that secure the slats to the slats. I should have used counter-sunk holes and bolts through the bolts. Why? Because the slats are warped from the heat. Not a lot, but a few thou. They bulge right where those bolt heads were welded on. If I ever do this again, I'll do it right. But I've also proven that I can use a grinder with a flap disc, along with a straight edge to take those bulges out. It will never be perfect as a real BuildPro, but I'm now confident it will be close enough.
I am also confident the adjustment mechanism I built it will allow me to get the slats butted up against each other square, and at the perfect height. I used fine-pitched bolts and the mounting holes are oversized (allowing lateral movement).
But, how am I going to accurately drill all those 5/8" holes???
The answer happens to involve me buying a new tool I've always wanted (just because): A magnetic drill press. I have ordered a "Fein Slugger JMU 137-2QW". After much research I decided on this because a) It's German-made, b) multispeed, and c) reversible because tapping. Probably way overkill for what I'll actually use it for, but I know having a mag drill is going to be super useful. This guy on Youtube makes great use of his for all sorts of things: https://www.youtube.com/watch?v=lvhwczDgNqI (in this video he makes a holder that lets him use it as a drill press and tube notcher).
It was this guy's videos that inspired me to drill my holes using the mag drill.
I will drill the holes in a 2"x2" grid. That's 320 holes. I'll probably regret my ambition later...
While I'm waiting for the dill to show up I ordered some 5/8" bar stock and a single 'real' BuildPro clamp so I can practice modifying my clamps to work like their system.
The first is the welding table. When I finished it in 2017 I had no idea what I was doing as a welder. I'm not much wiser now, but I have learned a few things. And I got some things wrong when I built it.
First, it's way overbuilt. It is too heavy and too long. There's not much I can do about the weight, and I'm ok with the width, but I can tweak the length.
Second, the gaps between the slats drive me nuts. I'm always dropping things between them. And, I'm jealous of the BuildPro-style tables with the grid of 5/8" holes throughout for fixturing.
So I'm going to bring the slats together and drill a massive number of holes.
Third, it's too short. I made it desk height (~29") and my back does not appreciate that. So I'm going to make it taller by about 8-9".
I also want to paint it (red) and I'd like to have a plasma grate I can use for easier plasma cutting.
On making it a bit shorter: by bringing the slats together I will remove about 3" of length off the end with cabinets. I have deleted the hitch receivers on that end as well (details to follow). 3" may not sound like a lot, but it means I can more effectively store the beast more effectively.
Here's the new design:
Note that I have no plan for the area of the top to the left, where the vise/grinder go. I may source another 1/2"x6"x36" plate, I may leave the space empty (makes using the vise easier), or I may put wood there. Still thinking about that.
On the right side, note the plasma grate. It will slide on/off using 2" & 1 3/4" OD square "Telespar" tubing (no interior welds, designed for telescoping) and I'll be able to store it on the side opposite where I hang tools. Here's the design of the plasma grate. it will provide a 36"x18" surface for doing plasma cutting and will sit flush with that top (Ignore that it says the slats will be 24" long; they will be 18").
All the material for this is on-hand and my goal is to build the plasma tray this weekend.
As for making it taller: I've already done it...
After:
I accomplished this by cutting 4 9" lengths of 2x2x1/4" and 4 4x4" 3/16" plates with holes for the wheels. I used the grinder to round the corners.
I'm glad I didn't weld these wheels on:
I was pretty confident the 1/4"+3/16" plates and tubing was going to be stout enough for this application, but I actually tested the first corner by rolling the table up on it after I made it just to be sure (I was also nervous about my welds... I just don't have much experience!).
It is def. stout enough!
For giggles, and because I wanted to practice with much thinner gauge sheet metal I made a little tray. I used my 1/2" planks as a brake since I don't have one. That was fun. I discovered that my Miller 211 is not really capable of welding 24ga sheet metal. I had the settings as low as I could go and even the smallest blip of the trigger caused burn-through (see corners). I'm going to remake this tray using some thicker metal and make it smaller because I did it before I decided on the plasma grate concept; that will now interfere. But I love having this little storage tray for all the tools required for grinders.
Now, what about the top?
First, I now know it was a STUPID idea to weld the heads of the bolts that secure the slats to the slats. I should have used counter-sunk holes and bolts through the bolts. Why? Because the slats are warped from the heat. Not a lot, but a few thou. They bulge right where those bolt heads were welded on. If I ever do this again, I'll do it right. But I've also proven that I can use a grinder with a flap disc, along with a straight edge to take those bulges out. It will never be perfect as a real BuildPro, but I'm now confident it will be close enough.
I am also confident the adjustment mechanism I built it will allow me to get the slats butted up against each other square, and at the perfect height. I used fine-pitched bolts and the mounting holes are oversized (allowing lateral movement).
But, how am I going to accurately drill all those 5/8" holes???
The answer happens to involve me buying a new tool I've always wanted (just because): A magnetic drill press. I have ordered a "Fein Slugger JMU 137-2QW". After much research I decided on this because a) It's German-made, b) multispeed, and c) reversible because tapping. Probably way overkill for what I'll actually use it for, but I know having a mag drill is going to be super useful. This guy on Youtube makes great use of his for all sorts of things: https://www.youtube.com/watch?v=lvhwczDgNqI (in this video he makes a holder that lets him use it as a drill press and tube notcher).
It was this guy's videos that inspired me to drill my holes using the mag drill.
I will drill the holes in a 2"x2" grid. That's 320 holes. I'll probably regret my ambition later...
While I'm waiting for the dill to show up I ordered some 5/8" bar stock and a single 'real' BuildPro clamp so I can practice modifying my clamps to work like their system.
-
- Posts: 1623
- Joined: May 10, 2006 11:27 AM
- Location: Cheshire, CT
Re: I weld
Looks like a good project! For that many holes, have you considered a mag drill with auto-feed? It doubles the price of a Fein (which are bad-ass tools), but you can get another brand and keep the price similar. Just thinking of your shoulder!
Re: I weld
I did not consider an auto-feed mag drill. Probably should have.
Progress on the plasma cutting grate! After actually fondling the various materials I bought I figured out how to ensure the 1" thick consumable slats would be guaranteed to be flush with the top. The trick was to use 1" square tubing.
Here's the 'final' design
To make this work, I set my circular saw up such that the material was further forward on the blade, causing the cut to be roughly 45 degrees. Thus the cuts went 1/2 of the way in on one side (1/2") and ALL THE WAY through the other side. The blade on my saw just happens to make an almost perfect 1/8" thick cut, so the 1"x1/8" slat material fits perfectly (just a scoche tight).
Then, to stop the slats in the vertical direction, I welded another 1" tube below the one with the cuts.
I made two of these:
And then I cut all the 18" long slats and fitted them.
I'm still figuring out how I'll mount this thing. The 2 1/4" and 2" telespar from McMaster is WAY too big for this application, so I also bought some 1" and 3/4" to try. McMaseter lies about it telescoping because both the 1" and the 3/4" are 0.08" thick, not 0.125, thus the 3/4" is way too small and doesn't fight tightly. Plus the 1" they sent me has an internal seam. WTF? I've contacted customer support and we'll see what they say.
I'm pretty proud of how this turned out. I got some good welding practice in and was able to apply what I've learned about metal warping as you weld to "do it right" (it's all very square).
Re: I weld
I decided to check out the latest in DIY video production and my friend at Adobe got me a
sub to Premiere Pro.
A test project: https://youtu.be/su1ucO2JfK8
Should I do more where I weld and shit?
sub to Premiere Pro.
A test project: https://youtu.be/su1ucO2JfK8
Should I do more where I weld and shit?
-
- Posts: 1340
- Joined: Sep 08, 2007 11:17 AM
- Location: John Graham ATL
Re: I weld
Moar weld and shit. Not literally.cek wrote: Apr 18, 2021 7:58 PM I decided to check out the latest in DIY video production and my friend at Adobe got me a
sub to Premiere Pro.
A test project: https://youtu.be/su1ucO2JfK8
Should I do more where I weld and shit?
Re: I weld
The worst part about surgery is not the pain, nor the drugs. It's the fact the drugs make you constipated. Which initially resulted in my first post-op shit coming 4 days later. The shit was seriously welded together. It was like diamond.muleskinner wrote: Apr 18, 2021 9:14 PMMoar weld and shit. Not literally.cek wrote: Apr 18, 2021 7:58 PM I decided to check out the latest in DIY video production and my friend at Adobe got me a
sub to Premiere Pro.
A test project: https://youtu.be/su1ucO2JfK8
Should I do more where I weld and shit?
And then I got hemmeroids. Fuck!
Re: I weld
Charlie you're mad, absolutely mad. In a good way. I mean you have a job, cars to tinker with, not one but two houses to keep up on and you still find time to do this stuff? Is sleep just for other people? Where do you find the time?
Seriously though, tip of the hat to you. Lookin' good. And yes on drugs, post op. I've been constipated once, after a hernia repair. Once in my life and I'm collecting SS these days.
Re: I weld
That looks like fun!
Learning to weld (and not simply glueing pieces of metal : ) is an amazing journey.
I had to learn the hard way (out of necessity) last year and enjoy every minute I grab the torch, and the more you learn the more you notice you need to keep on learning.
Learning to weld (and not simply glueing pieces of metal : ) is an amazing journey.
I had to learn the hard way (out of necessity) last year and enjoy every minute I grab the torch, and the more you learn the more you notice you need to keep on learning.
Re: I weld
Actually I don't have a job right now. Well not a real job. I left my last job in Nov. My job right now is seeking gainful employment in the space industry.
Thanks man. I haz fun.Mike W. wrote: Apr 18, 2021 11:56 PM Seriously though, tip of the hat to you. Lookin' good. And yes on drugs, post op. I've been constipated once, after a hernia repair. Once in my life and I'm collecting SS these days.
Re: I weld
Not sure if you have seen these tables that came out recently, 2x3 cast iron tabletop with 336 hole, precision machined and a side apron for.....$600. I am suspicious that the table weight is only 150lbs. I currently use a table similar to yours that i plan to retire to rough work once i grab one of these.
https://www.langmuirsystems.com/arcflat
Re: I weld
Wow, that's very cool. I could save myself a lot of timemitch5 wrote: Apr 19, 2021 2:51 PM Not sure if you have seen these tables that came out recently, 2x3 cast iron tabletop with 336 hole, precision machined and a side apron for.....$600. I am suspicious that the table weight is only 150lbs. I currently use a table similar to yours that i plan to retire to rough work once i grab one of these.
https://www.langmuirsystems.com/arcflat
Re: I weld
That's the similar thought i had, I hope you managed to scroll over to their other offering, a 2x2 cnc plasma table for $1500( plasma cutter not included).cek wrote: Apr 19, 2021 7:22 PMWow, that's very cool. I could save myself a lot of timemitch5 wrote: Apr 19, 2021 2:51 PM Not sure if you have seen these tables that came out recently, 2x3 cast iron tabletop with 336 hole, precision machined and a side apron for.....$600. I am suspicious that the table weight is only 150lbs. I currently use a table similar to yours that i plan to retire to rough work once i grab one of these.
https://www.langmuirsystems.com/arcflat
Re: I weld
As you can see from the video above, I had foot surgery. Figured you gearheads would appreciate the hardware.
Before:
After:
Someday I'll need to do the left foot as well.
I'm 3 weeks into my 6 weeks of no weight on the right foot. It sucks not being able to drive, but the iWalk "peg leg" gizmo is fantastic for getting around. Other than getting down low, I can pretty much wrench all I want.
After a crazy delay (COVID-related supply chain issues, I'm guessing), my Fein Slugger JMU 137-2QW Mag Drill has arrived.
Those holes were not made by this drill; I've only made some practice cuts so far. I bought this model because a) made in Germany, b) reversible, c) adjustable speeds. I also bought an annular cutter set. I'll be posting a bunch of stuff as I use this to turn my welding table top into a Strong Hand clone...
Meanwhile a bunch of wrenching has happened. I helped my future-son-in-law and daughter with their Sprinter van build. Specifically I fabricated a bracket to mount their interior deisel heater under the passenger seat.
I don't have a press or break, so I had to resort to some old-school pounding to get the bend right. Building a custom 20-ton shop press is high on my list.
A few weeks ago, I built a retractable hose reel stand for the upper garage:
The other day, I made one for the lower driveway/garage. Plasma cutting is SO MUCH FUN. I'm getting better.
This time I bought the retractable reel on Amazon because I wanted a really long hose. I'm pretty impressed with this unit.
TACKLIFE Retractable Garden Hose Reel,1/2" x 100+6.7FT Wall Mounted Retractable Garden Hose Reel, 8 Pattern Hose Nozzle, Any Length Lock/Auto Rewind/Wall Mounted/180°Swivel Bracket
Re: I weld
Ouch. No wonder a buddy of mine was bitching about his bunion surgery years ago. I thought it was kind of like a bad callous.cek wrote: May 01, 2021 1:20 PM As you can see from the video above, I had foot surgery. Figured you gearheads would appreciate the hardware.
Before:
On the other hand, my knowledge of orthopedics is so weak when my wife broke her legs years ago they showed me the X-ray and it was so displaced I didn't realize what was supposed to connect to what. But that wasn't all my fault, it was over 60 degrees from where it was supposed to be.
Re: I weld
I need a bigger garage.
Re: I weld
So do I.