

just when i thought i had jumped most of the hurdles in this project, i blew the turbo seal. I believe this is due to the drain not functioning properly, i have a e34 b35 pan which leaves less room to drill a proper hole and due to the angle of the engine means the drain is most likely submerged during operation. I have not finalized my solution but i think i will be pulling the pan to weld up the hole and will drain the turbo into the lower timing cover. Both of these areas are leaking oil so i might ass swell fix it.
On a good note i installed a 20 amp pushstart button with a ten amp inline fuse, this was significantly easier and cheaper the replacing the ignition switch.
External links now open in a new browser tab - turn this off in your UCP - Read more here.
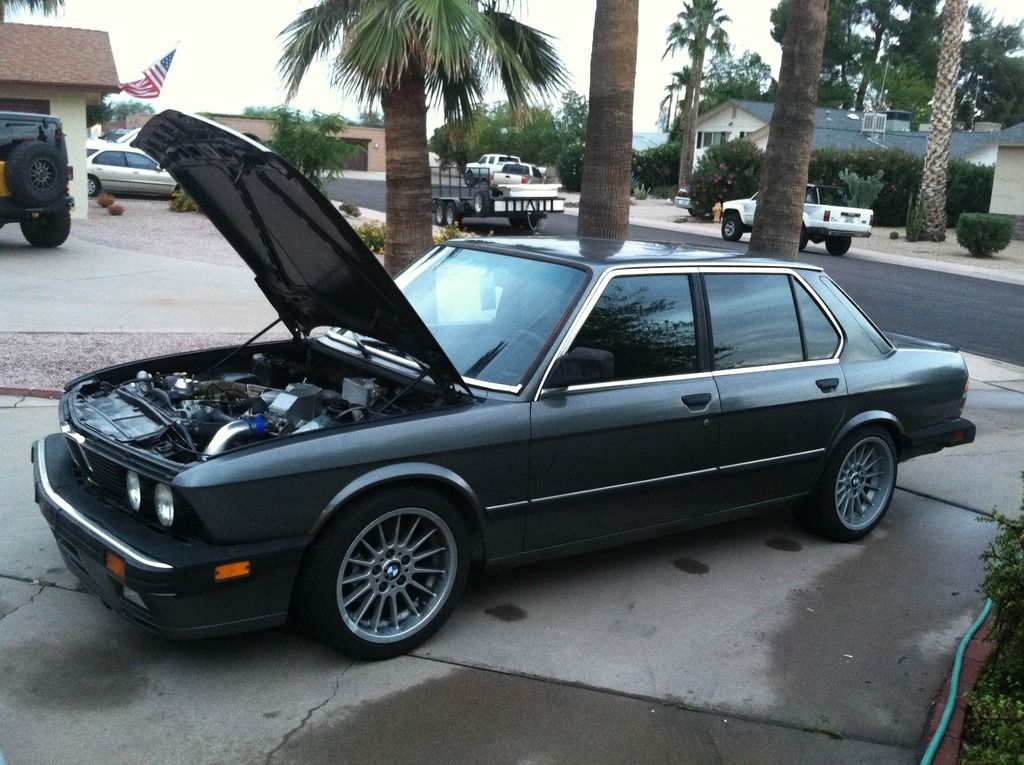
533i turbo
Re: 533i turbo *running
The has currently been running great, i have it tuned for boost but have just been messing with cold start. I had to take the oil pan off to tig up the old drain hole. The new drain is huge, 12 an dumping into 1 inch alm. tube that then is welded to the front timing cover. The next issue is the valve cover is leaking, upon reintsalling the front covers i realized the upper timing cover in about .01 inches higher than the head, i have had the cover off before and didnt notice it. I will probably reinstall it and if not machine it down at school.
While the car lights tires in first, the biggest disappoint is the turbo size, i can confirm that the hx35 is too small for the m30b35. I will eventually post a datalog, but i start building boost at 2900 rpm in second gear, then the car falls flat at 4400 rpm when the boost hits 7 psi. I will eventually turn the boost up to 11 psi to make the car have more power but right now school is priority.
Take away is if you are on a budget build the hx35 will choke the engine.
Re: 533i turbo
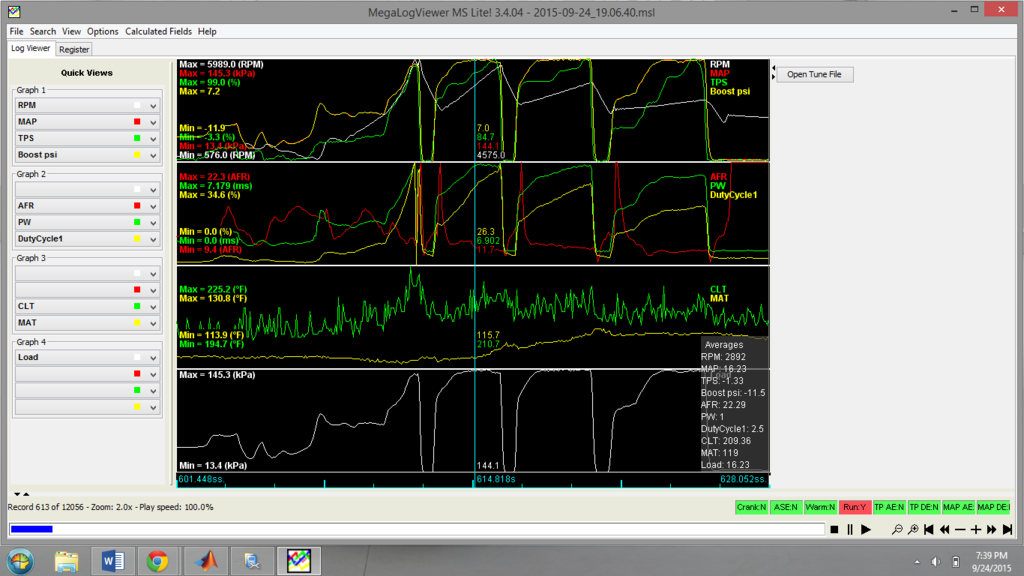
Here are some screen shots of two pulls, i still need to have someone drive it so i can tune but this is what auto has come up with. Im going to keep tuning at 7 psi then bump it to 11. Im open to any criticism so let me hear some opinions.


Re: 533i turbo
i feel you pain with the school being the main priority! Had my car and turbo ( e23 turbo kit) for a little over a month now but i have zero time to do anything with it. Hoping to catch some time during fall break as we get 2 days off. Keep us updated!
Re: 533i turbo
Update
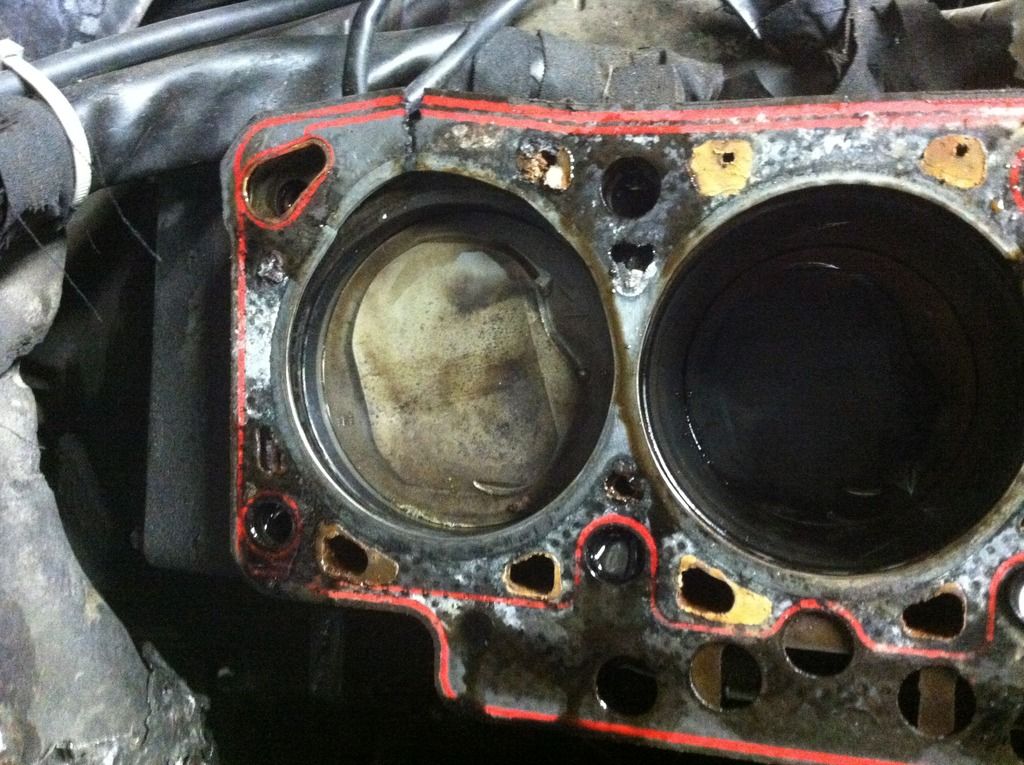
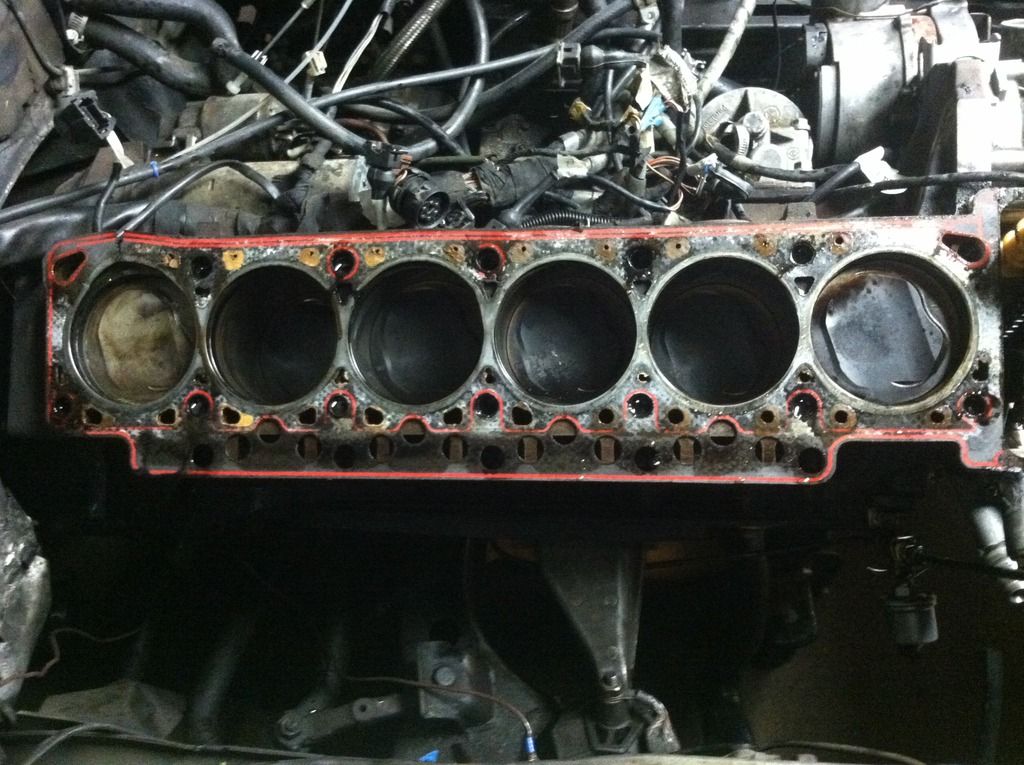
So about 2 months ago i blew the head gasket, my guess was that it ran lean and well the pictures tell what happened. I noticed it once i started blowing that sweet white smoke. I let the car sit for a few days and when i went to start it found it was hydrolocked. I drained the coolant then let the car sit till after finals.
After pulling the head and assessing the damage i came up with a plan on a budget.I'll call it stage 2
Stage II
arp studs
stock head gasket(elringer)
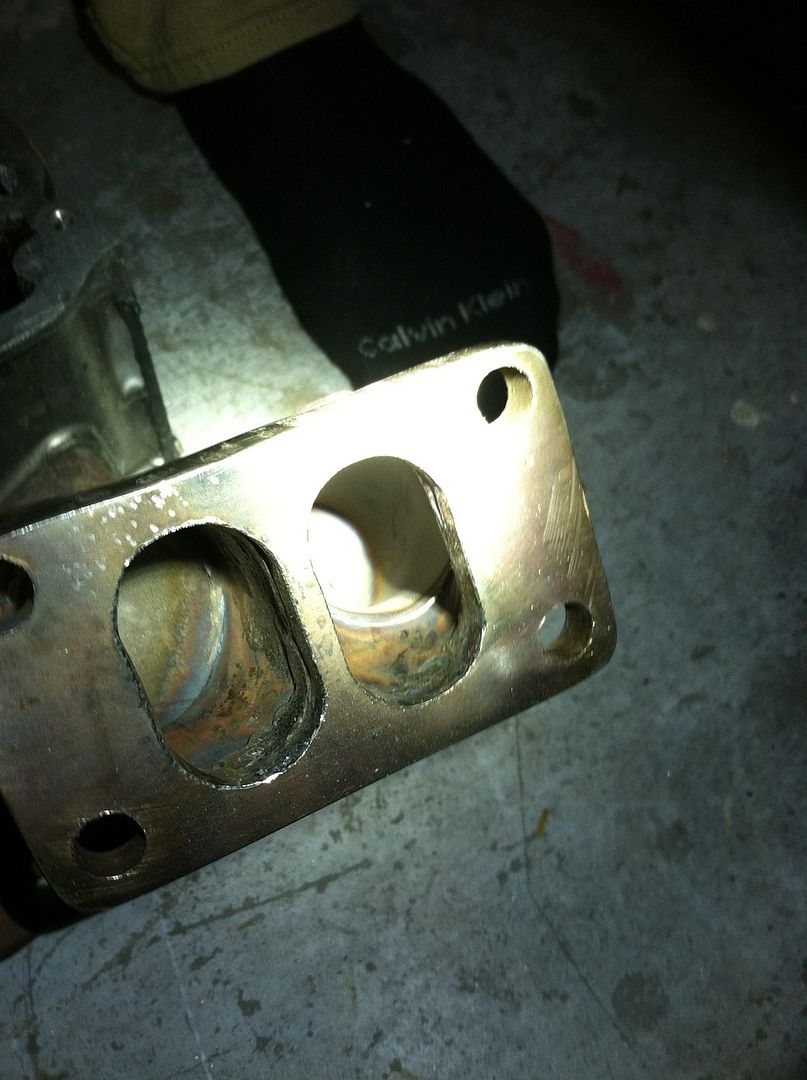
sch40 ss304l split pulse t3 manifold adaptor
increase plenum volume and flip tb
install electronic boost control for ms2
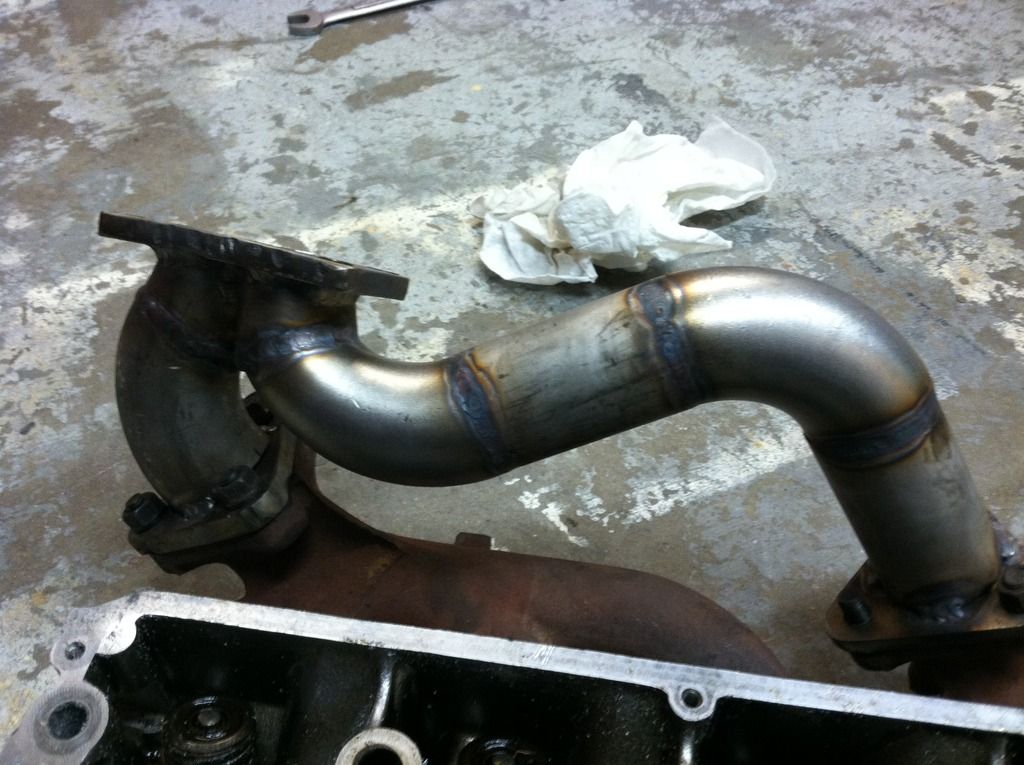
reroute down pipe with 3 inch 304l
install pusher fan off an amg g wagon
paint engine and engine bay to go for a cleaner look
fix the exhaust leak issues with the hx35 v-band
run 12psi
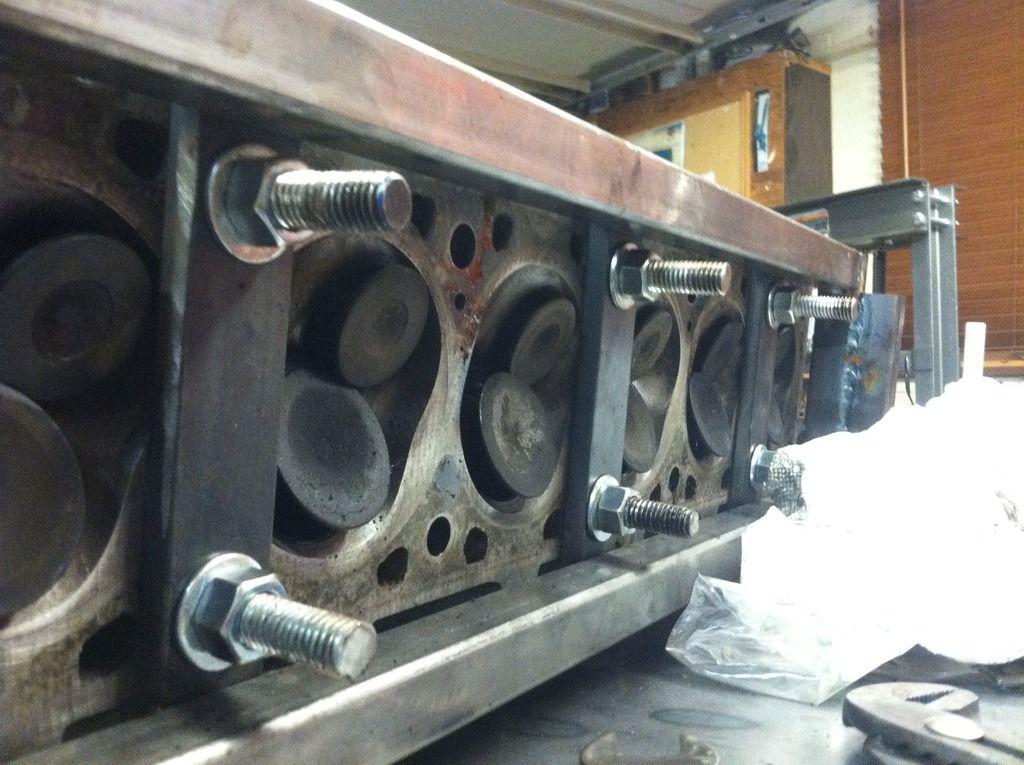
first thing to do was check the head and valvetrain. I'm so far deep into this e28 i doubt i will ever sell it and im sure this wont be the last m30 motor i have to deal with, so i decided to make a cam removal tool. This was made with some .120 wall tubing and some various scrap i had laying around. It made removing the cam a breeze.
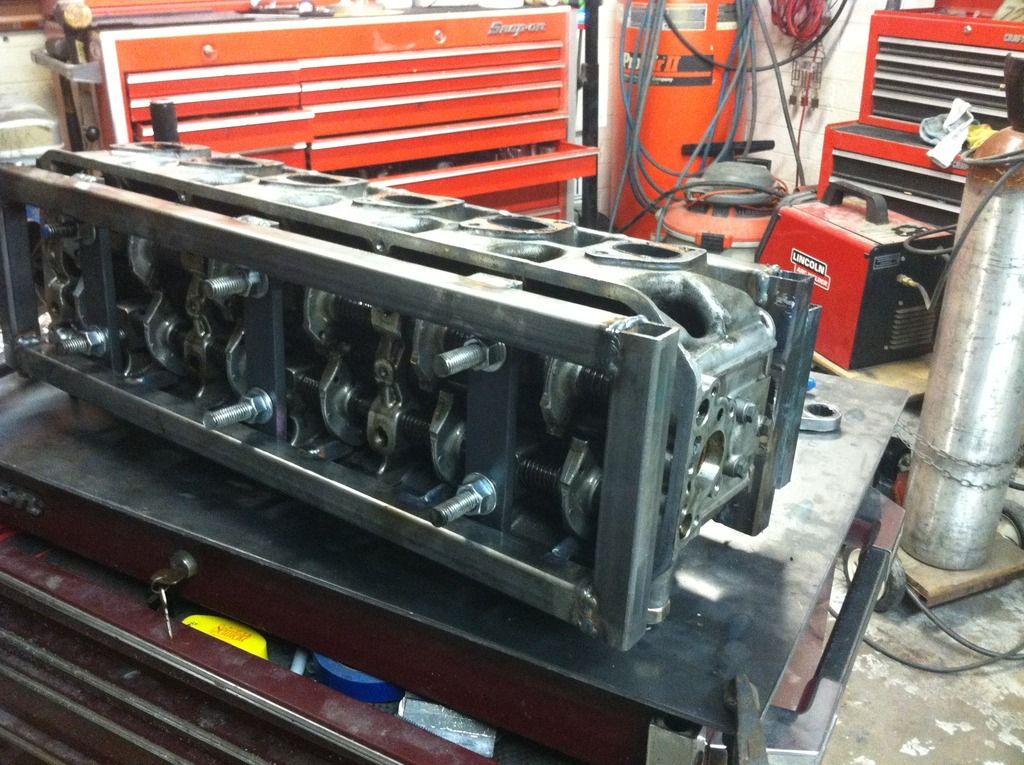
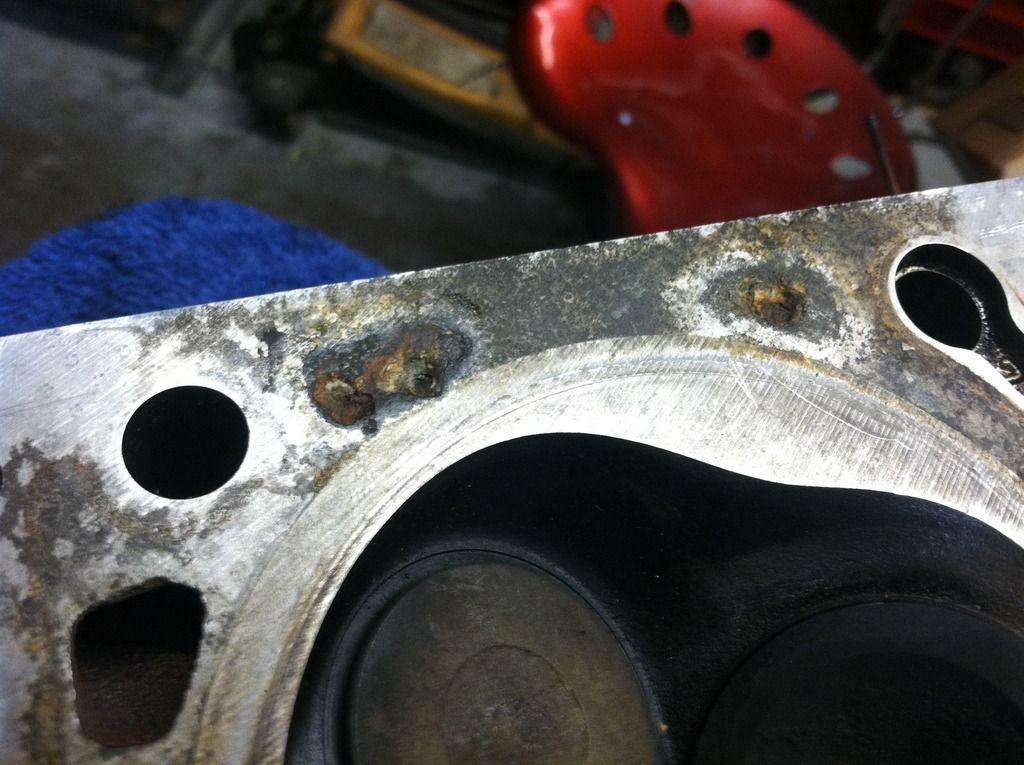
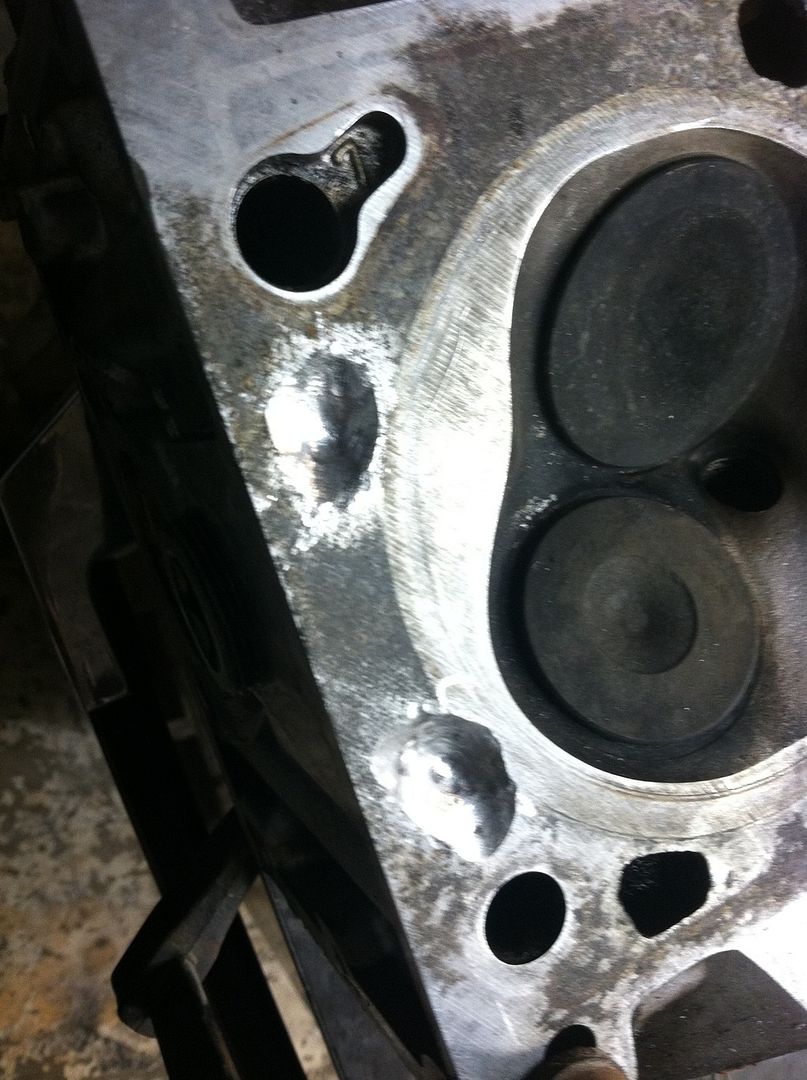
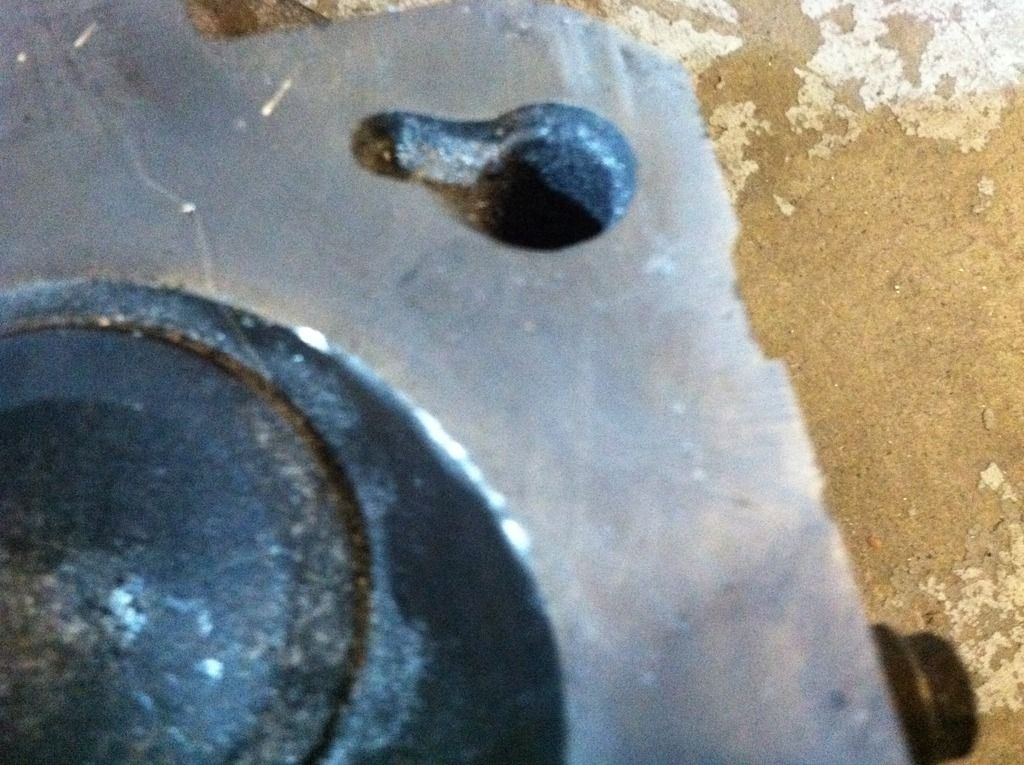
There was a fair amount of corrosion on the b35 head so i decided to take a crack at digging out the corrosion and welding it.My setup is a thermal arc 185, i was going at it with a gas lens and a 3/32 2% thorated tungsten electrode with some 4043 filler. One side i was able to fill pretty nicely, file it down and keep the pinholes to a minimum. The other side just kept giving me issues, the cast aluminum head just did not want to weld without getting very porus. I tried to adjust the ac balance but that didnt do a whole lot. After trying for hours to weld the other side i started to get porosity where the rings are and gave up. The head was already below the bently recommended minimum thickness and after all the heat had to be warped. I decided to search for another head with no corrosion.
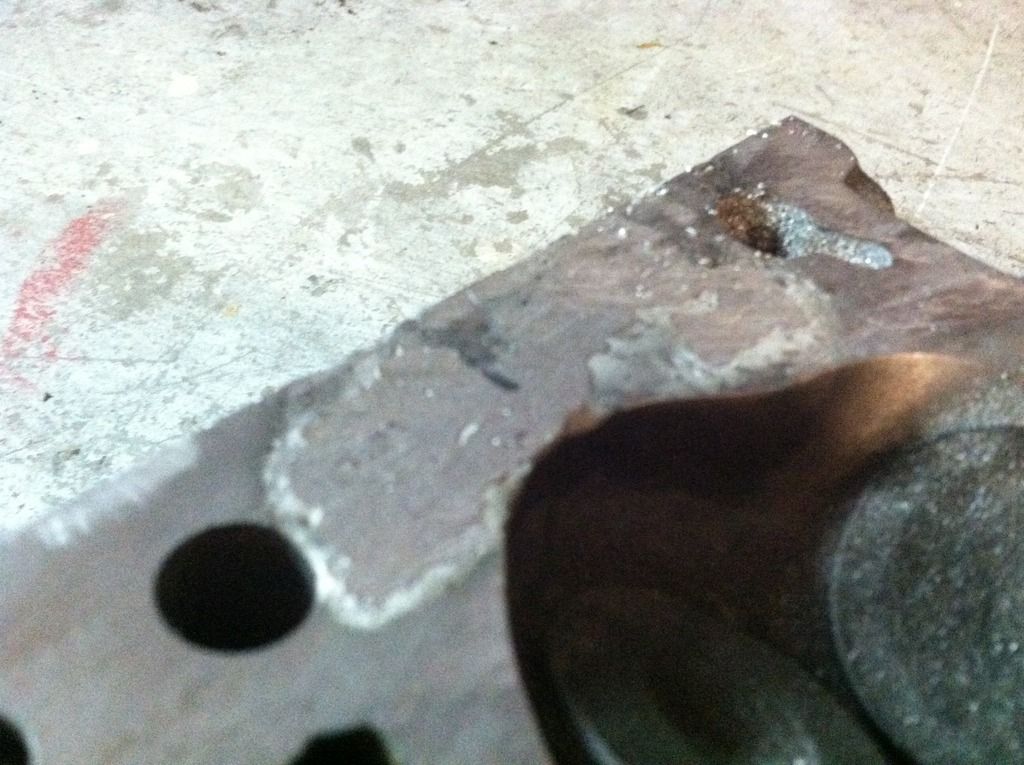
I found a low mileage head from a forum member that should arrive next week, it's a shame because the b35 cam in the other head had very little wear.
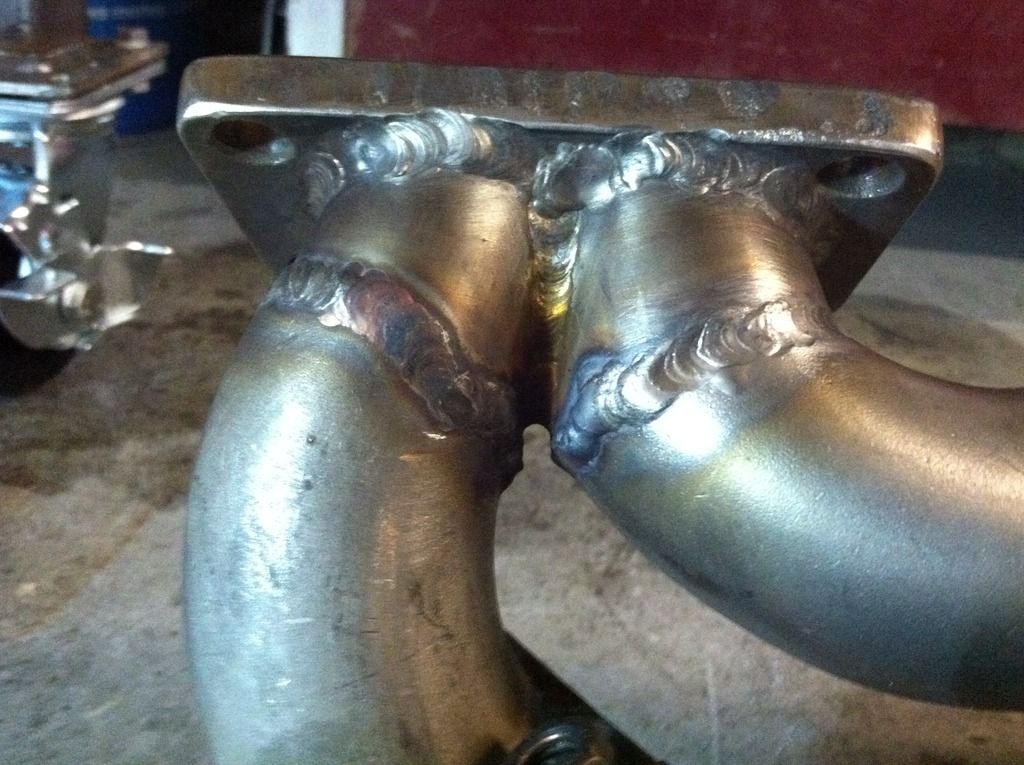
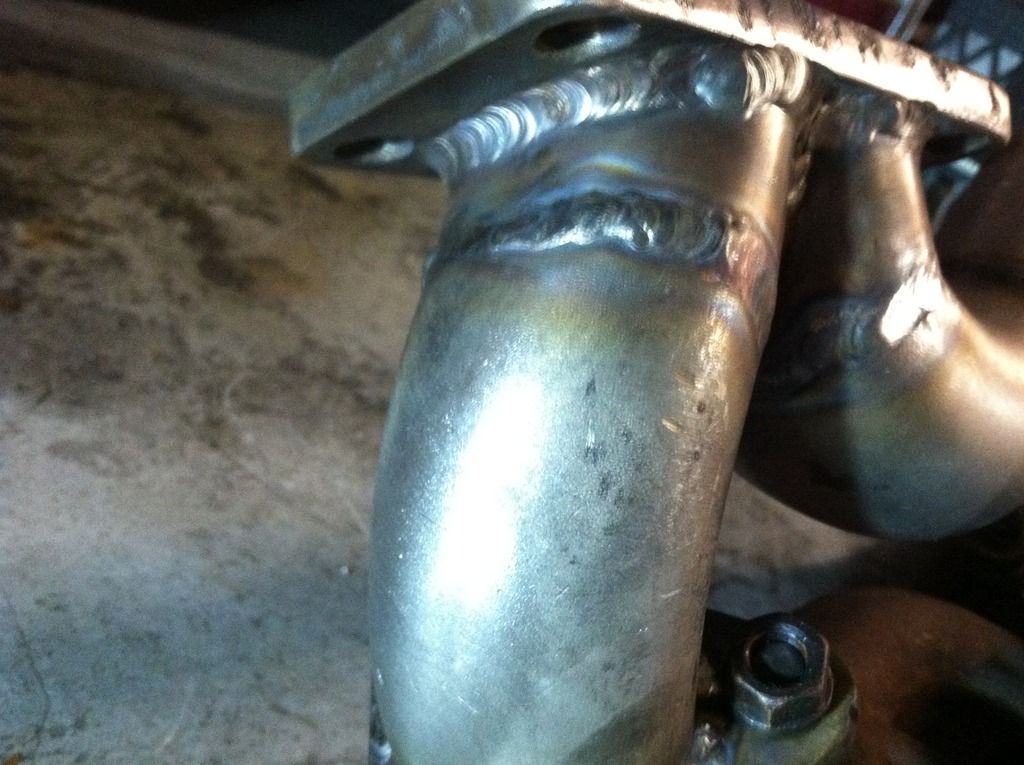
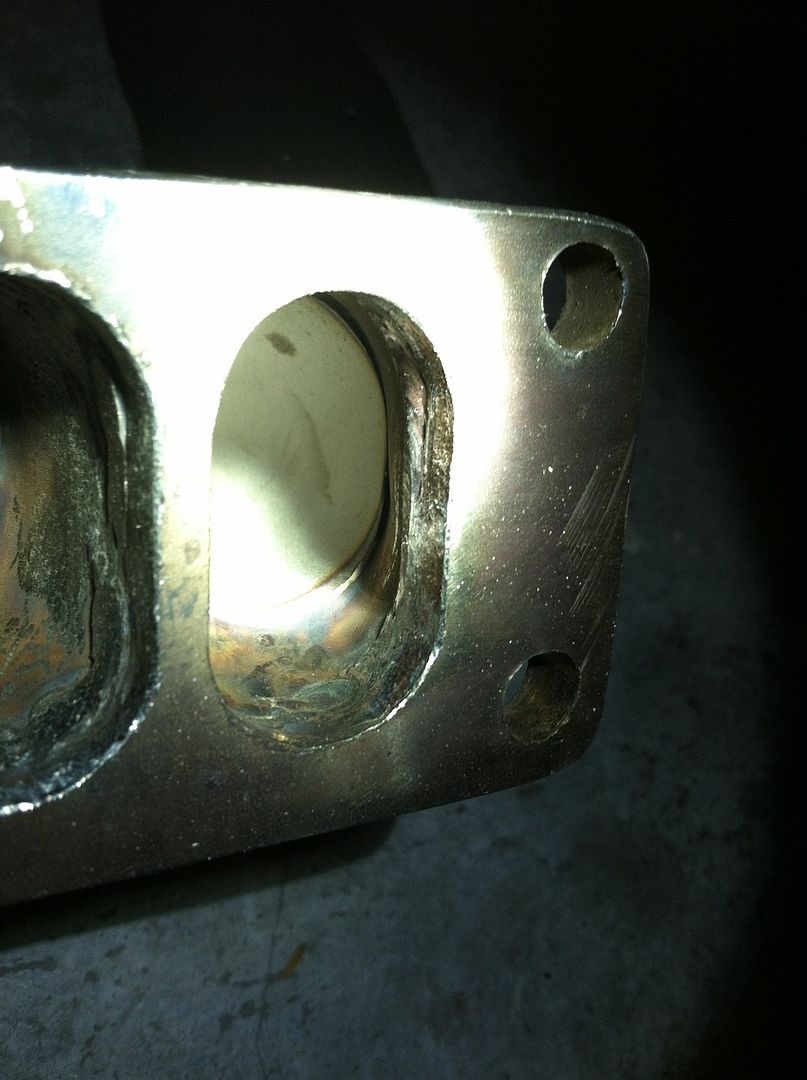
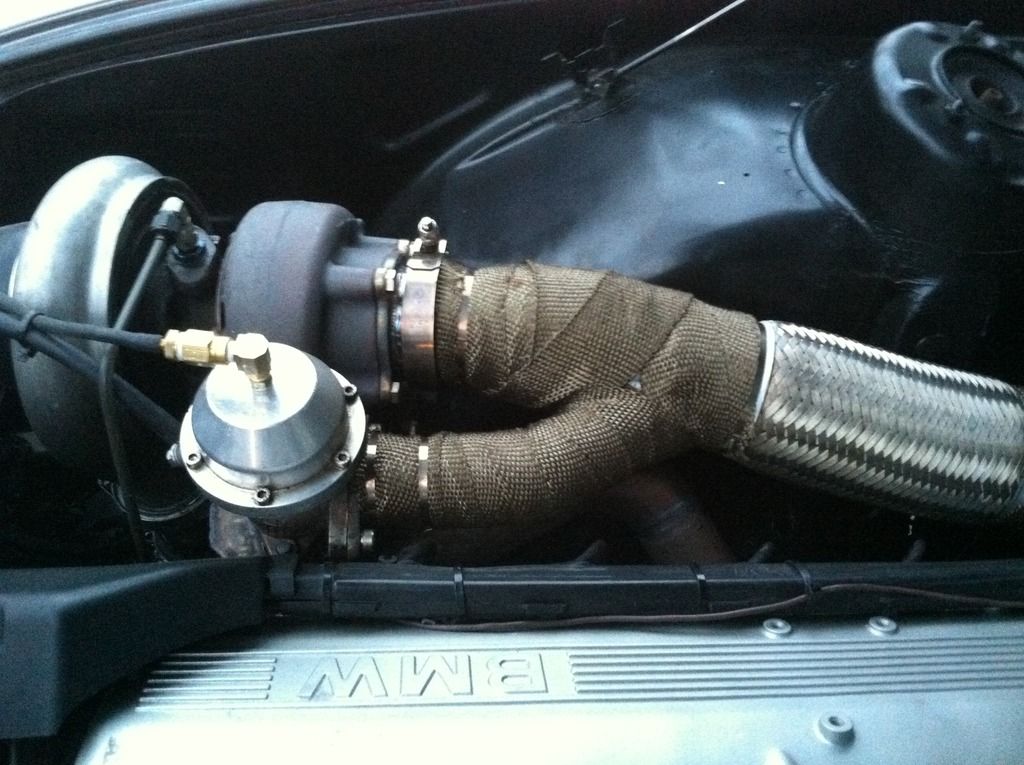
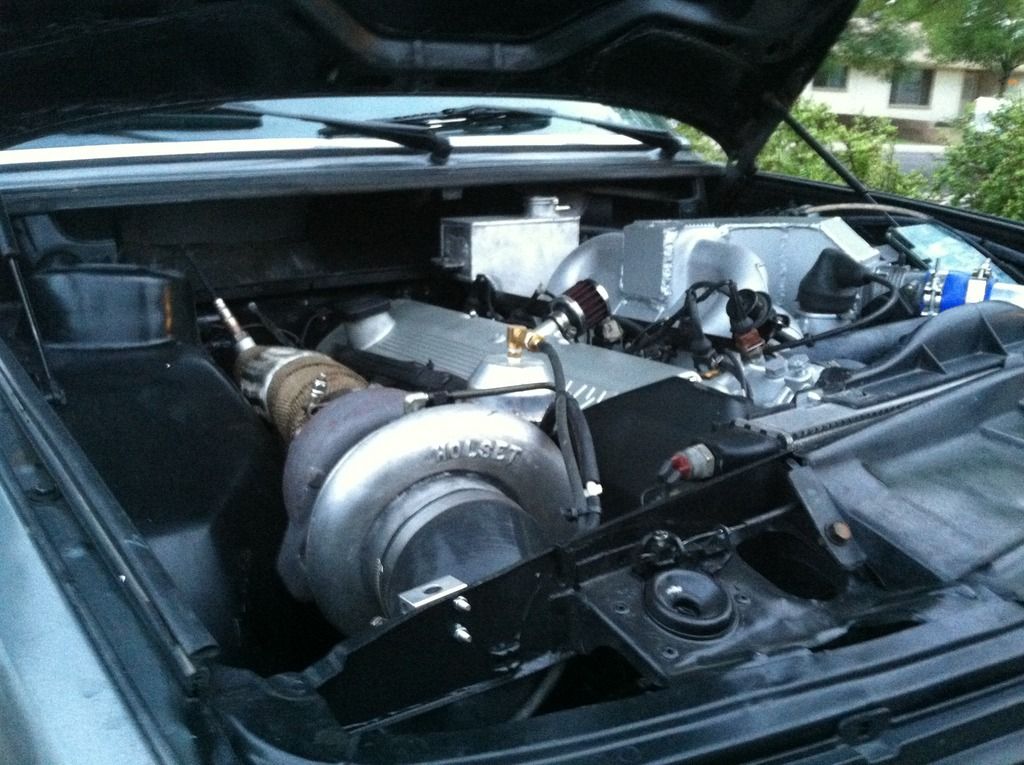
The problem with my last setup is that the stock hx35 flange is a vband, but is a non standard size. Its very close to 2.5 inches but not colse enough to seal properly with a standard 2.5 vband. I decided the easiest route was to draw up the hx35 backing plate in solidworks and get it cnc plasma cut. While i was at it i got the triangluler b34 flanges out of .400 plate and a hx35 almost t3 flange cut out of the same 304l plate. I got the hx35 backing plate and some tial 38mm wastegate flanges cut out of 1/4 inch to save money. Heres my welding job..

The next step was to start working on the manifold, my last one was mig welded, wasn't pretty and im sure didn't flow well. This one is going to a top mount adapter style made from sch40 ss pipe. I started by making the merge collector, i used some heat and a 20 ton press to make the transition from oval to circular. This was harder than i first imagined because the t3 flange doesn't allow much room when using thick 1.5 pipe. My welds got better as time went on after i realized how little amperage you really need for stainless. I still need to finish the wastegate routing and then grind the ports.

This is my progress so far, im a fulltime mech. engineering student on a budget so who knows when i'll be able to drive it again. My next task is to relocate or build an expansion tank, to make room for a flipped tb.
So about 2 months ago i blew the head gasket, my guess was that it ran lean and well the pictures tell what happened. I noticed it once i started blowing that sweet white smoke. I let the car sit for a few days and when i went to start it found it was hydrolocked. I drained the coolant then let the car sit till after finals.


After pulling the head and assessing the damage i came up with a plan on a budget.I'll call it stage 2
Stage II
arp studs
stock head gasket(elringer)
sch40 ss304l split pulse t3 manifold adaptor
increase plenum volume and flip tb
install electronic boost control for ms2
reroute down pipe with 3 inch 304l
install pusher fan off an amg g wagon
paint engine and engine bay to go for a cleaner look
fix the exhaust leak issues with the hx35 v-band
run 12psi
first thing to do was check the head and valvetrain. I'm so far deep into this e28 i doubt i will ever sell it and im sure this wont be the last m30 motor i have to deal with, so i decided to make a cam removal tool. This was made with some .120 wall tubing and some various scrap i had laying around. It made removing the cam a breeze.


There was a fair amount of corrosion on the b35 head so i decided to take a crack at digging out the corrosion and welding it.My setup is a thermal arc 185, i was going at it with a gas lens and a 3/32 2% thorated tungsten electrode with some 4043 filler. One side i was able to fill pretty nicely, file it down and keep the pinholes to a minimum. The other side just kept giving me issues, the cast aluminum head just did not want to weld without getting very porus. I tried to adjust the ac balance but that didnt do a whole lot. After trying for hours to weld the other side i started to get porosity where the rings are and gave up. The head was already below the bently recommended minimum thickness and after all the heat had to be warped. I decided to search for another head with no corrosion.


I found a low mileage head from a forum member that should arrive next week, it's a shame because the b35 cam in the other head had very little wear.
The problem with my last setup is that the stock hx35 flange is a vband, but is a non standard size. Its very close to 2.5 inches but not colse enough to seal properly with a standard 2.5 vband. I decided the easiest route was to draw up the hx35 backing plate in solidworks and get it cnc plasma cut. While i was at it i got the triangluler b34 flanges out of .400 plate and a hx35 almost t3 flange cut out of the same 304l plate. I got the hx35 backing plate and some tial 38mm wastegate flanges cut out of 1/4 inch to save money. Heres my welding job..

The next step was to start working on the manifold, my last one was mig welded, wasn't pretty and im sure didn't flow well. This one is going to a top mount adapter style made from sch40 ss pipe. I started by making the merge collector, i used some heat and a 20 ton press to make the transition from oval to circular. This was harder than i first imagined because the t3 flange doesn't allow much room when using thick 1.5 pipe. My welds got better as time went on after i realized how little amperage you really need for stainless. I still need to finish the wastegate routing and then grind the ports.


This is my progress so far, im a fulltime mech. engineering student on a budget so who knows when i'll be able to drive it again. My next task is to relocate or build an expansion tank, to make room for a flipped tb.
-
Nebraska_e28
- Beamter

- Posts: 9070
- Joined: Apr 13, 2006 11:18 PM
- Location: Council Bluffs, IA
- Contact:
Re: 533i turbo
Good stuff! Keep the updates coming!
Re: 533i turbo
Very cool. I envy your fab skills.
Re: 533i turbo
Thank you, i started my first fab project a year ago when i made a welding cart. I guess it just shows that anyone using the internet watching lots of youtube videos can fab stuff haha.cek wrote:Very cool. I envy your fab skills.
Re: 533i turbo
I've been very, very good at procrastinating on the getting started part. Glad to know that you were able to pick it up quickly. I now have several projects that require welding so...mitch5 wrote:Thank you, i started my first fab project a year ago when i made a welding cart. I guess it just shows that anyone using the internet watching lots of youtube videos can fab stuff haha.cek wrote:Very cool. I envy your fab skills.
-
jodystevens
- Posts: 314
- Joined: Oct 10, 2013 2:45 PM
- Location: Canada
Re: 533i turbo
Looks good! Can definitely see where you started to get the hang of the tig on the manifold. I need to get myself a tig setup.mitch5 wrote:Thank you, i started my first fab project a year ago when i made a welding cart. I guess it just shows that anyone using the internet watching lots of youtube videos can fab stuff haha.cek wrote:Very cool. I envy your fab skills.
Re: 533i turbo
Yup I made the collector first, all those welds are very gray. Eventually I managed to get them looking like stainless welds. If your looking for a tig I would highly suggest an inverter tig machine, they save a lot of space compared to an old syncrowave miller. Htp and thermal arc are the best options for the 1k-2k range.jodystevens wrote:Looks good! Can definitely see where you started to get the hang of the tig on the manifold. I need to get myself a tig setup.mitch5 wrote:Thank you, i started my first fab project a year ago when i made a welding cart. I guess it just shows that anyone using the internet watching lots of youtube videos can fab stuff haha.cek wrote:Very cool. I envy your fab skills.
Re: 533i turbo
Update: It was finished
Intake/Cooling
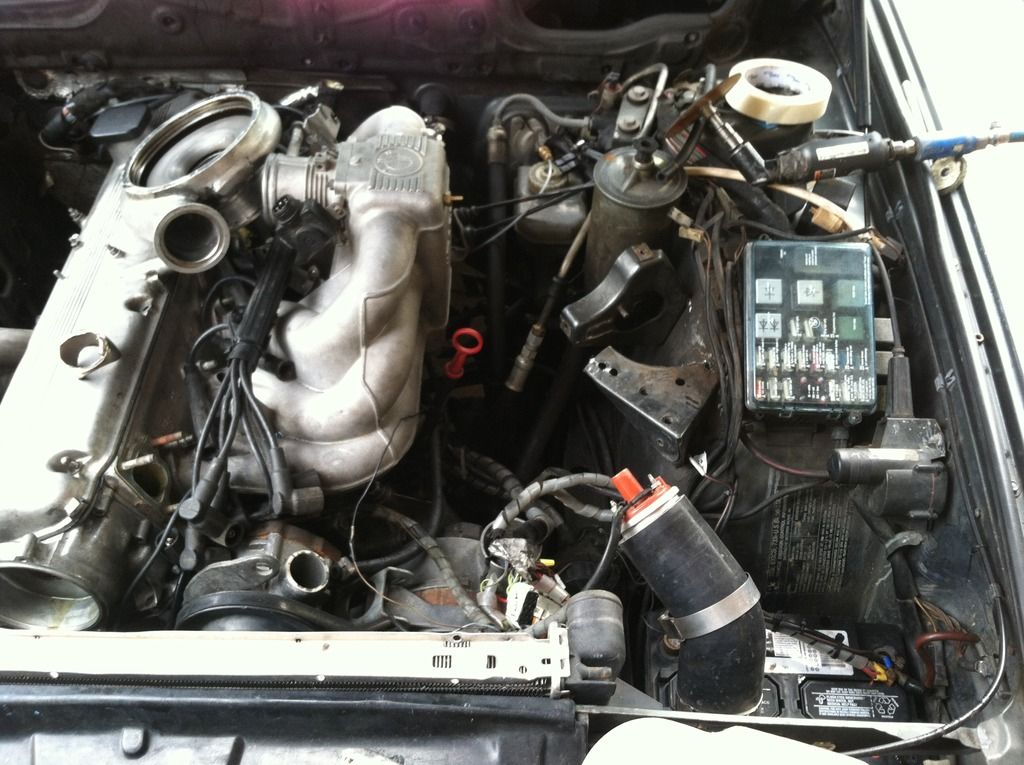
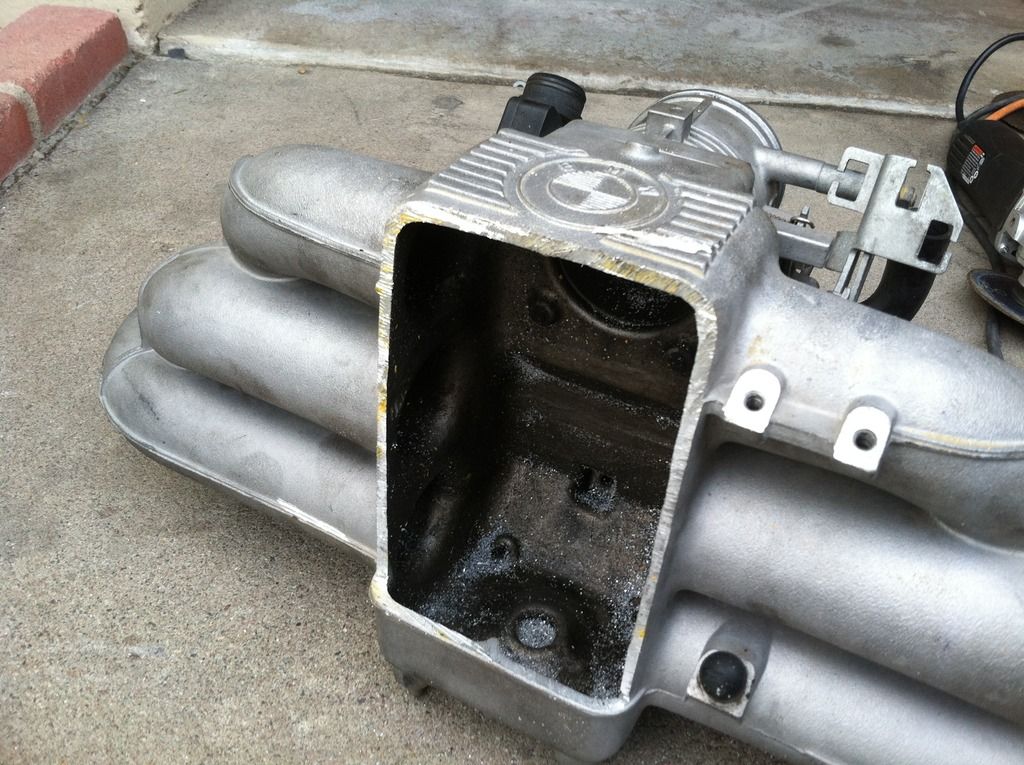
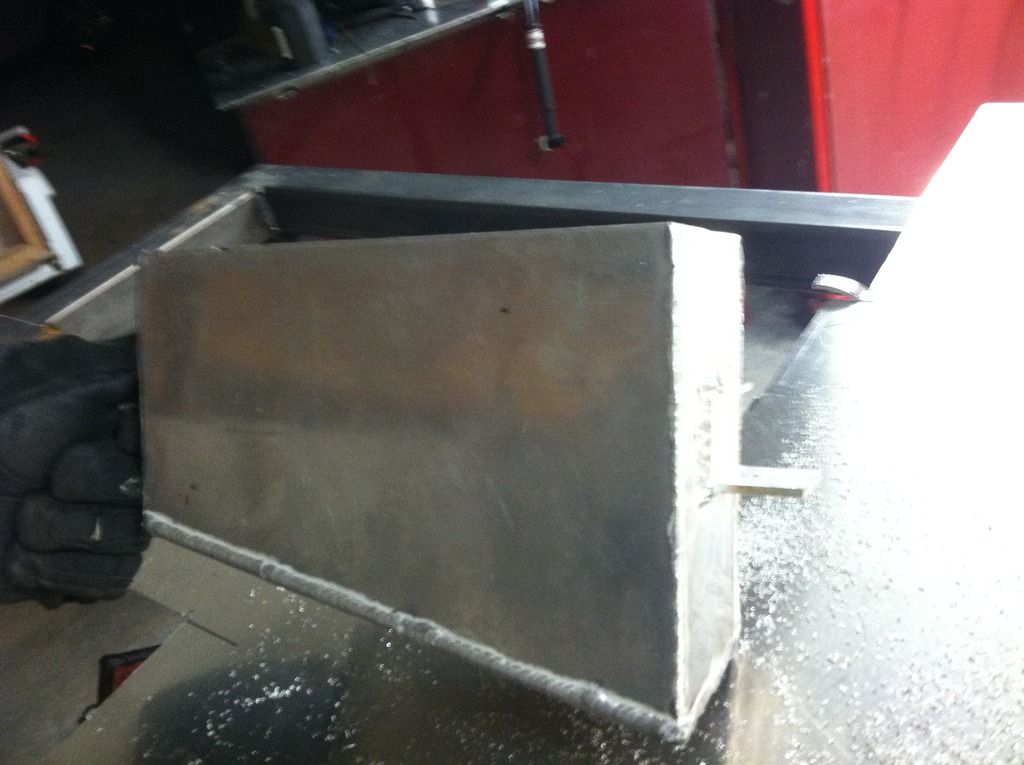
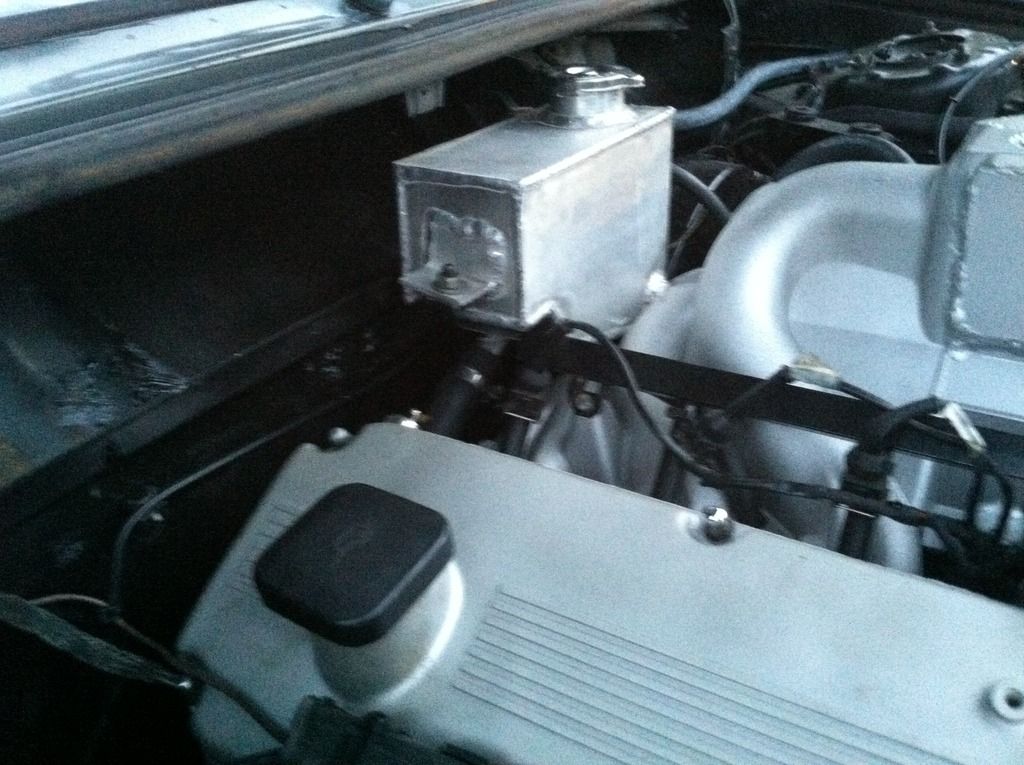
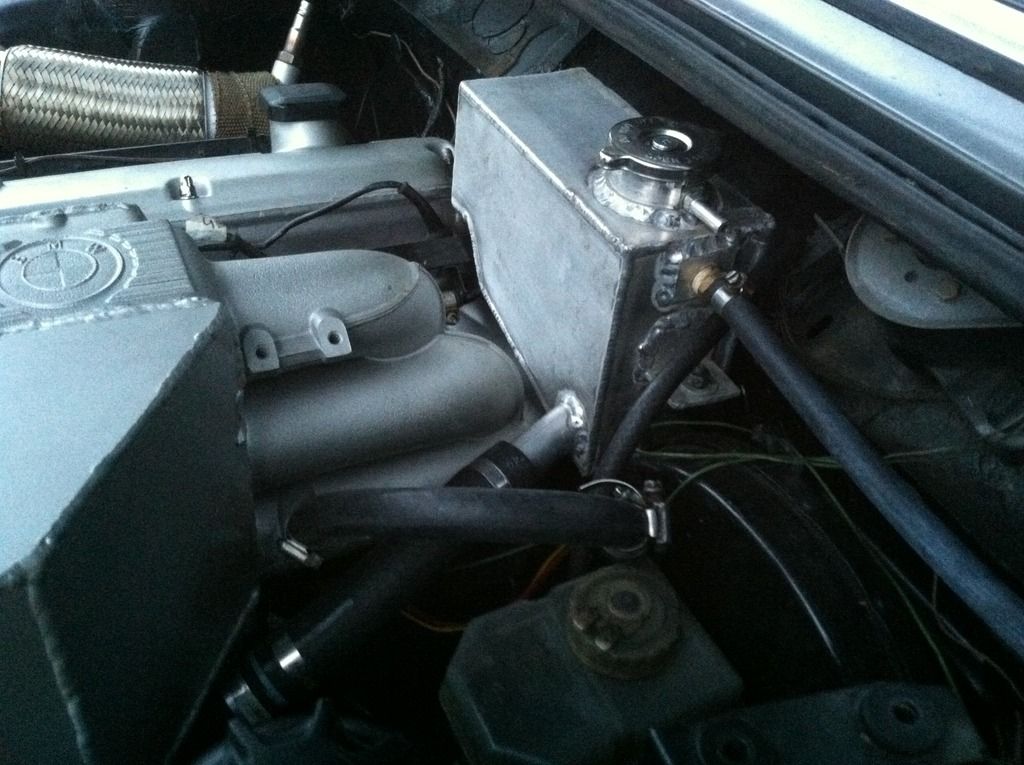
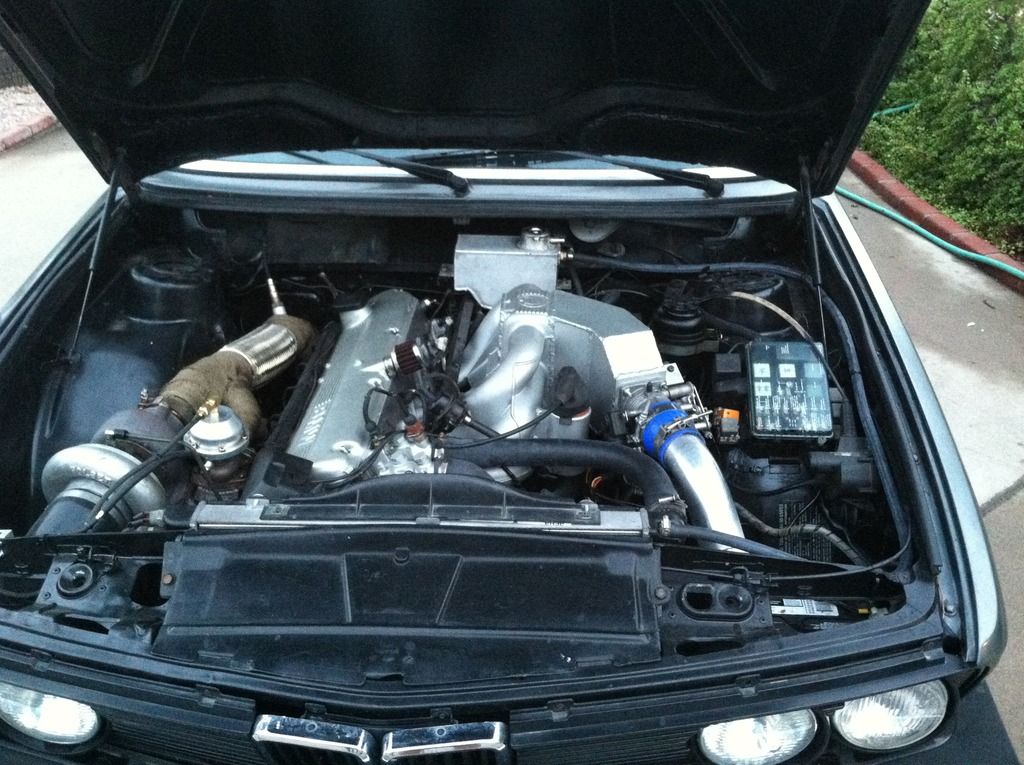
I decided i wanted to flip the TB since it really helps de-clutter the engine bay, not to mention minor head loss caused by the extra inter cooler pipe bends. I really wanted to get some more practice with tig welding so i decided to increase the plenum volume. The design is based purely off theory and i didn't even bother to calculate the increased volume. The first problem with doing this is where to relocate the coolant expansion tank. I searched and couldn't find much in terms of e28 applications. I decided the firewall was a good location since it would keep it at the highest point and the e34 was configured as such. I increased the capacity of the new one by about 20%. Instead of a proper coolant level gauge i welded a brace where the tank should be full. The coolant tank has 2 barbs, one for the thermostat housing and one for the coolant neck. The heater is long gone so need to worry about that. Both the manifold and tank was made with .125 inch t6 plate, with 1/4 used for the tb. I mounted the tb upside down so the stock linkage could be used.
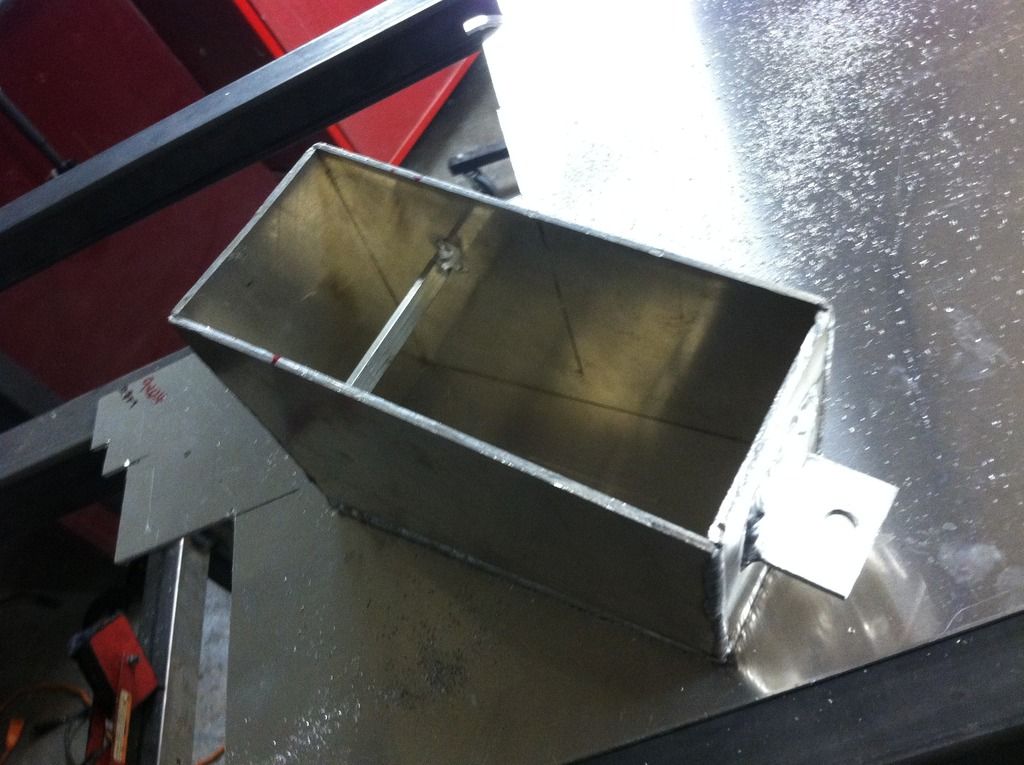
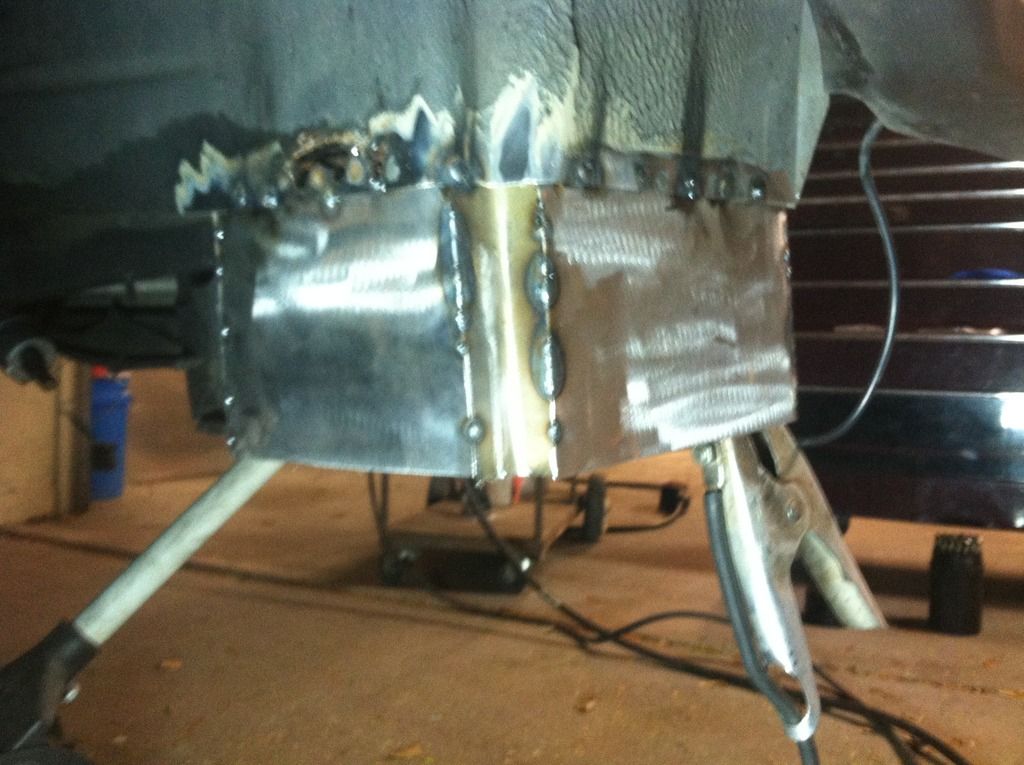
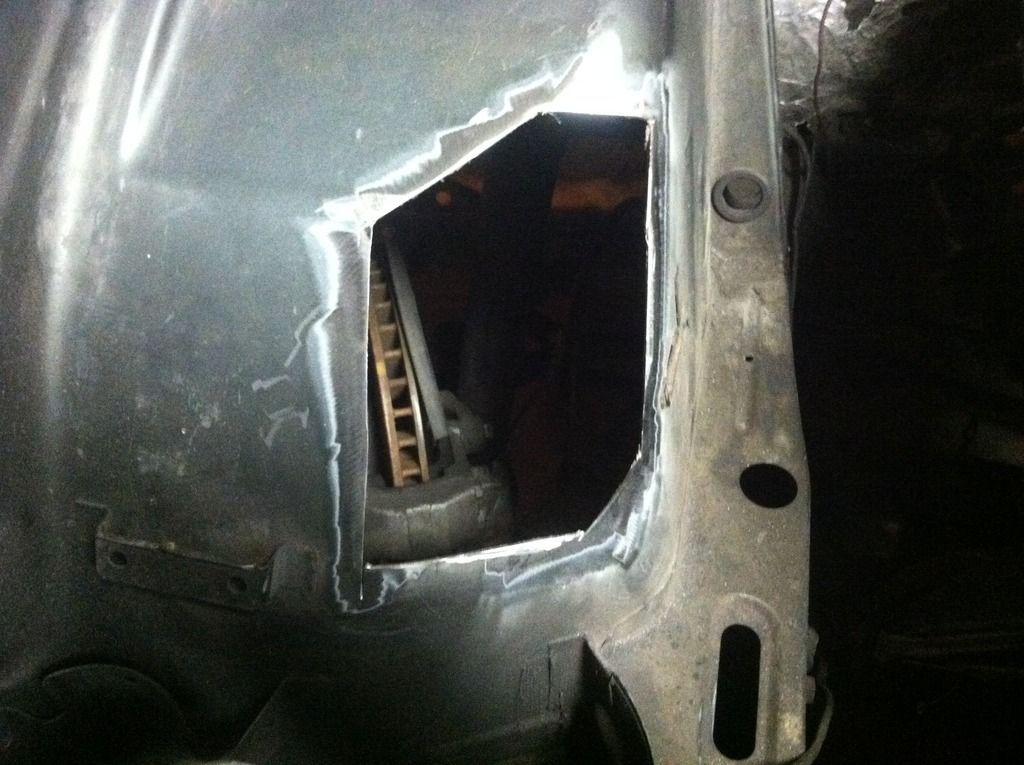
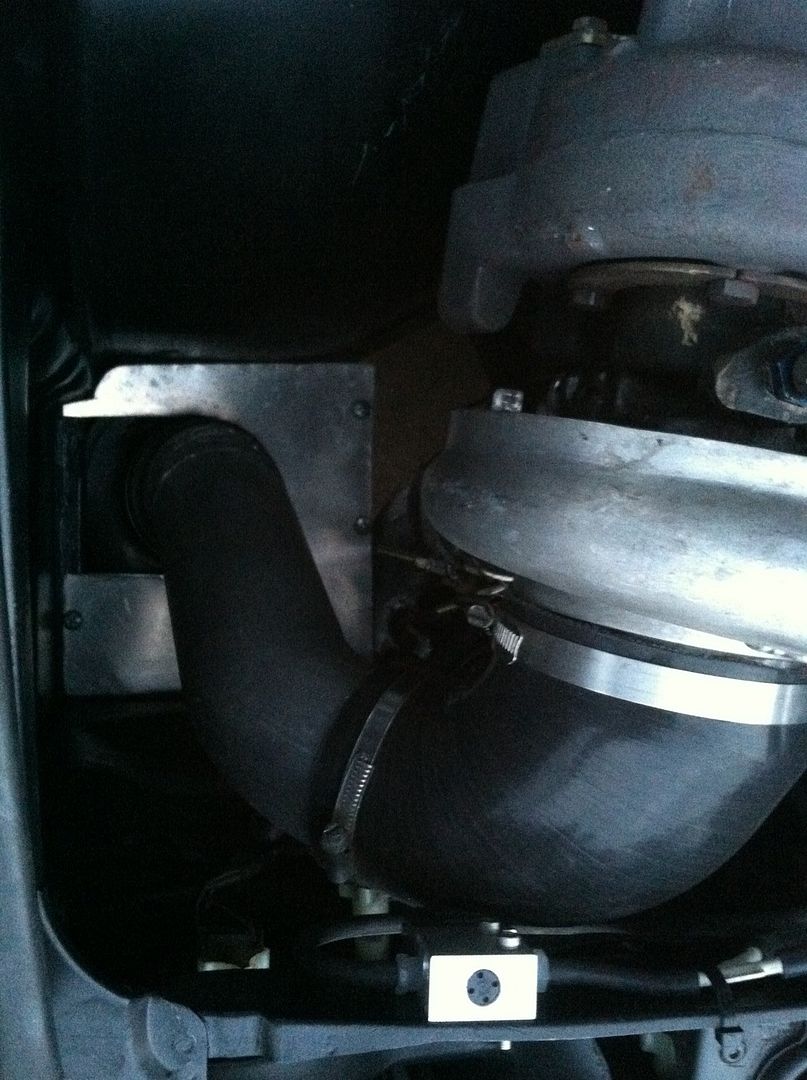
The next issue was with the air intake, I previously had cut a hole and ran a 3 inch cone filter by the front tire. This CAI worked great when it was dry(AZ) but in the rain not so much. I opted to make a proper intake box, its a sheetmetal box and is welded to the chassis. The box has a aluminum cover and is just deep enough for the kn cone filter. The air inlet is a 3 inch tube that extends out horizontally into the bumper cover area with some baffling. I didnt take any pictures of the finished product just some of the tacking, The box was seam sealed and undercoated. The other pic shows a panel repair to make more room for the turbo. I also had to repair some rust in that area.

Skid plate:
At the the same time i converted to vacuum brakes, the hydro system was always leaking and needed some high pressure hoses replaced. I used a 528e booster, 528e power steering pump to steering pbox pressure line and a 528e filter, if you pull the parts like i did then you should grab the filters brackets. The 533i already has the holes. I also decided to clean up the engine bay and wiring, everything was re wrapped.
Story:
I initially planned to spray the bay with 2 stage delphin, but halfway through decided i just cared about the function of the turbo. So my young brother was tasked with rattle canning the bay and hood. The hood was rusted so i told my brother he could repair it while i was on vacation. I instructed him to cut out some sheet metal, weld up the holes, seam seal and paint. Well my younger brother who lacks listening skills made a sheet metal repair with aluminum...he tried to mig weld the aluminum to the steel. He was determined though because he attempted to fuse both side and never stopped to wonder why it wasn't working. That's what happens when you leave a 18 year old unsupervised with a welder. Unphased by that he proceeded to seam seal it, with alex latex caulking. Luckily its the 30+ year variety. By the time i got home, the hood was back on and the job was done, i nicely let him go back to fixing up his elcamino.
Currently:
The car has only been street tuned and i doubt ill ever pony up the money for a dyno. I have been running the car 12psi with the ebc, holding full boost till the limit. Tuning has been straight forward since all my warm up/enrichment maps were set. The holset hx35 hits full boost at 3500 rpm and car is spinning tires in 2nd and 3rd. I was just enjoying the car until last week i dropped the clutch and snapped the oil drain for the turbo. The shitty jegs hose isnt flexible enough, so i will be doing a new return in push lock hose. Luckily i let off and then saw oil pressure drop, so i immediately shut it down. I should have it running again this week. If any one has any constructive comments, im all ears.

Intake/Cooling
I decided i wanted to flip the TB since it really helps de-clutter the engine bay, not to mention minor head loss caused by the extra inter cooler pipe bends. I really wanted to get some more practice with tig welding so i decided to increase the plenum volume. The design is based purely off theory and i didn't even bother to calculate the increased volume. The first problem with doing this is where to relocate the coolant expansion tank. I searched and couldn't find much in terms of e28 applications. I decided the firewall was a good location since it would keep it at the highest point and the e34 was configured as such. I increased the capacity of the new one by about 20%. Instead of a proper coolant level gauge i welded a brace where the tank should be full. The coolant tank has 2 barbs, one for the thermostat housing and one for the coolant neck. The heater is long gone so need to worry about that. Both the manifold and tank was made with .125 inch t6 plate, with 1/4 used for the tb. I mounted the tb upside down so the stock linkage could be used.


The next issue was with the air intake, I previously had cut a hole and ran a 3 inch cone filter by the front tire. This CAI worked great when it was dry(AZ) but in the rain not so much. I opted to make a proper intake box, its a sheetmetal box and is welded to the chassis. The box has a aluminum cover and is just deep enough for the kn cone filter. The air inlet is a 3 inch tube that extends out horizontally into the bumper cover area with some baffling. I didnt take any pictures of the finished product just some of the tacking, The box was seam sealed and undercoated. The other pic shows a panel repair to make more room for the turbo. I also had to repair some rust in that area.


Skid plate:


At the the same time i converted to vacuum brakes, the hydro system was always leaking and needed some high pressure hoses replaced. I used a 528e booster, 528e power steering pump to steering pbox pressure line and a 528e filter, if you pull the parts like i did then you should grab the filters brackets. The 533i already has the holes. I also decided to clean up the engine bay and wiring, everything was re wrapped.
Story:
I initially planned to spray the bay with 2 stage delphin, but halfway through decided i just cared about the function of the turbo. So my young brother was tasked with rattle canning the bay and hood. The hood was rusted so i told my brother he could repair it while i was on vacation. I instructed him to cut out some sheet metal, weld up the holes, seam seal and paint. Well my younger brother who lacks listening skills made a sheet metal repair with aluminum...he tried to mig weld the aluminum to the steel. He was determined though because he attempted to fuse both side and never stopped to wonder why it wasn't working. That's what happens when you leave a 18 year old unsupervised with a welder. Unphased by that he proceeded to seam seal it, with alex latex caulking. Luckily its the 30+ year variety. By the time i got home, the hood was back on and the job was done, i nicely let him go back to fixing up his elcamino.
Currently:
The car has only been street tuned and i doubt ill ever pony up the money for a dyno. I have been running the car 12psi with the ebc, holding full boost till the limit. Tuning has been straight forward since all my warm up/enrichment maps were set. The holset hx35 hits full boost at 3500 rpm and car is spinning tires in 2nd and 3rd. I was just enjoying the car until last week i dropped the clutch and snapped the oil drain for the turbo. The shitty jegs hose isnt flexible enough, so i will be doing a new return in push lock hose. Luckily i let off and then saw oil pressure drop, so i immediately shut it down. I should have it running again this week. If any one has any constructive comments, im all ears.
-
Kyle in NO
- Posts: 17638
- Joined: Feb 12, 2006 12:00 PM
- Location: Nasty Orleans------> Batten-Rooehjch------>More Souther LA
Re: 533i turbo
Dude. You're a talented fabricator.
-
Mark 88/M5 Houston
- Posts: 8548
- Joined: Feb 12, 2006 12:00 PM
- Location: Far North Houston
Re: 533i turbo
Very nice fab work there in the engine bay!  Good luck getting the oil drain issue sorted out.
-
EventuallyAyrton
- Posts: 975
- Joined: Oct 12, 2015 11:47 PM
- Location: Wherever the E28 happens to be parked- Morrisville, NY
Re: 533i turbo
x1807Kyle in NO wrote:Dude. You're a talented fabricator.
Re: 533i turbo
Thanks for the compliments. The fabrication is almost as much fun as driving it. So I went to fix the oil drain tonight and discovered i cracked the passenger side motor mount. I must be doing something right to make enough power to crack the mount. I really hate doing oil lines as they always seem to leak on me.
-
Nebraska_e28
- Beamter
- Posts: 9070
- Joined: Apr 13, 2006 11:18 PM
- Location: Council Bluffs, IA
- Contact:
Re: 533i turbo
Awesome work! One small thing, seeing the coil wire that close to the fuel line makes me squirm a bit.
Re: 533i turbo
I really never thought about that. Would the fear of a fire be from the return line squirting onto the coil? Or a spark arcing? I have a fire extinguisher in the car so i try to be on the safe side.Nebraska_e28 wrote:Awesome work! One small thing, seeing the coil wire that close to the fuel line makes me squirm a bit.
-
Nebraska_e28
- Beamter
- Posts: 9070
- Joined: Apr 13, 2006 11:18 PM
- Location: Council Bluffs, IA
- Contact:
Re: 533i turbo
It's probably unlikey for a spark to jump from a non-moving part like the coil itself. But with that said, last year I chased a random arching issue near my dist cap that took forever to find. In the event a spark did jump & ignite anything fuel related or under fuel pressure, I dont think you'd be able to get that handheld out fast enough. Then again I could be wrong.mitch5 wrote:I really never thought about that. Would the fear of a fire be from the return line squirting onto the coil? Or a spark arcing? I have a fire extinguisher in the car so i try to be on the safe side.Nebraska_e28 wrote:Awesome work! One small thing, seeing the coil wire that close to the fuel line makes me squirm a bit.
Re: 533i turbo
Update:
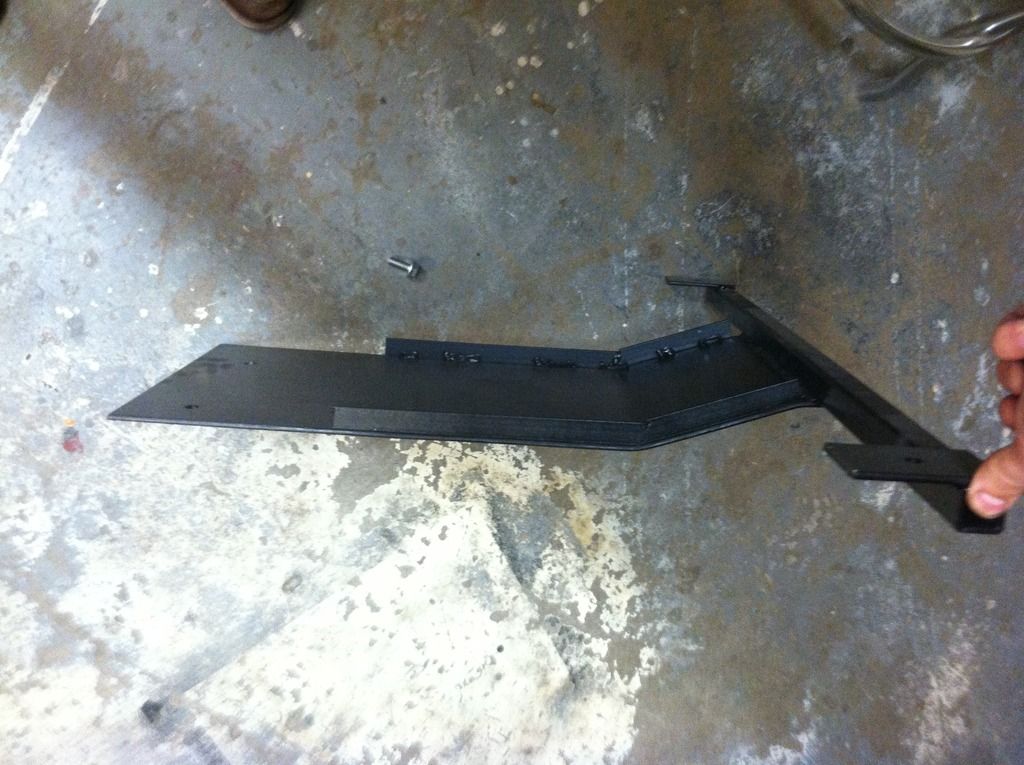
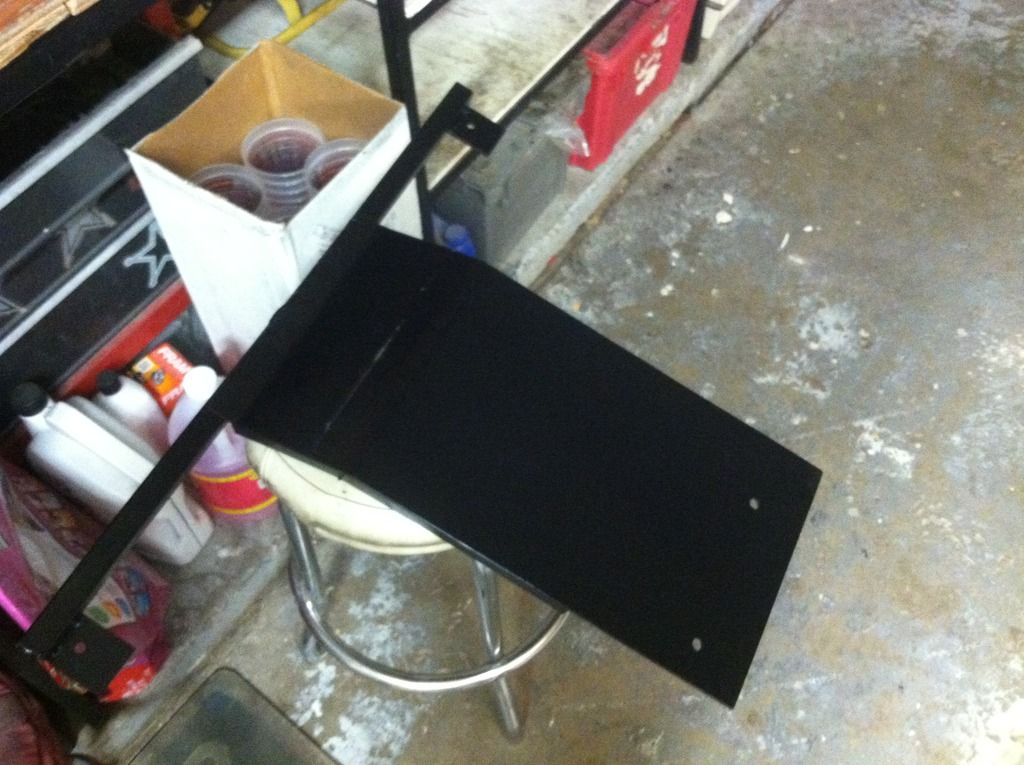
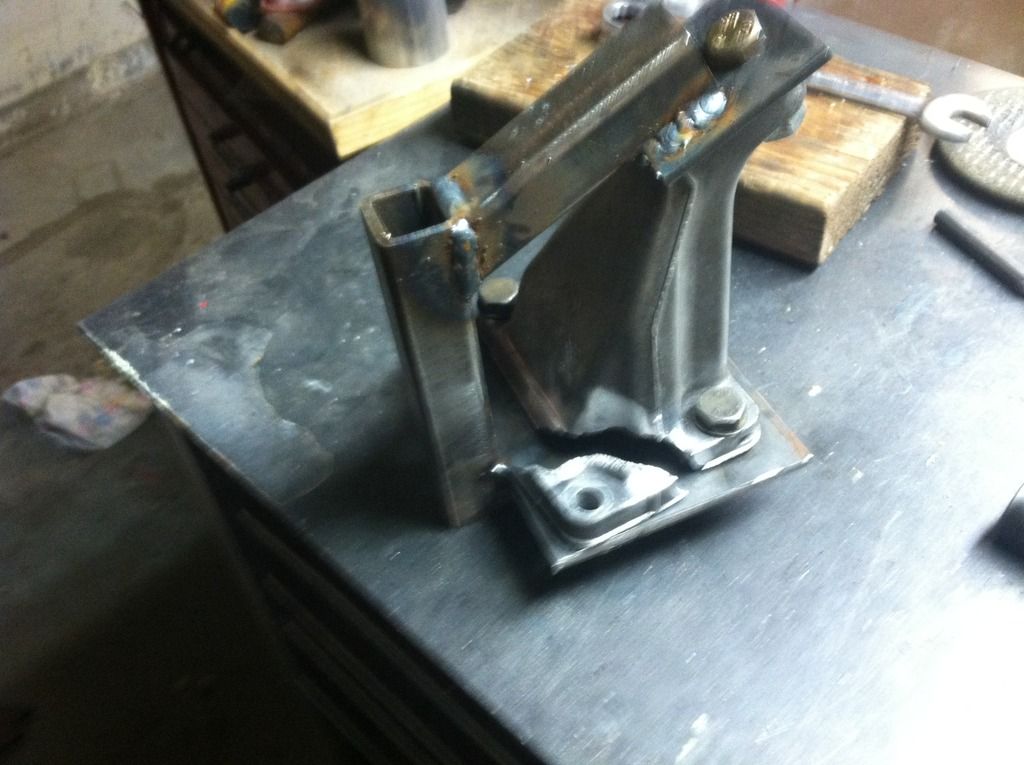
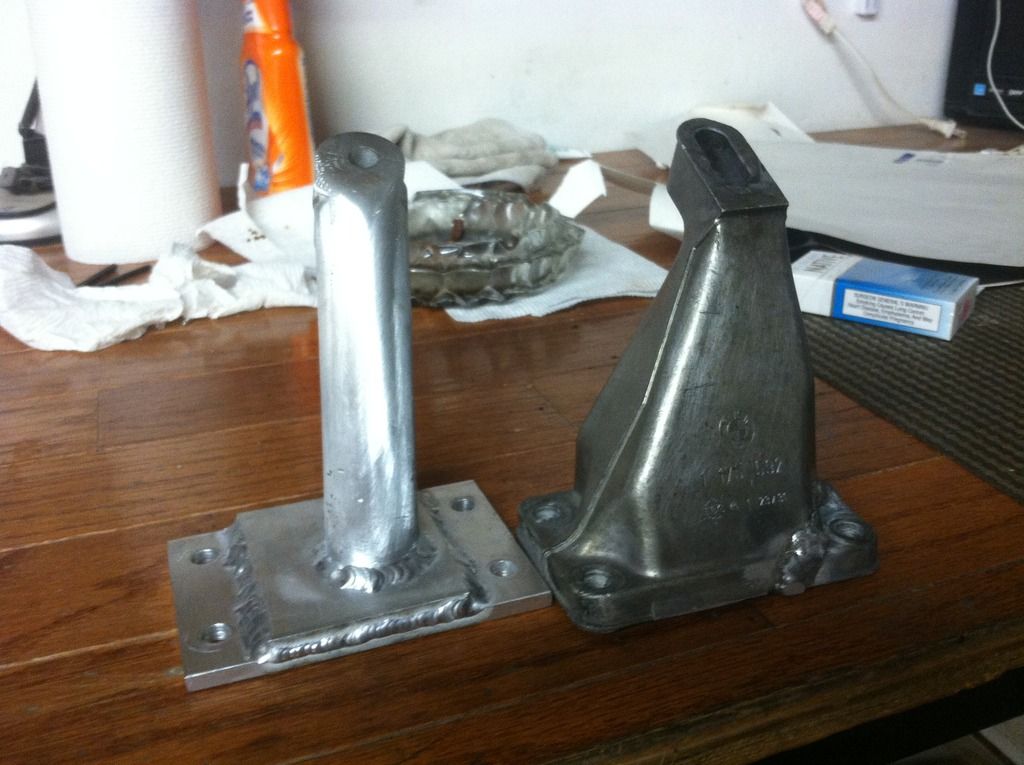
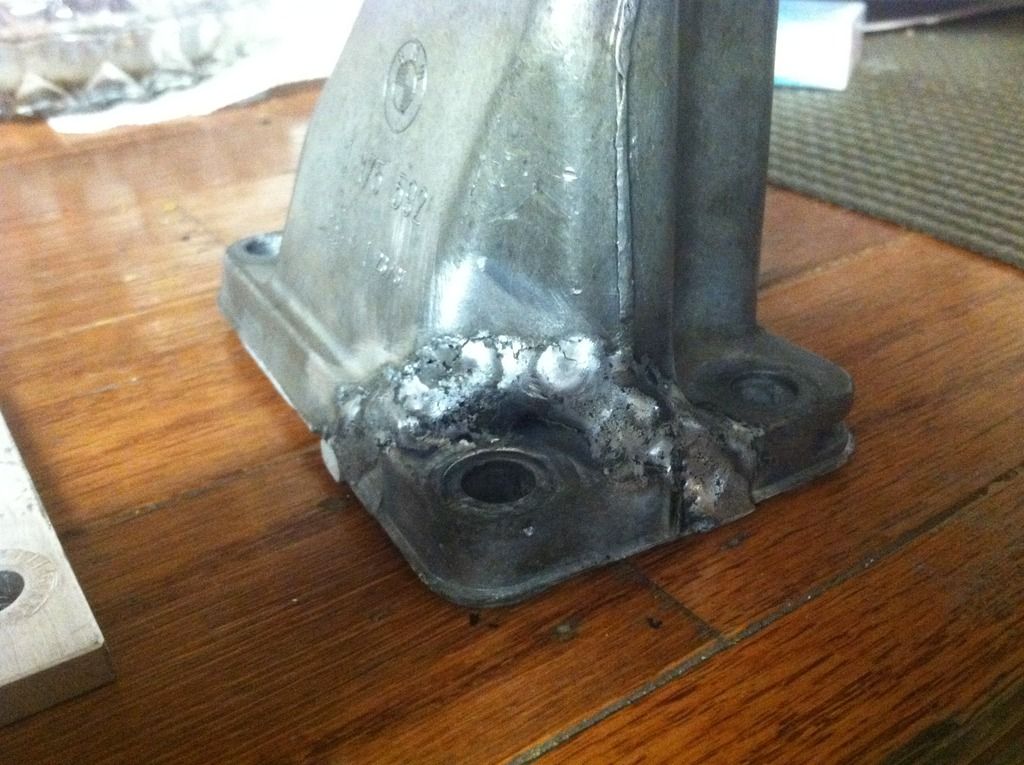
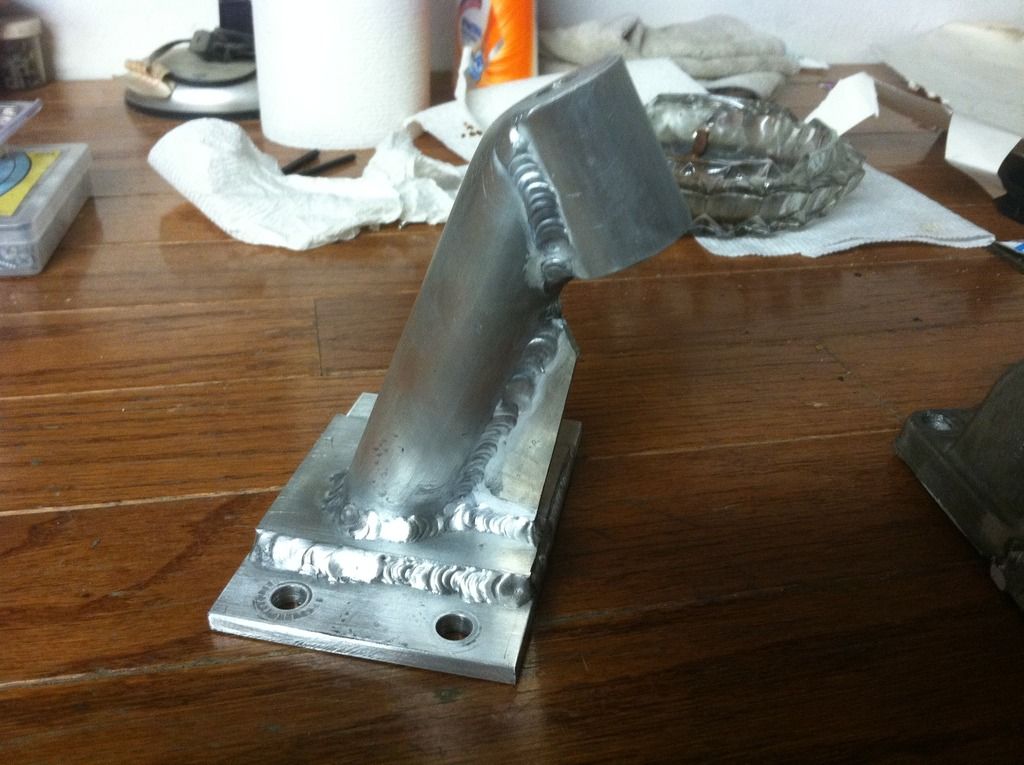
About a month ago i broke an ear on the passenger side motor mount, i was busy finishing finals so i pulled the mount and attempted to repair. The repair didn't go so well, due to it being a very dirty casting. While i had the mount out i made a steel jig so i could later make my own.
Using mild steel for a mount would have been alot easier, but you just dont see many aluminum mounts. The design i came up with should allow me to dump clutches all day long. It's an assortment of t6 .25 plate, thick tube and some round stock.
The next step is replacing the torn diaphragm in my tial wastegate, right now it only holds 5 psi when the spring is 10. I recently found out that asu partners with a community machine shop called techshop, so fulltime students get free membership. This means i will eventually have access to a 4-axis cnc along with all other kinds of machines. The first order of business is to replace all the bushings in the rear with poly, im cheap so i plan on turning all of them myself. Unfortunately my brother totaled his elco, so my turbo has become my daily driver, which gets toasty with no ac. Also due to employee pricing via internship the holset may be getting replaced by a garrett, which would mean a new manifold. But of course that all has to be put on hold until my brother can afford another car.


-
EventuallyAyrton
- Posts: 975
- Joined: Oct 12, 2015 11:47 PM
- Location: Wherever the E28 happens to be parked- Morrisville, NY
Re: 533i turbo
Incredible work. That mount looks like it will last forever