Eggenberger Group A E28 Tribute Build Thread
-
- Posts: 513
- Joined: Mar 01, 2007 12:06 AM
Eggenberger Group A E28 Tribute Build Thread
Hello friends!
I've had a whole bunch of folks ask me if I'd put together a build thread for my E28. I figured I'd at least put something together. It'll take me a bit to do the whole thread, and truth be told, with my track record, I'll get partway done and then not come back and finish the thread. But a start is better than nothing I suppose! I also didn't take photos of much of the build process, except for with my phone, so honestly this thread is more of an inside look at the car and the parts on it, as opposed to a start-to-finish build progression.
I've had the old girl out on track at Chuckwalla and Buttonwillow and it's been driving phenomenally, and I'm very excited to continue dialing in and tuning the suspension to maximize the car's potential.
For the sake of thoroughness, here's my "build sheet" of what all is done to the car. It's probably missing a few things, but it's mostly there.
1984 533i, 165,279 miles on chassis.
Custom “Original Teile” Livery, based on GR. A E24
Suspension:
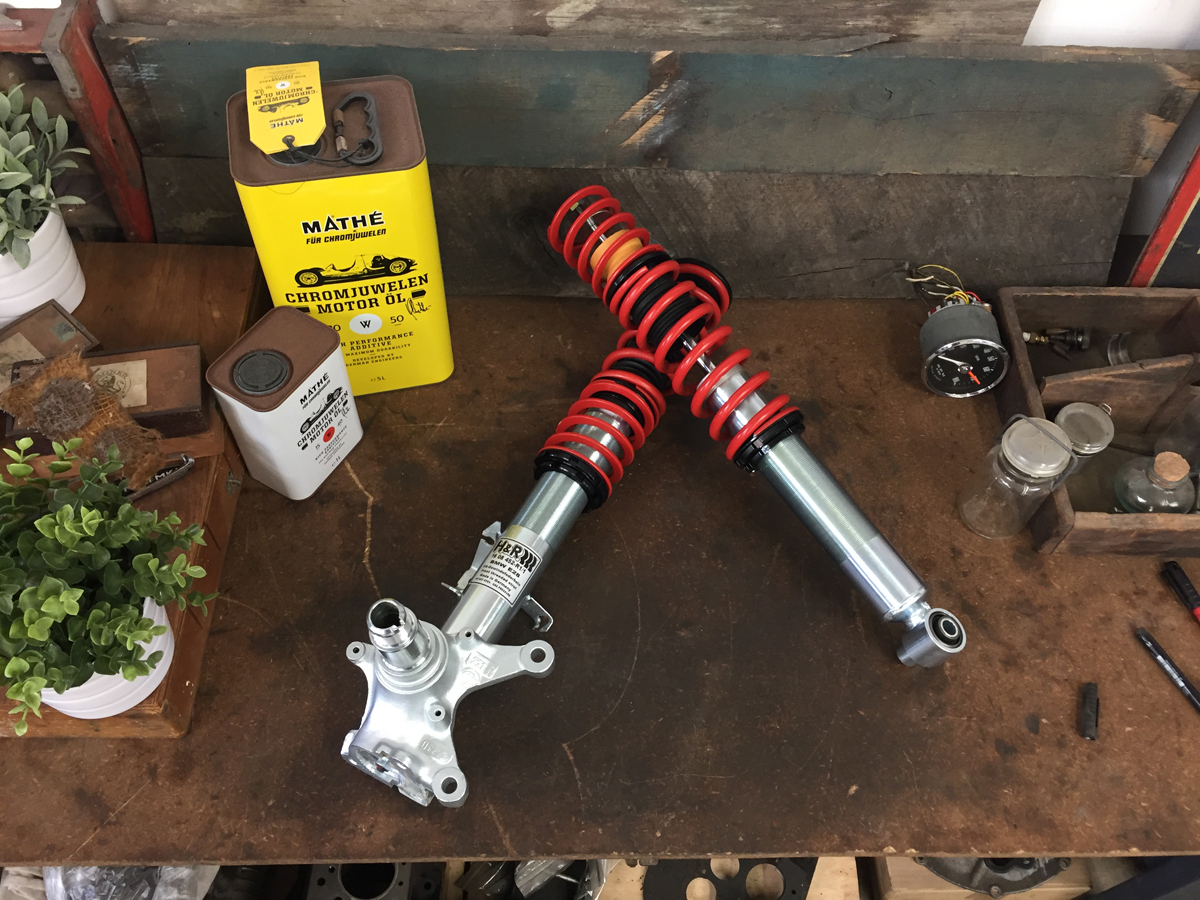
H&R Coilovers, custom made in Germany
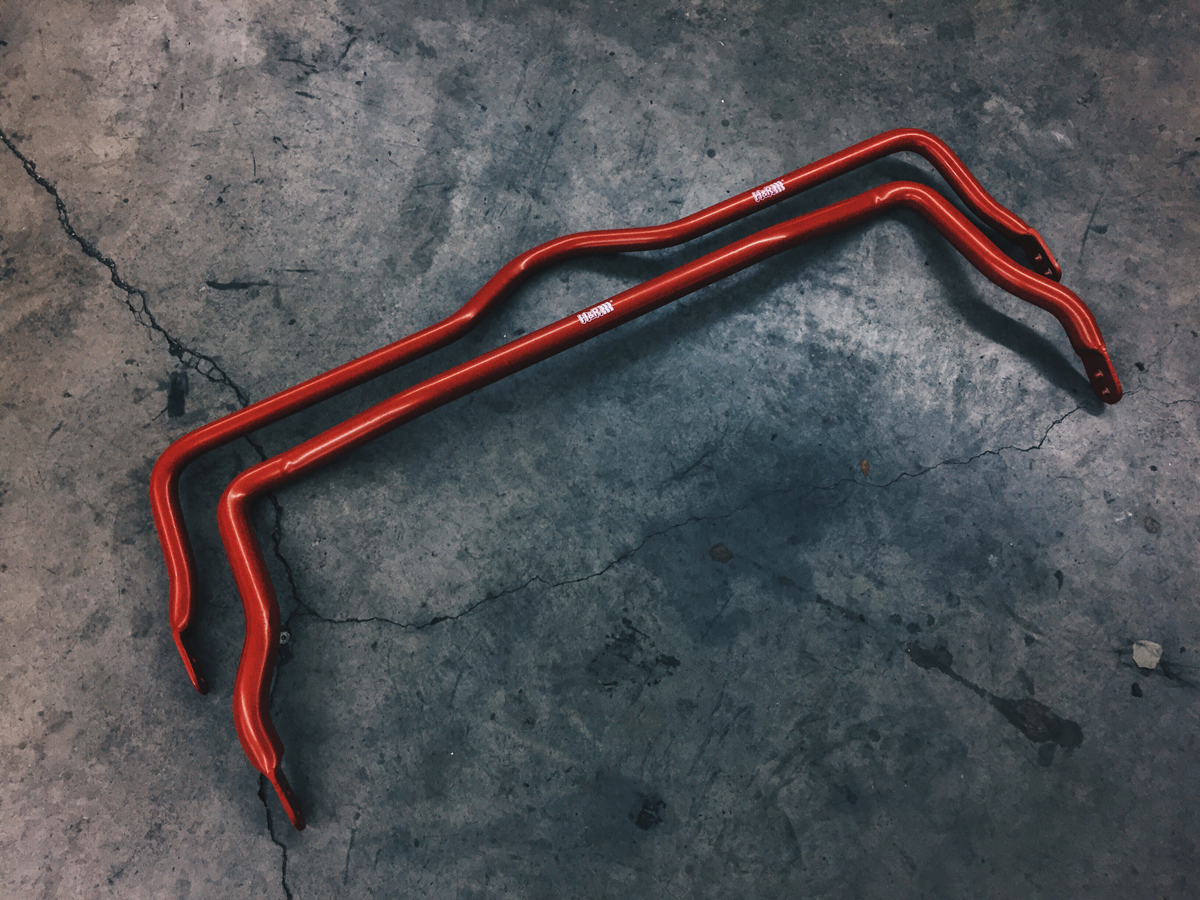
H&R Sway bars, one-off, custom made. 30mm front, 25mm rear
Custom adjustable swaybar links
Custom fabricated reinforced swaybar mounts
Ground Control race camber plates
E31 aluminum lower control arms
Powerflex black race bushings for:
Front LCAs
Front UCAs
RTABs
Rear Subframe
Complete suspension overhaul, all OEM:
New front wheel bearings/hubs
New rear wheel bearings
New lock rings and collar nuts
New dog bones
New axles
New rear shock mounts
New front LCAs
New front UCAs
New tie rods and center link
New steering idler arm
Custom 7075 alloy Centerlock hub adapters, Steel drive pins, built to Gr. A E28 spec
Brand new BBS centerlock nuts
Ronal Racing centerlock wheels, 16x8 square
Built with brand new BBS rim halves, sealing rings, and hardware
Pirelli P-Zero Trofeo R 225/45 tires
Tarox 6-pot aluminum big brake calipers, front
E32 750 rear brake calipers
310x26mm slotted front rotors
300x20mm slotted rear rotors
Tarox Corsa track brake pads
Exterior:
European bumpers front and rear
Euro M5 front air dam
Euro headlamps and grilles, with custom crosshairs
M5 rear spoiler
Interior:
NASA legal, 1985 FIA Group A-spec 6-point Roll cage, 1.75” .120 DOM
Pair of Momo Daytona fixed back seats, FIA compliant til 2020
VAC machined seat mounts
Pair of Willains 6-point harnesses, FIA compliant til 2020
Vintage Momo Futura steering wheel
Rennstall white delrin RSKT2 shift knob
Stripped and fully painted interior
Black headliner
Black door cards
Driveline:
S38B35 Engine swap - Pulled from 125k mile car, cluster accurate.
Swap includes complete M5 driveline:
G280 transmission
Rebuilt 4.10 E30 M3 Limited Slip Differential, converted to 3-clutch setup
Custom reinforced rear differential mount
Euro “bundle of snakes” headers
Conforti software
JB Racing 11.5lb flywheel
Clutchmasters 6-puck sprung clutch
Custom short-shift kit
CSF Aluminum radiator
SPAL 16” fan
Maintenance includes:
Complete top end rebuild, fully redone cylinder head
New timing chain
New timing chain guides
New head gasket
New front and rear main seals
New ancillary gaskets
New waterpump
New thermostat
etc.
Fueling:
ATL 120-liter Aluminum fuel cell, 1982 GR. A touring spec
3-liter fuel swirl pot/surge tank
Bosch 044 inline fuel pump
Holley Red lift pump
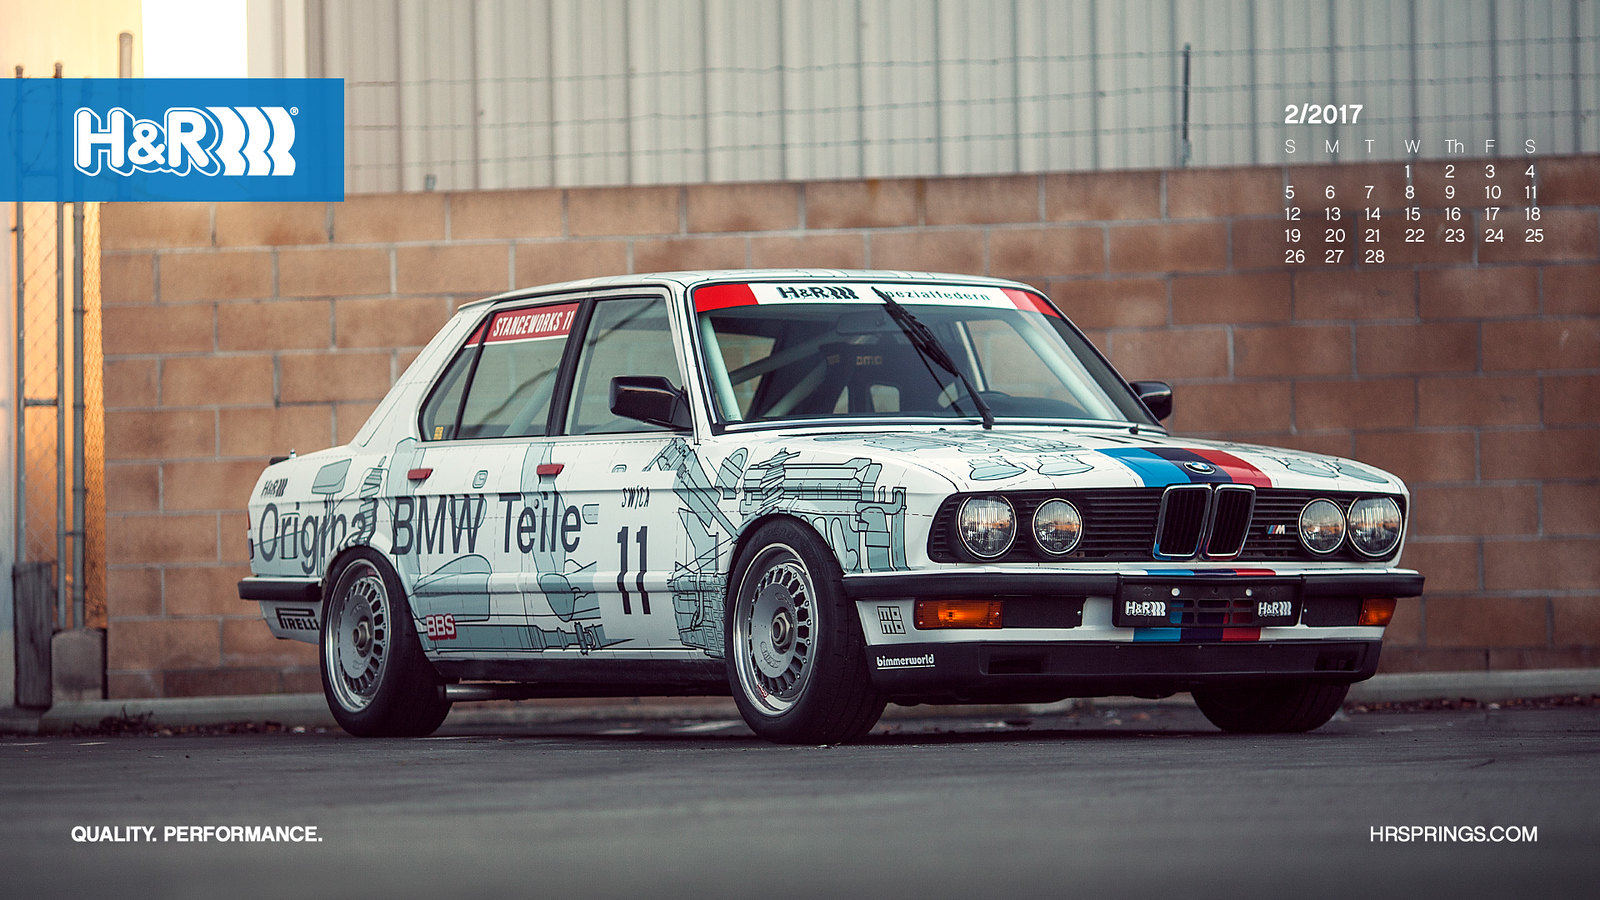
As a bit of an opener, the car is a bit of a mashup of ideas, most notably, it's inspired by the '82 Group A Eggenberger E28 ETCC race cars.
None of them were blessed with particularly beautiful liveries, so in building a tribute car, I went with something with a bit more flair, and pulled inspiration from the E24 factory works "x-ray" cars.
But, because those are E24s, they're not quite right in terms of simply copying the livery, so I had my good friend and business partner Andrew Ritter redesign the graphics to correctly portray an E28, including the rear seat, doors, etc. We also changed the engine and transmission to reflect M5 components.
M5 components are reflected because that's the final piece to my puzzle. While a built 2.8 M30 would be more correct in the car, it felt wrong to do anything but go for the best the E28 had to offer, despite the fact that the S38 was never homologated for FIA racing. I used an M5 donor car to contribute all of the parts, including tidbits like M5 door sills, to keep things authentic.
The build itself is something I've been planing for quite a few years, but last year I was given the opportunity to realize the vision and bring it to fruition. While the Group A E28s serve as the basis for the build, my initial inspiration was a french Superproduction E28. I had originally planned to copy this car, to a T, but with the influx of Marlboro-themed cars out there, I didn't want the effort to go to waste in the mix of something trendy, so I shifted my gears and worked towards the car I have today. (Humorously, halfway through my build, this exact car surfaced and went up for sale. When I had found photos a year or two prior, I had assumed it was long gone.)
Anyway, on July 1 of last year (2016), I picked up a reasonably nice example of an early body E28, which I wanted due to the fact that the race cars were also early-body. It was white over cardinal red in good overall shape.
I've had a whole bunch of folks ask me if I'd put together a build thread for my E28. I figured I'd at least put something together. It'll take me a bit to do the whole thread, and truth be told, with my track record, I'll get partway done and then not come back and finish the thread. But a start is better than nothing I suppose! I also didn't take photos of much of the build process, except for with my phone, so honestly this thread is more of an inside look at the car and the parts on it, as opposed to a start-to-finish build progression.
I've had the old girl out on track at Chuckwalla and Buttonwillow and it's been driving phenomenally, and I'm very excited to continue dialing in and tuning the suspension to maximize the car's potential.
For the sake of thoroughness, here's my "build sheet" of what all is done to the car. It's probably missing a few things, but it's mostly there.
1984 533i, 165,279 miles on chassis.
Custom “Original Teile” Livery, based on GR. A E24
Suspension:
H&R Coilovers, custom made in Germany
H&R Sway bars, one-off, custom made. 30mm front, 25mm rear
Custom adjustable swaybar links
Custom fabricated reinforced swaybar mounts
Ground Control race camber plates
E31 aluminum lower control arms
Powerflex black race bushings for:
Front LCAs
Front UCAs
RTABs
Rear Subframe
Complete suspension overhaul, all OEM:
New front wheel bearings/hubs
New rear wheel bearings
New lock rings and collar nuts
New dog bones
New axles
New rear shock mounts
New front LCAs
New front UCAs
New tie rods and center link
New steering idler arm
Custom 7075 alloy Centerlock hub adapters, Steel drive pins, built to Gr. A E28 spec
Brand new BBS centerlock nuts
Ronal Racing centerlock wheels, 16x8 square
Built with brand new BBS rim halves, sealing rings, and hardware
Pirelli P-Zero Trofeo R 225/45 tires
Tarox 6-pot aluminum big brake calipers, front
E32 750 rear brake calipers
310x26mm slotted front rotors
300x20mm slotted rear rotors
Tarox Corsa track brake pads
Exterior:
European bumpers front and rear
Euro M5 front air dam
Euro headlamps and grilles, with custom crosshairs
M5 rear spoiler
Interior:
NASA legal, 1985 FIA Group A-spec 6-point Roll cage, 1.75” .120 DOM
Pair of Momo Daytona fixed back seats, FIA compliant til 2020
VAC machined seat mounts
Pair of Willains 6-point harnesses, FIA compliant til 2020
Vintage Momo Futura steering wheel
Rennstall white delrin RSKT2 shift knob
Stripped and fully painted interior
Black headliner
Black door cards
Driveline:
S38B35 Engine swap - Pulled from 125k mile car, cluster accurate.
Swap includes complete M5 driveline:
G280 transmission
Rebuilt 4.10 E30 M3 Limited Slip Differential, converted to 3-clutch setup
Custom reinforced rear differential mount
Euro “bundle of snakes” headers
Conforti software
JB Racing 11.5lb flywheel
Clutchmasters 6-puck sprung clutch
Custom short-shift kit
CSF Aluminum radiator
SPAL 16” fan
Maintenance includes:
Complete top end rebuild, fully redone cylinder head
New timing chain
New timing chain guides
New head gasket
New front and rear main seals
New ancillary gaskets
New waterpump
New thermostat
etc.
Fueling:
ATL 120-liter Aluminum fuel cell, 1982 GR. A touring spec
3-liter fuel swirl pot/surge tank
Bosch 044 inline fuel pump
Holley Red lift pump
As a bit of an opener, the car is a bit of a mashup of ideas, most notably, it's inspired by the '82 Group A Eggenberger E28 ETCC race cars.
None of them were blessed with particularly beautiful liveries, so in building a tribute car, I went with something with a bit more flair, and pulled inspiration from the E24 factory works "x-ray" cars.
But, because those are E24s, they're not quite right in terms of simply copying the livery, so I had my good friend and business partner Andrew Ritter redesign the graphics to correctly portray an E28, including the rear seat, doors, etc. We also changed the engine and transmission to reflect M5 components.
M5 components are reflected because that's the final piece to my puzzle. While a built 2.8 M30 would be more correct in the car, it felt wrong to do anything but go for the best the E28 had to offer, despite the fact that the S38 was never homologated for FIA racing. I used an M5 donor car to contribute all of the parts, including tidbits like M5 door sills, to keep things authentic.
The build itself is something I've been planing for quite a few years, but last year I was given the opportunity to realize the vision and bring it to fruition. While the Group A E28s serve as the basis for the build, my initial inspiration was a french Superproduction E28. I had originally planned to copy this car, to a T, but with the influx of Marlboro-themed cars out there, I didn't want the effort to go to waste in the mix of something trendy, so I shifted my gears and worked towards the car I have today. (Humorously, halfway through my build, this exact car surfaced and went up for sale. When I had found photos a year or two prior, I had assumed it was long gone.)
Anyway, on July 1 of last year (2016), I picked up a reasonably nice example of an early body E28, which I wanted due to the fact that the race cars were also early-body. It was white over cardinal red in good overall shape.
Last edited by SpasticDwarf on Mar 10, 2017 4:50 PM, edited 1 time in total.
Re: Eggenberger Group A E28 Tribute Build Thread
Thanks for taking the time to do this.
I think a lot of us would like to see the custom parts of the car when you have the time to upload. I have struggled to find pictures of the modified suspensions of the group A cars like custom trailing arms/shocks and the like, have you seen much in that way?
Really cool stuff. How does the car feel to you on the track? Over/understeer? It sure looks flat in the picture.
One of the cool things about those cars were the air jacks to help with pit stops.
-
- Posts: 513
- Joined: Mar 01, 2007 12:06 AM
Re: Eggenberger Group A E28 Tribute Build Thread
Thank you. I'll share what I can.86GT635 wrote:Thanks for taking the time to do this.
I think a lot of us would like to see the custom parts of the car when you have the time to upload. I have struggled to find pictures of the modified suspensions of the group A cars like custom trailing arms/shocks and the like, have you seen much in that way?
Really cool stuff. How does the car feel to you on the track? Over/understeer? It sure looks flat in the picture.
One of the cool things about those cars were the air jacks to help with pit stops.
I do have FIA Homologation papers for one of the E28s, as well as a few sourced images of the suspension components. On my car, I do not have Gr. A trailing arms - snagging a set will set you back about $4,000, from the only set I have found for sale. The front arms are easy, and are on my list of things to build soon.
The car feels great on track; very planted. I'm sorting out a few things, but overall, it is wonderfully balanced. Not a lick of understeer, and just a bit of throttle-induced oversteer if you get a little rowdy with it. Totally manageable, and exactly how I'd like it to feel behind the wheel.
I have air jacks on my other E28. It's something I've considered adding to this car, but since I do not need to do rapid pit stops, I haven't made moves towards doing so yet.
Re: Eggenberger Group A E28 Tribute Build Thread
Subscribed, this car is awesome!
Hope I can learn a few things for my M5.
Re: Eggenberger Group A E28 Tribute Build Thread
really am enjoying your new car. any additional info on build would be great; pics especially.
thanks for sharing.
thanks for sharing.
Re: Eggenberger Group A E28 Tribute Build Thread
More details would be great, especially of the interior and cage. My personal favorite of the '82 Group A cars is this one
Goodwood has done some recent videos with that car, it looked like they also had one of the Groupe A E24's that day but had trouble getting it to run.
Track Test
https://www.youtube.com/watch?v=6LVzmZv_7e0
On Board
https://www.youtube.com/watch?v=WJSz56m-FW4
Comparison with slightly newer (and Uglier) Rover
https://www.youtube.com/watch?v=Pd8fpmmF0VA
Thanks for everything you've posted so far.
Adam
-
- Posts: 513
- Joined: Mar 01, 2007 12:06 AM
Re: Eggenberger Group A E28 Tribute Build Thread
As said, I don't really have a great chronological collection of photos, so I'm more aiming to showcase the components of the car, or at least parts of it.
The suspension and underside of the car were the most important to me. I worked closely with H&R to build a special setup for it, and BimmerWorld helped to supply to parts necessary to overhaul literally everything.
Most here in the US are unaware that H&R builds complete coilover kits for the E28. While they're expensive, they're also a bolt-on affair engineered specifically for our chassis. For anyone interested in a set, feel free to reach out to me and I can help to get you set up.
We also built a one-off set of sway bars as an exercise in curiosity and experimenting. Aftermarket swaybar options are limited for E28s - M5s are equipped with 25/18mm bars front and rear, and can do so because of special sway bar mounts. Non-M cars have more fragile mounts, and require reinforcement to the chassis in order to upgrade to larger bars. There are a few companies that make larger bars for our cars, with the largest being an M5-spec 25mm front and a slightly upgraded 19mm rear bar, as far as my research has shown. We opted to size up substantially, with 30mm front bars and 25mm rears. At the moment, there's no plan to put these into production, but if others are interested, a group-buy might be something I can help put together.
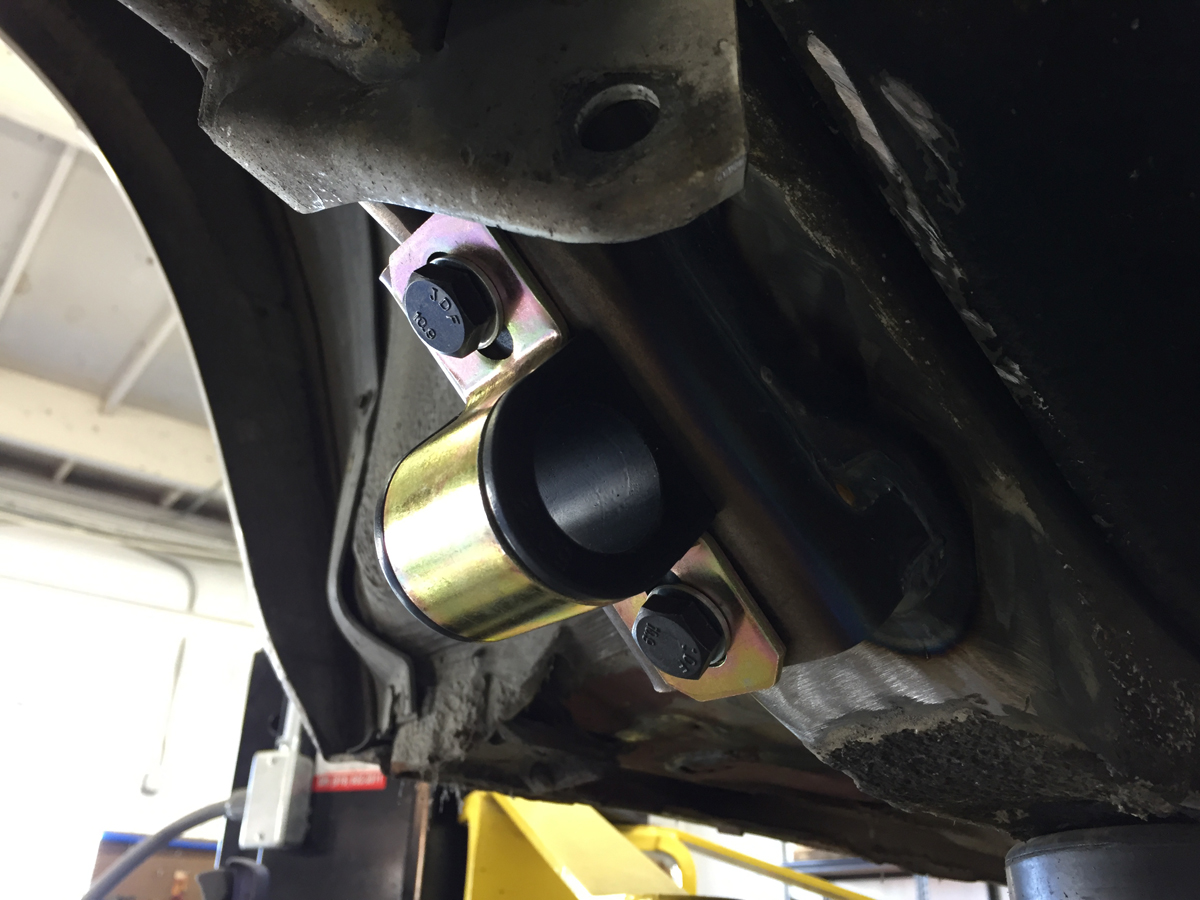
To mount the sway bars, reinforcement was needed. I opted for Aaron's (limitedslip engineering) front mounts, since he clearly did a nice job with his kit. I ordered a second pair of D-mounts and bushings from him for use in the rear of my car. For the front, I bored out his largest D-bushings to accomodate my bars.
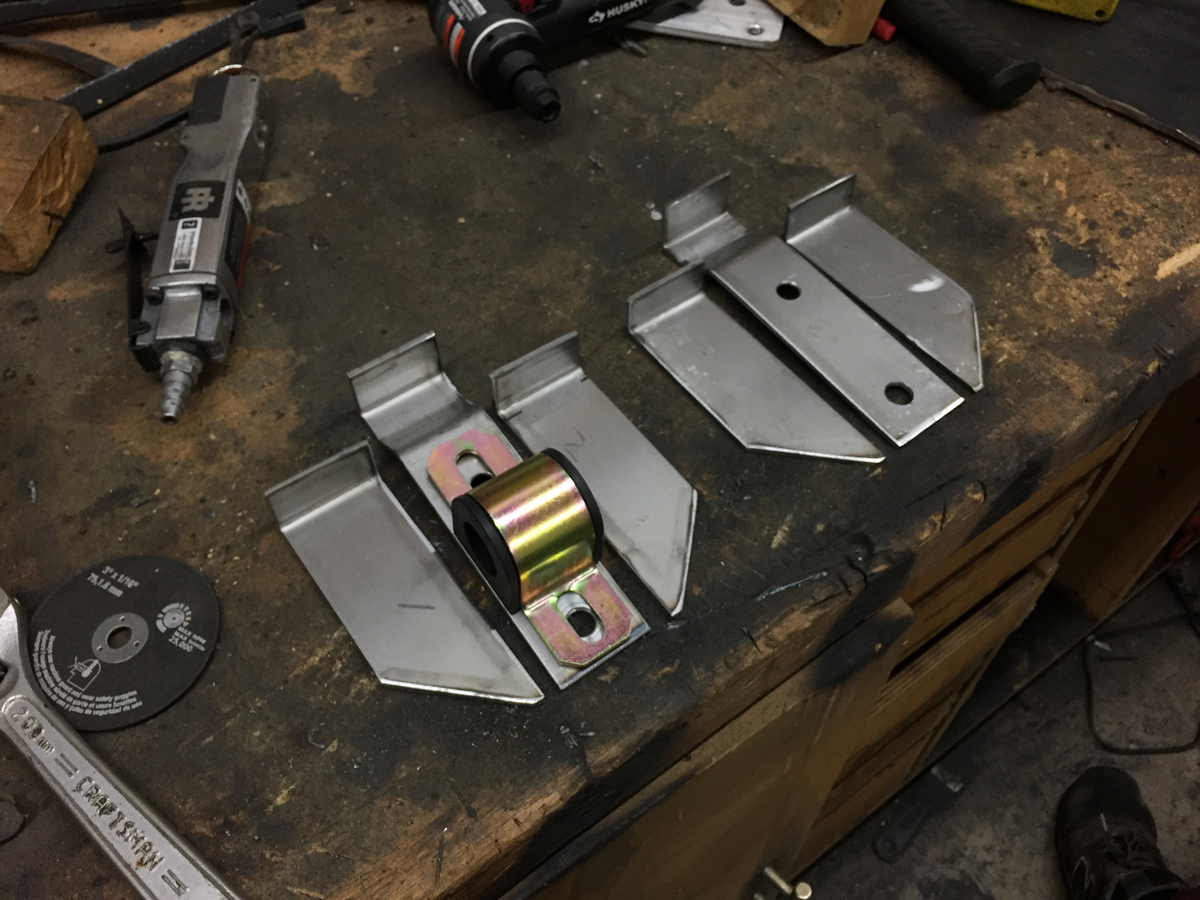
For the rear, he offered an upgrade for the swaybar mounts on late-model E28s, but for the early car, the mounts are different, and much more fragile. Tearing them from the body is a common occurrence with upgraded sway bars, so I designed my own reinforcement setup, and welded it into the car. I fabricated a differential mount reinforcement setup while I was under the car as well, and can find a photo if people are interested.
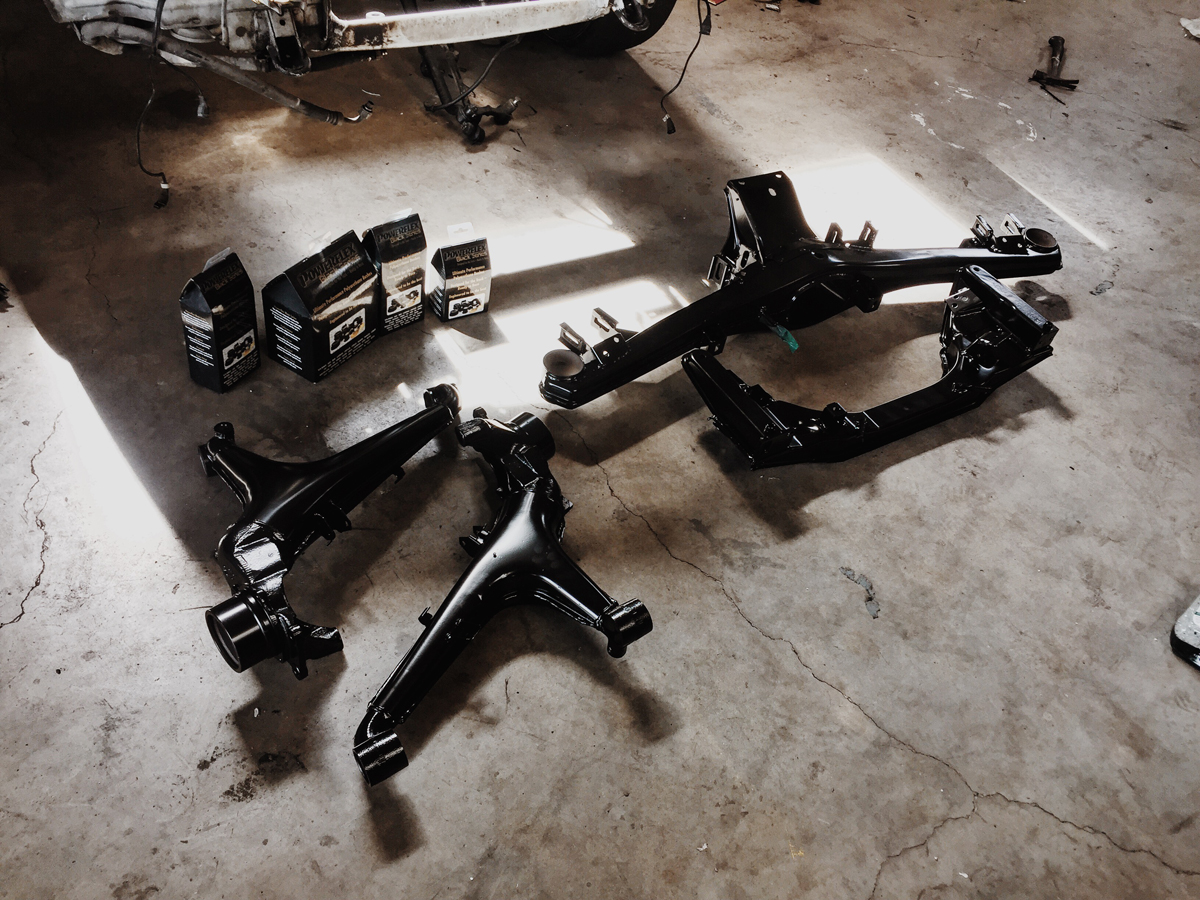
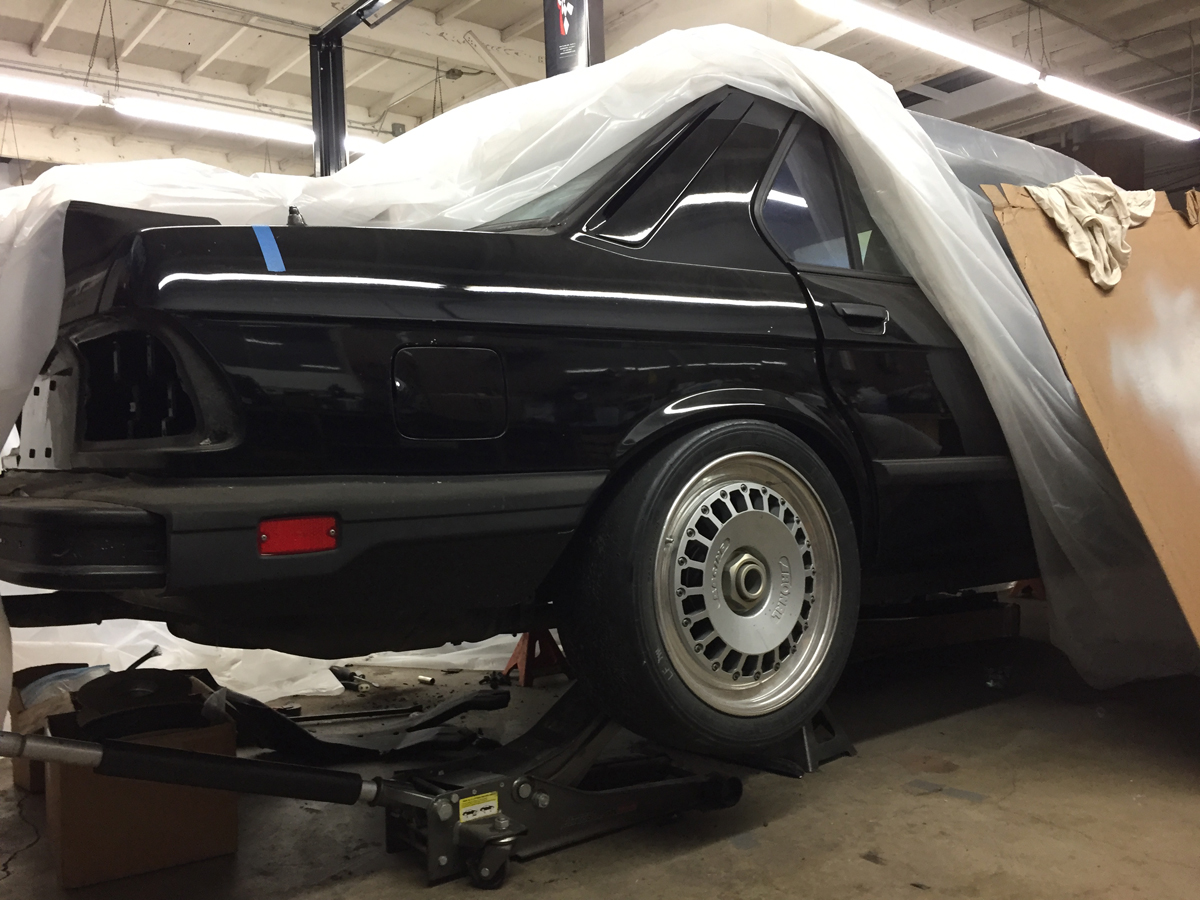
For the build, I stripped every component from under the car, except for the factory fuel and brake hardlines. I modified the rear subframe with an Ireland Engineering posi-lock style toe/camber adjustment kit, and then had both subframes, and the trailing arms powdercoated in a factory satin black.
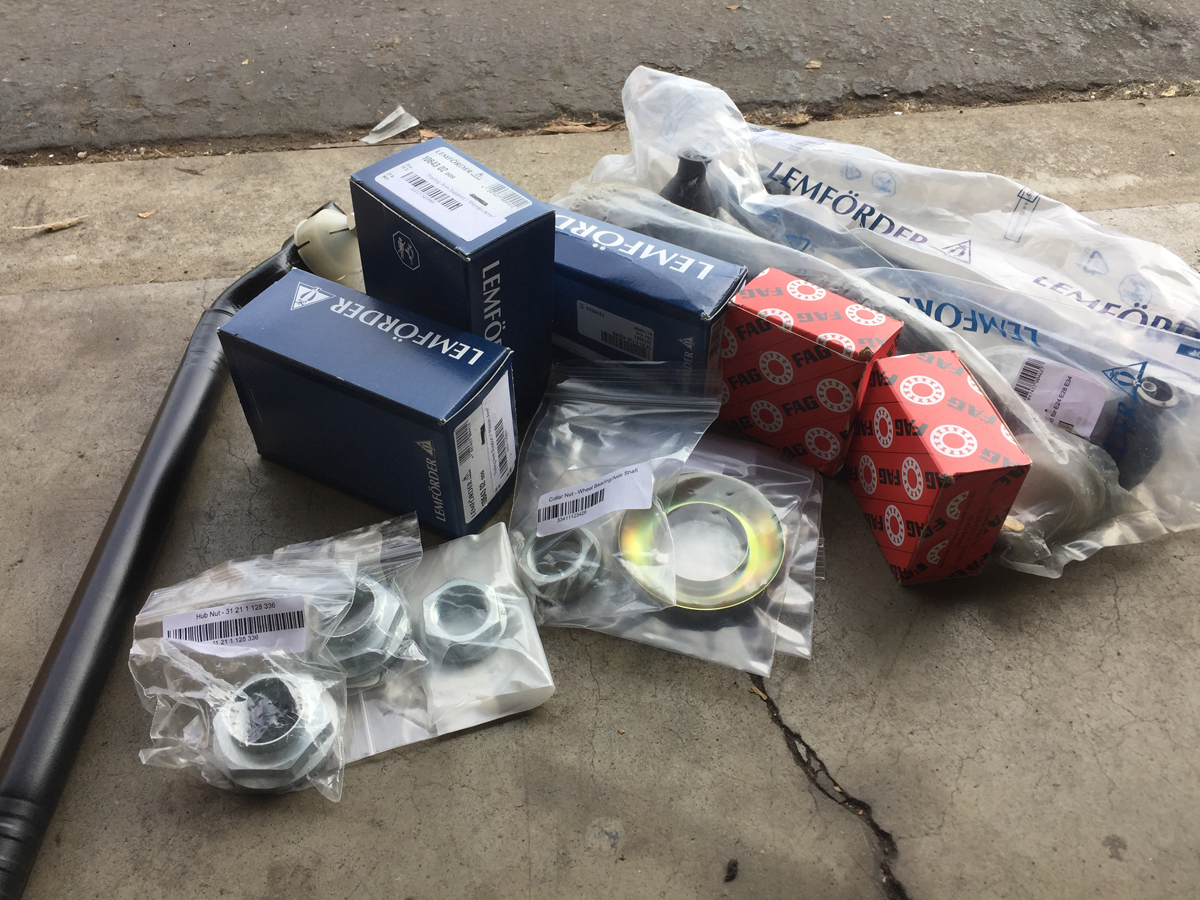
With everything apart, I wanted to replace every component underneath the car, so I had BimmerWorld source everything needed. All four wheel bearing assemblies, the hubs, the axles, all of the bushings, control arms, steering components, dog bones, shock mounts, and even brake shields, nuts and bolts were all replaced; some pictured, some not. Every part used was OEM, including the Lemfoerder arms, which I pressed the bushings out of to replace with Powerflex components. I used black Powerflex bushings on every component they offer, except for the sway bars, and the LCAs.
Seen before the bushing swap:
The rear end, mocked up:
Today, the only thing I have planned for the underside of the car is a cryoblast session to restore it to its former shine. I considered stripping and repainting the whole car, but it didn't make sense on a car I actually want to drive and race. A perfect show-car undercarriage would be pretty to look at, but flinging rocks and debris at it with R Comp tires seems like wasted effort.
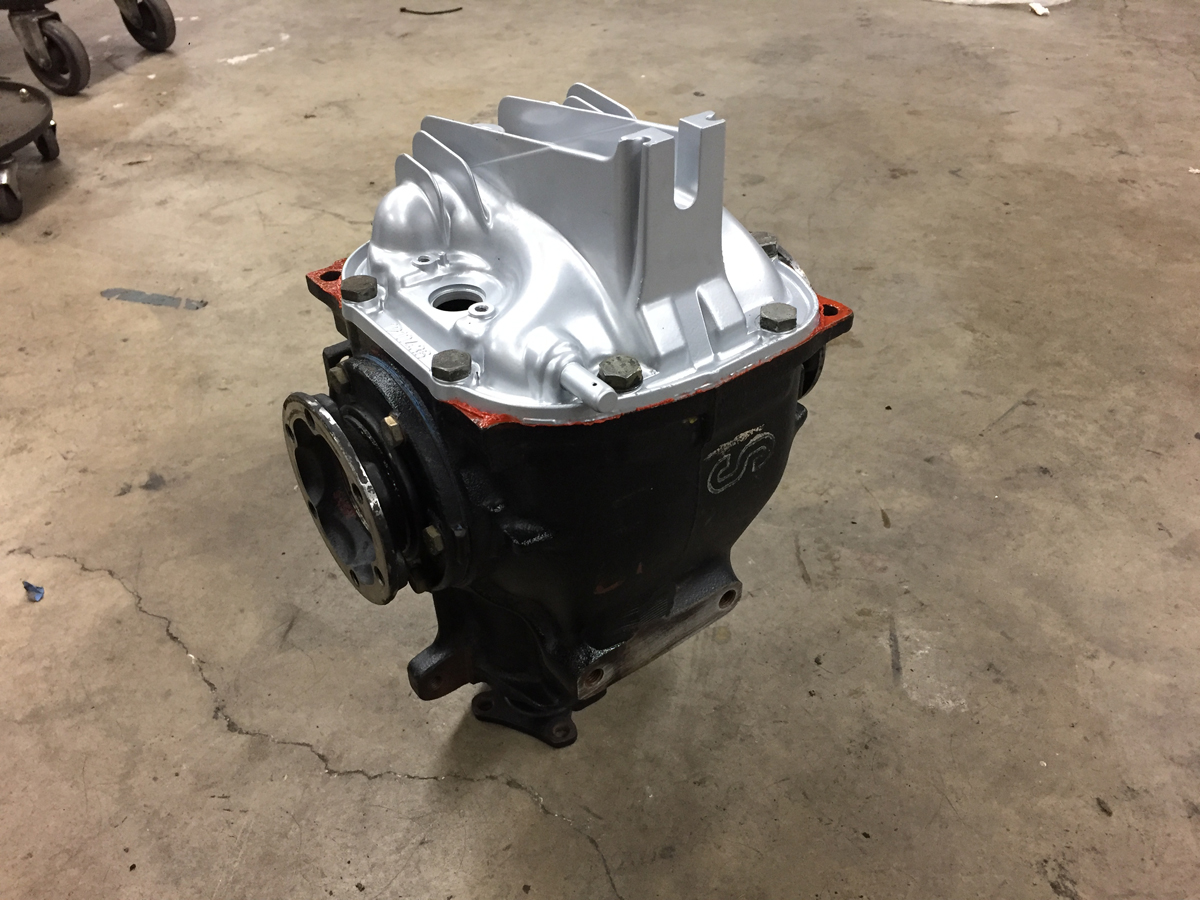
My original plan was to use the M5's large-case 3.91 diff, but it wasn't until trying to physically install it into the car that I realized that it would take more than just a rear mount modification to pull off. The floor pan is different in early versus late E28s, with the early model floor pan providing inadequate clearance for the larger differential case. I opted for an E30 M3 4.10 LSD, as it was a direct bolt-in solution. I'm currently in the middle of rebuilding it with a Thayer 3-clutch kit, new bearings, seals, and hardware. The 4.10 was a great choice in this car when paired with the G280's long gears. I really enjoy the way it drives.
I wish I had more photos of the suspension to show off the thoroughness of the build, but that'll have to do. No expense was spared in the running gear of this build. I wanted it to be thorough, and true to form in wanting an E28 that drives better than new. The only factors that I am unhappy with would be the lack of true Group A trailing arms. The front components will be swapped out for Group A bits in the coming months, as those are much more simple.
Last edited by SpasticDwarf on Mar 10, 2017 7:17 PM, edited 1 time in total.
-
- Posts: 513
- Joined: Mar 01, 2007 12:06 AM
Re: Eggenberger Group A E28 Tribute Build Thread
adam_poll wrote:More details would be great, especially of the interior and cage. My personal favorite of the '82 Group A cars is this one
Goodwood has done some recent videos with that car, it looked like they also had one of the Groupe A E24's that day but had trouble getting it to run.
Track Test
https://www.youtube.com/watch?v=6LVzmZv_7e0
On Board
https://www.youtube.com/watch?v=WJSz56m-FW4
Comparison with slightly newer (and Uglier) Rover
https://www.youtube.com/watch?v=Pd8fpmmF0VA
Thanks for everything you've posted so far.
Adam
I've got many, many photos of that car saved, as well as a lot of its history. As far as I am aware, it is the only Group A E28 remaining. It's for sale right now, if you have $200,000 to spare.
-
- Posts: 513
- Joined: Mar 01, 2007 12:06 AM
Re: Eggenberger Group A E28 Tribute Build Thread
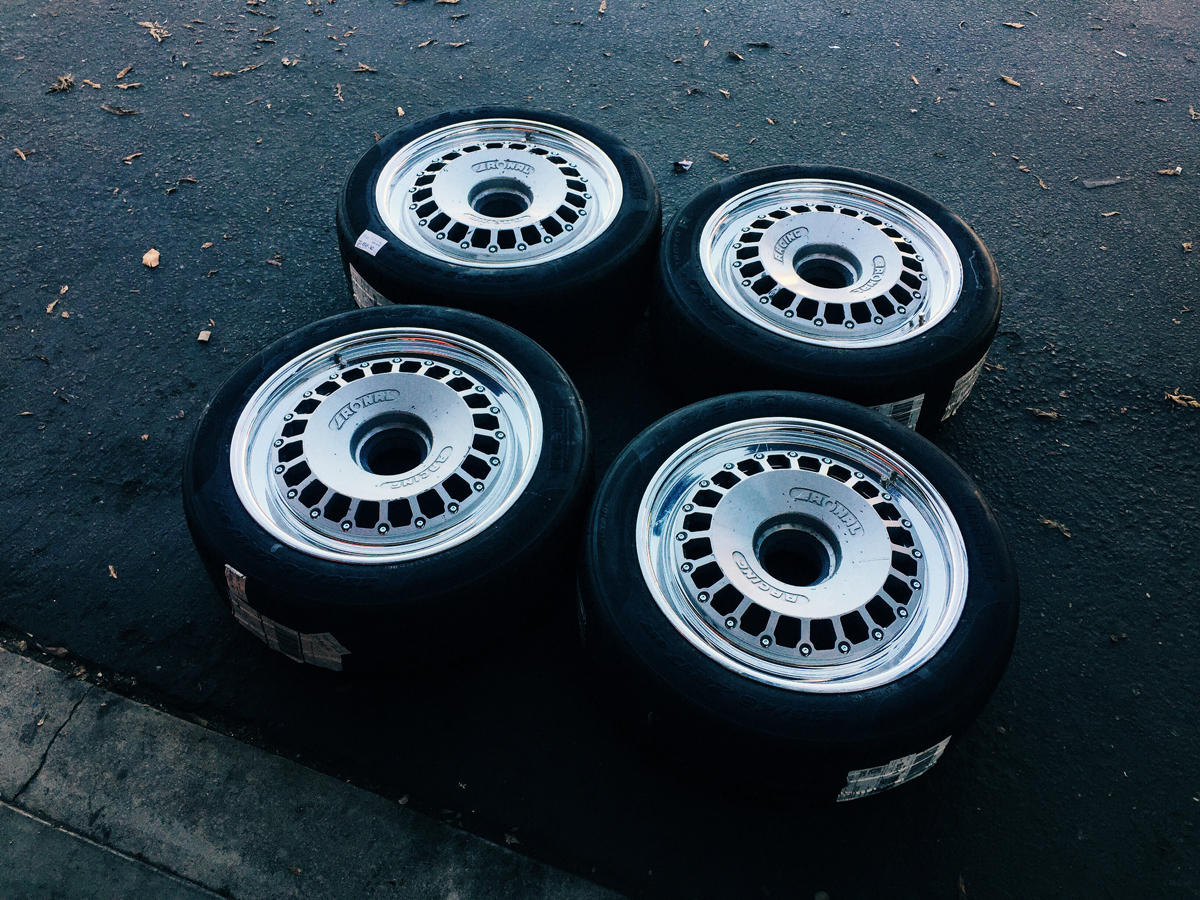
The wheels are probably my favorite part of the build, and might be the most important part. In wanting to build a spiritual “sister car” to the E24s, it was important to use the correct wheel. I found these Ronal splits, off of a Group A car, a few years back, I believe in 2012, and have been sitting on them ever since. They’re a spot-on match for the E24s, and as run on some of the E28s as well.
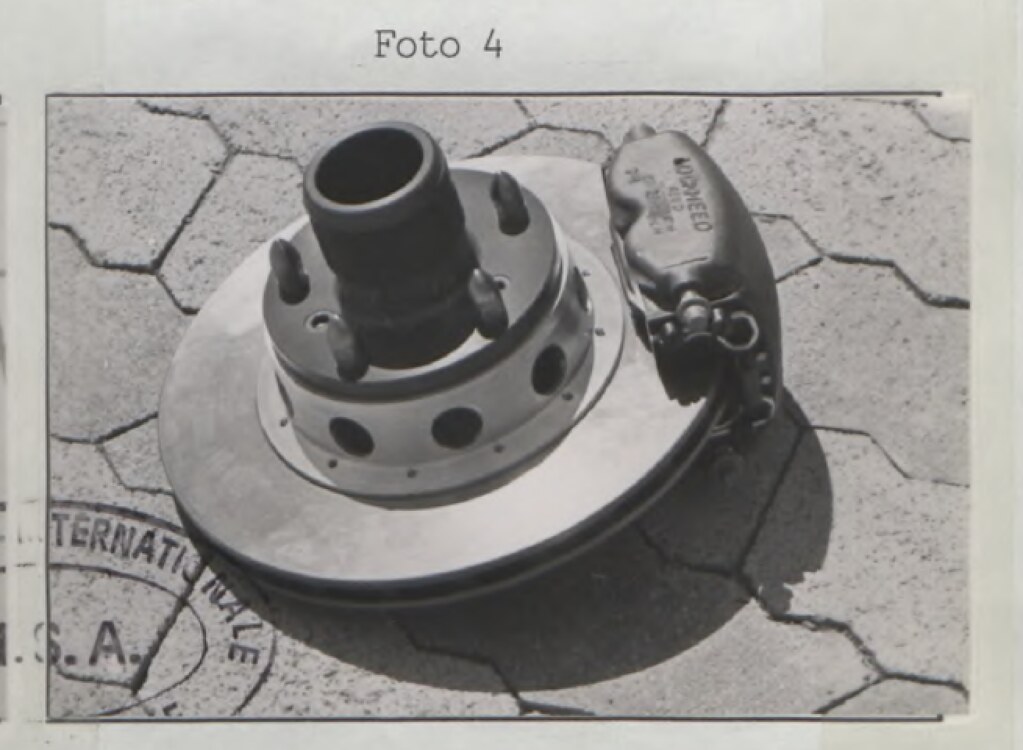
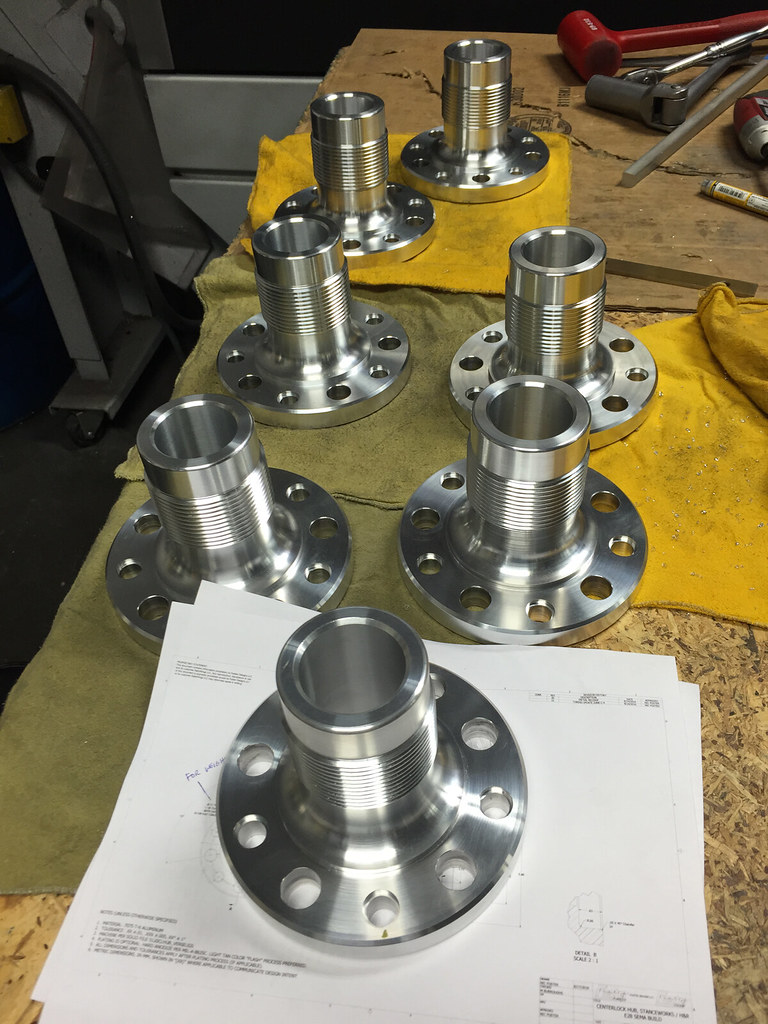
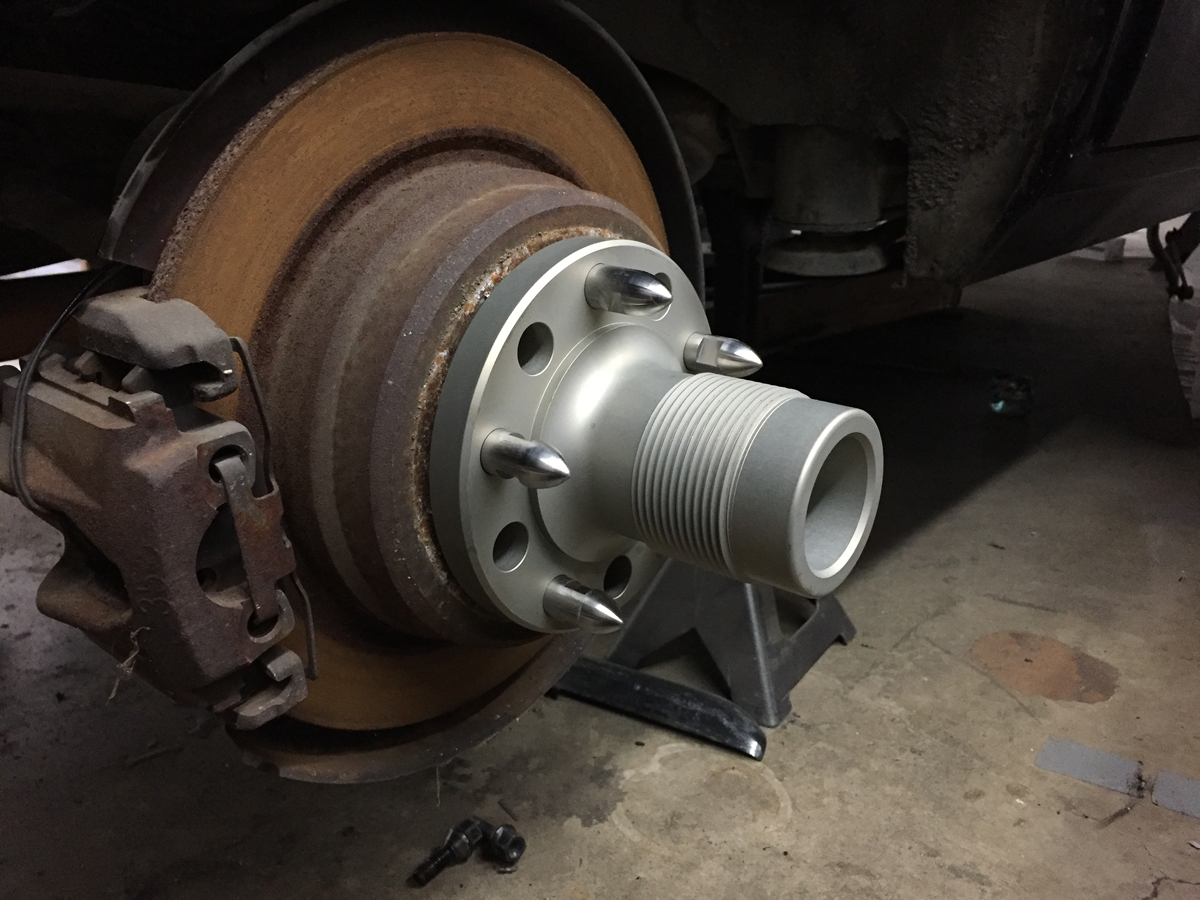
Using a few reference materials, primarily homologation papers for one of the Gr. A E28s, and an old rear hub I happened to have here at the shop, I joined forces with one of my closest friends, Nic Foster, to build a set of centerlock hubs for the E28. Pictured below is the original hub I had, which I sent to Nic up in Seattle, so that we could replicate it.
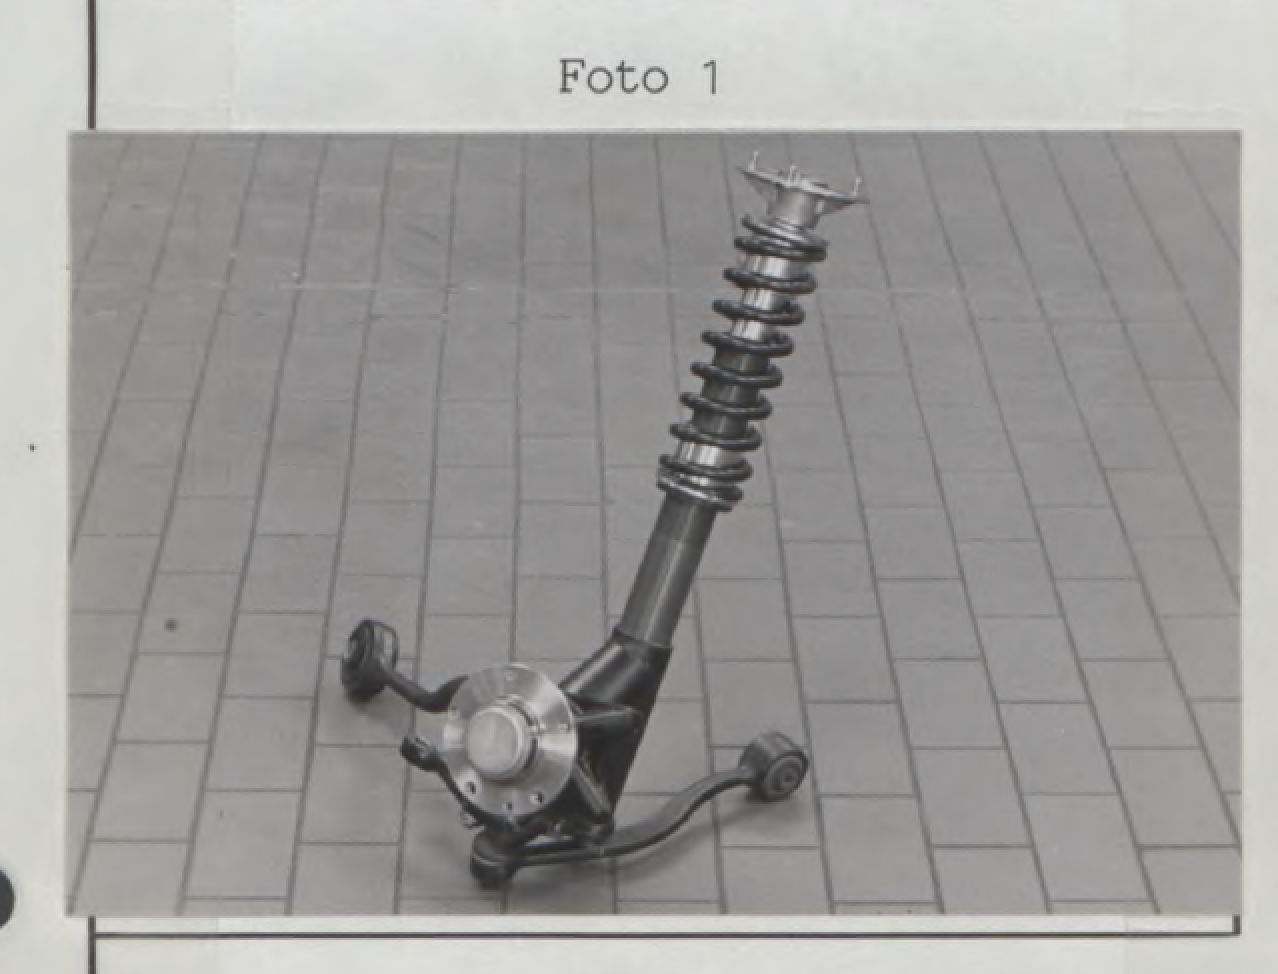
The factory E28 race cars are setup slightly different to our road cars, as their strut-to-spindle attachment is a a bit different from the road cars as it’s a BMW Motorsport coilover. However, it does utilize the factory geometry and the stock steering arm, so it’s practical difference is, well, none. You will note, however, that the hub assembly is almost identical. We used my spare factory centerlock hub for measurements and dimensions for both the hub and the drive pins. Pictured below are two photos from the E28 FIA homologation papers - the motorsport strut assembly, and the centerlock unit.
For our hub, we did add some lightening holes (as also used on the original hub I own, but not as seen on the Gr. A E28s in the pic above), however, they do use the drive pins to affix to the car - they’re not a dual-bolt style “adapter”. It’s as close to the factory centerlock hubs as we could venture.
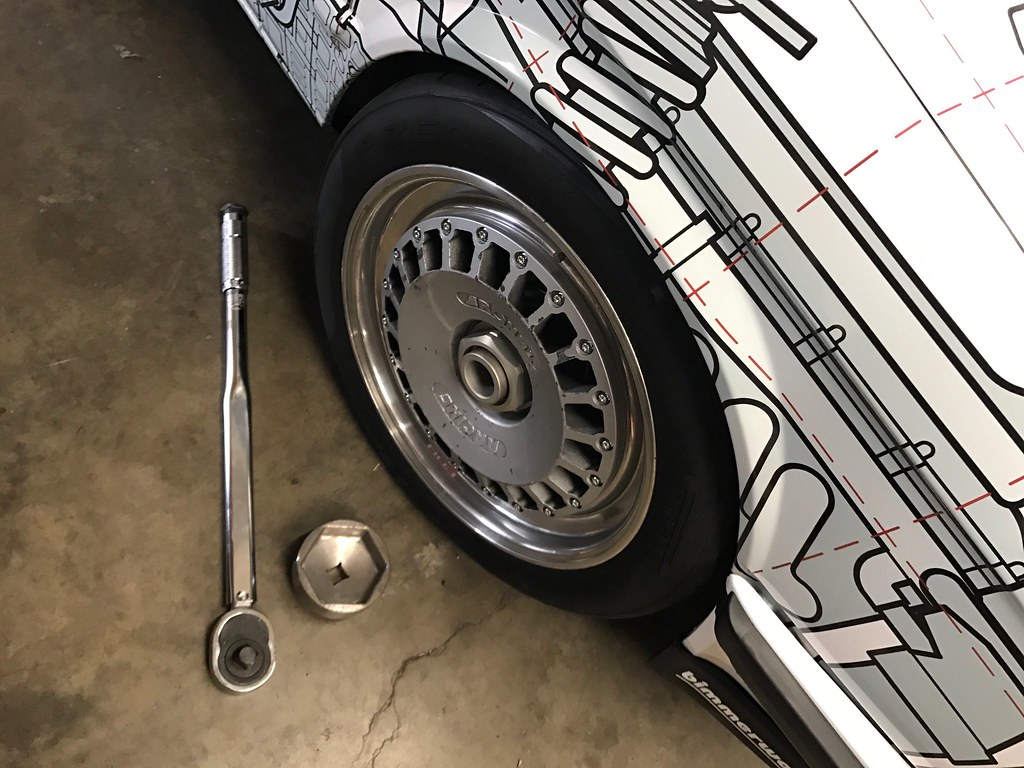
We produced the parts with a 7000-series alloy and FEA testing shows the load capabilites well past 4x the German TUV minimum safety rating, so this is a true race-capable part. A crows foot and torque wrench is used to install them to the car via the drive pins.
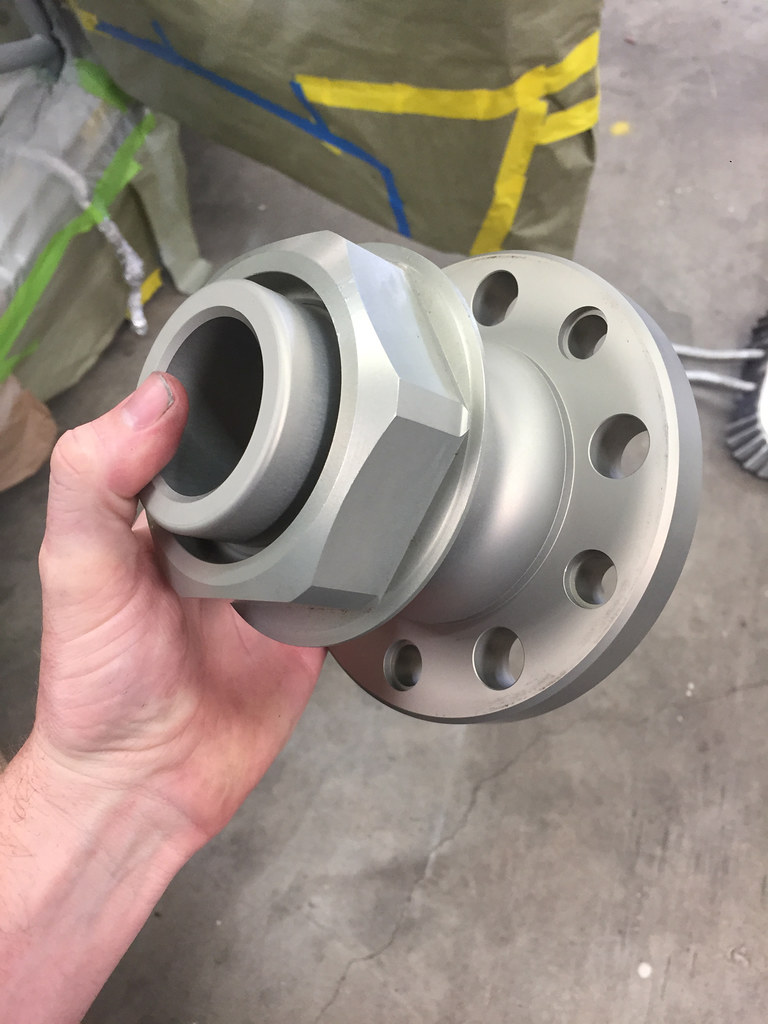
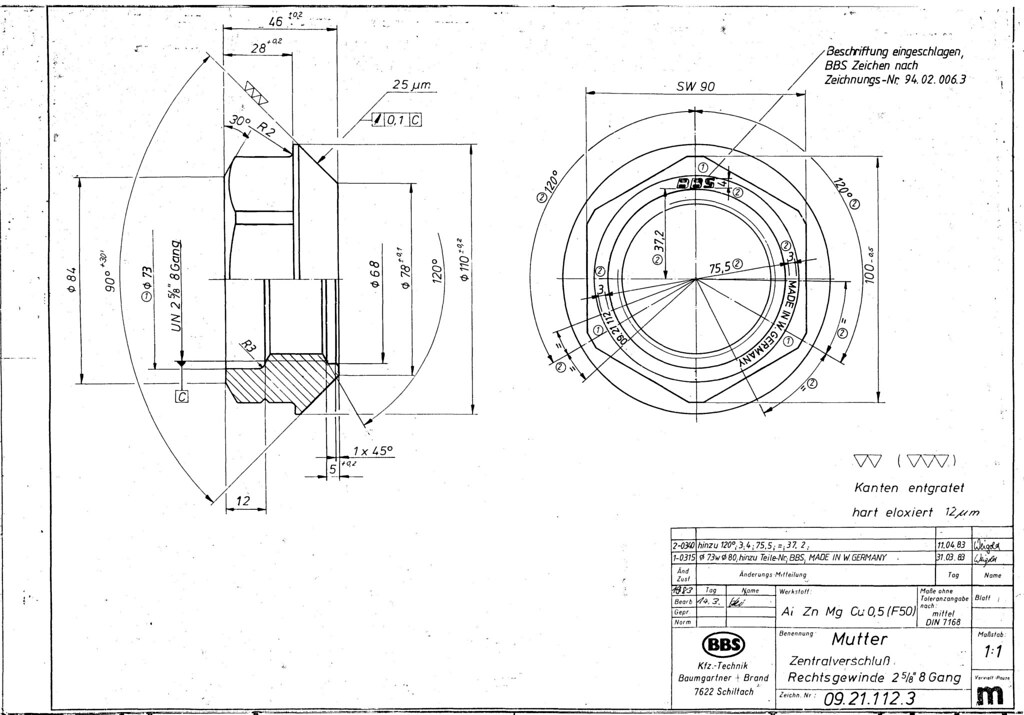
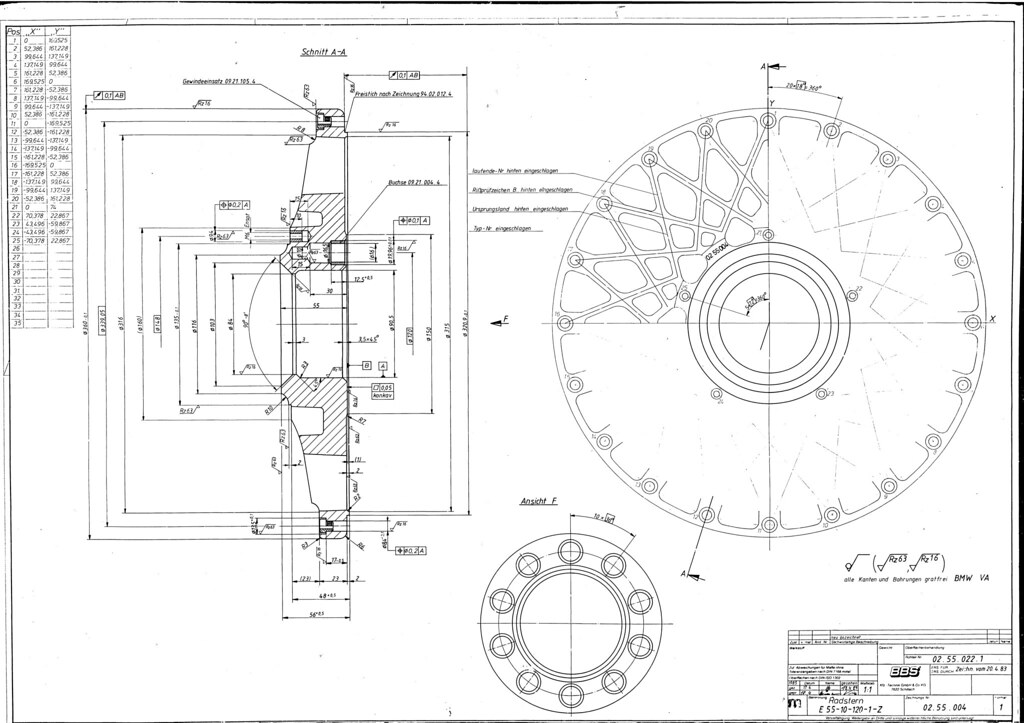
Ronals were built, back in the day, to BBS dimensions and to utilize BBS hardware. BBS supplied me with NOS centerlock nuts, as well as the original ’83 CAD drawings so we could perfect our hub and mate them perfectly.
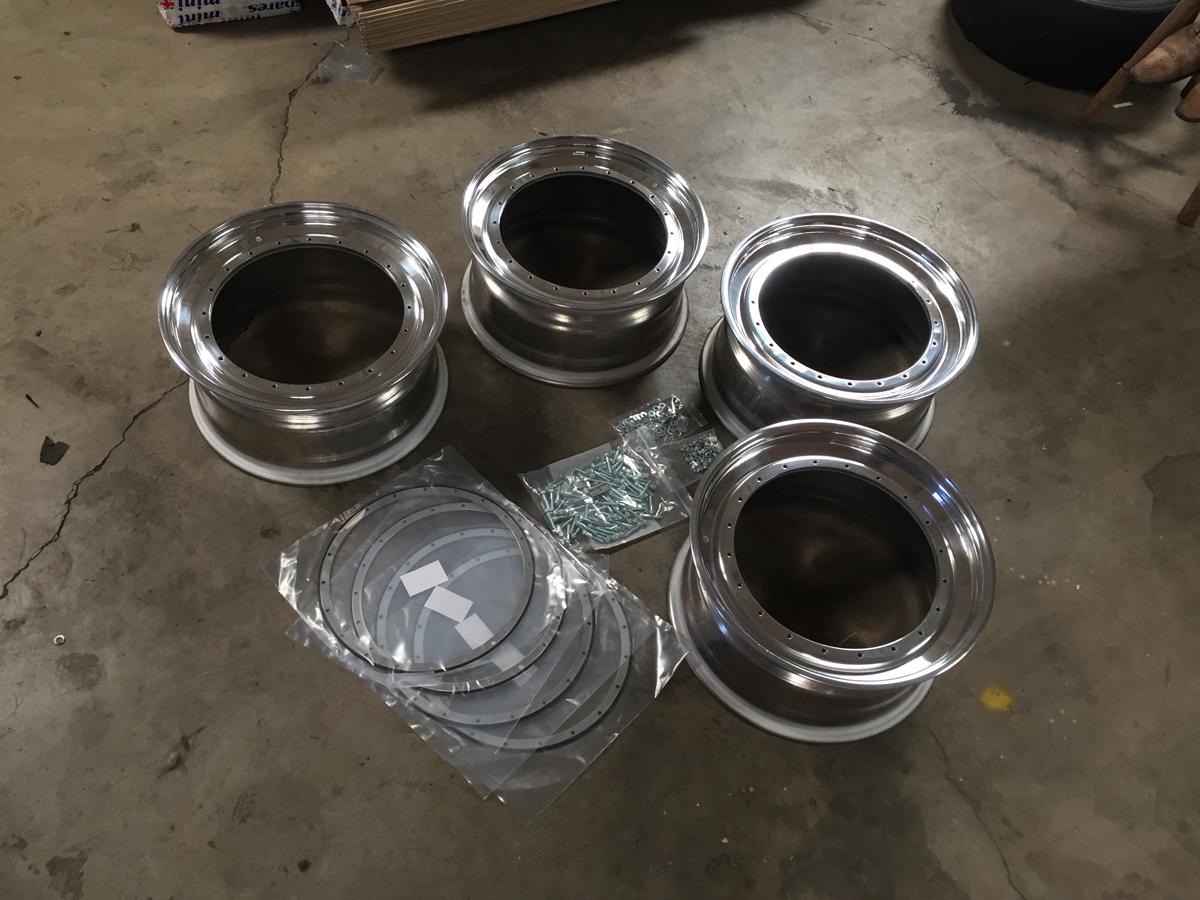
For the wheel build, I simply rebuilt them to factory spec with new BBS inners, outers, bolts, nuts, and sealing rings. I left the wheel centers as-is, opting to not refinish them in favor of retaining the patina and as-raced marring and imperfections.
All of the components fit together perfectly, and I was eager to see them on a car. At the time, the white car had no subframes, so mockup there wasn't an option. Here’s a few photos of initial test-fit on my M5 of all of the components. Sorry for the rusty surfaces - it’s been sitting since ’94, and is on my list of builds to do. Seeing them on an E28 had me excited and eager to finish up the suspension build on the race car.
And the original, for comparison:
Wheels on!
Mounting them on the race car was pretty straight forward, as per above. Torquing the wheels down required me having to have a custom 90mm socket made. While you can buy one ($1200 from SnapOn for the one socket, $400 for the cheapest out there), it was cheaper to have one made. The nuts are torqued to 400lb-ft.
Re: Eggenberger Group A E28 Tribute Build Thread
Thanks for posting Mike
Re: Eggenberger Group A E28 Tribute Build Thread
Very nice!
I would love to know more about the H&R coilovers...
Last edited by Karl Grau on Mar 12, 2017 8:26 AM, edited 1 time in total.
Re: Eggenberger Group A E28 Tribute Build Thread
Very cool project. Thanks for sharing it here.
Re: Eggenberger Group A E28 Tribute Build Thread
Simply incredible. I love those hubs & wheels.
Re: Eggenberger Group A E28 Tribute Build Thread
Duuude. That's cash.
Lovin the stock photos of the FIA photos. That means a lot.
Really hyped seeing the amount of work to make your car resemble a race car, in detail.
You have supreme amount of accessibility getting drawings and pics from the cars that raced the world.
This is some good turkey. Could you show the pics of the rear trailing arms from the group A cars? I've never seen them.
-
- Posts: 5052
- Joined: Feb 12, 2006 12:00 PM
- Location: Don't waste my motherf***in' time!
- Contact:
Re: Eggenberger Group A E28 Tribute Build Thread
This is outstanding, thanks for sharing the details and for tackling such an ambitious project.
-
- Posts: 513
- Joined: Mar 01, 2007 12:06 AM
Re: Eggenberger Group A E28 Tribute Build Thread
Thank you everyone. I really appreciate the kind words.
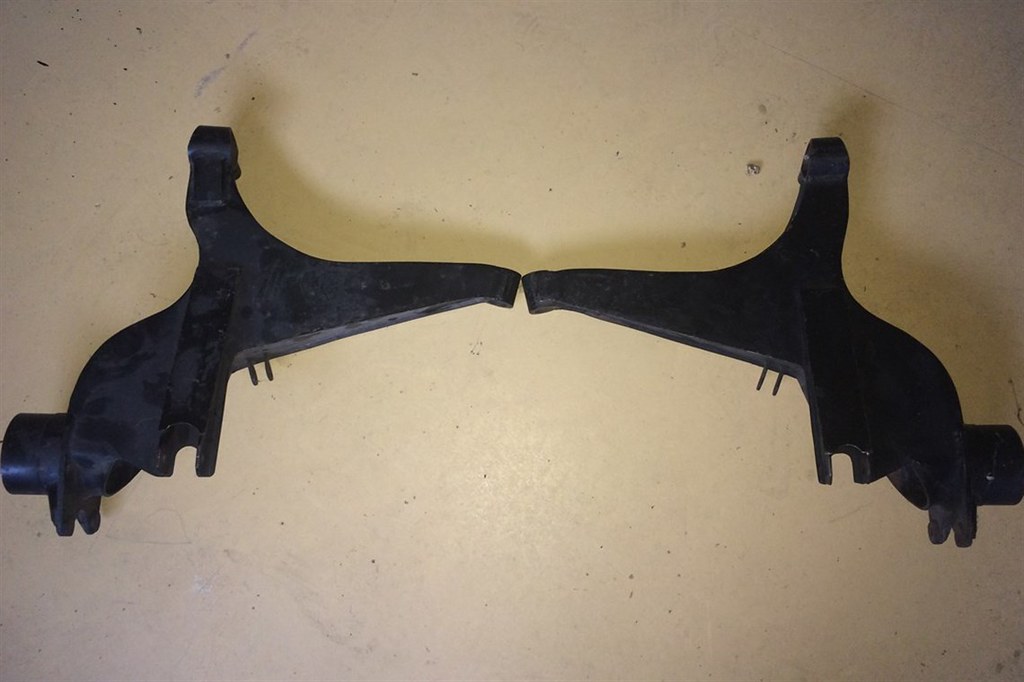
Here's some reference photos of the RTAs. The first photo is from the homologation papers. The second is an unmounted set so you can see them more easily. They mount similarly to the factory RTAs. The inner mount's orientation looks odd, but it mounts with a forward-facing heim/rose joint.
What more can I tell you? Happy to answer any questions. I could carry on all day about them, but I'll save you.Karl Grau wrote:Very nice!
I would love to know more about the H&R coilovers...
I'm glad you're enjoying the tidbits and details. I worked really hard to get some of the details right on my car. She's far from perfect, but I'm happy with it, for the most part. The rest will come with time.86GT635 wrote:Duuude. That's cash.
Lovin the stock photos of the FIA photos. That means a lot.
Really hyped seeing the amount of work to make your car resemble a race car, in detail.
You have supreme amount of accessibility getting drawings and pics from the cars that raced the world.
This is some good turkey. Could you show the pics of the rear trailing arms from the group A cars? I've never seen them.
Here's some reference photos of the RTAs. The first photo is from the homologation papers. The second is an unmounted set so you can see them more easily. They mount similarly to the factory RTAs. The inner mount's orientation looks odd, but it mounts with a forward-facing heim/rose joint.
-
- Posts: 513
- Joined: Mar 01, 2007 12:06 AM
Re: Eggenberger Group A E28 Tribute Build Thread
I've really grown to enjoy the ins and outs of roll cage and chassis design, and while I am very far from a pro, I'm happy with the outcome on the E28. It's one of the places I took some creative liberties from the original Group A cars, all in the name of safety. The Eggenberger E28s all ran bolt-in roll cages, and while they can be safe, I prefer something that is safe. However, I did source a copy of the 1985 FIA Group A rulebook, and built the cage to spec, preserving some sense of authenticity.
Inarguably, the most important aspect of cage design is strength and integrity, and while there's an immense amount of wonderful rollcage fabrication out there (and all far better than mine, no doubt), it's the place I see skimped out on most often as I peruse threads and facebook groups. More often than not, "cage builders" seem to skip building proper nodes - where tubes meet - in favor of quicker fabrication. Is it safe? Yeah, probably. But is it right? No, not by my book at least. It doesn't mean you or your cage is wrong, it's just not how I like to work.
An example of what I'm talking about (seen on an E36 sedan, from google images). None of the tubes "intersect." The door bar is below the belt bar, the diagonal misses the rear braces, etc, as does the a-pillar bar. Each of these tubes dead-ends into another perpendicular tube.
You'll see none of the tubes actually meet each other. It's quicker to build this way, but it provides poor load paths in the event of an accident. It also doesn't look very nice. The photo below is one of the few reference photos I have of the actual E28 Group A roll cage - bolted together, and also not incredibly well designed.
You can see in this picture, of my cage, a general idea of my layout and noding. Every tube meets another, "noding" correctly. Again, it may not be important to others, but it was to me, so I spent a lot of time getting it right.
I wish I had taken more photos of stripping the interior itself, but I didn't. It was, by far, the most laborious part of the whole build. Removing the sound deadener and the adhesive for it was a monumental task that took several long nights of scrubbing - the best chemical I found for it was Xylene, which is an adhesive dissolver. It took a few of us to get the job done. The common "dry ice" trick does not work at all on E28s, and I'd imagine it goes for other BMWs as well. Good luck to you if you decide to strip your interior and repaint it. It was an awful job, and probably a month long from start to finish, including the cage build too.
For my roll cage, I opted to build atop plinth boxes, which are a bit stronger than attaching directly to the floor, and they allow the cage to be dropped away from the roof for final welding. Here's a bit of before and after for a front and rear plinth box.
Here's one in place - this one's on the driver's rear. All four plinth boxes are slightly different due to asymmetry in the floor pan. For the finished cage, there is a base plate to each plinth box - it is not welded directly to the floor. This was just mockup purposes. You can also see the adhesive I was dealing with. It covered every inch of the interior. It haunts me to this day.
More adhesive. In some instances and places in the car, it was a few milimeters thick. We had to remove ALL of it to ensure a good finish on the floor pan.
Here's the front two plinth boxes (and base plates) mocked into position. I'm no pro welder, so affixing my base plate material to the floor, effecitvely, was hard. Strong? Yes. Pretty? Eh, not so much. Sorry, professionals out there.
From there, I moved on to cage construction, of which I didn't take too many photos.
My position for the rear bars is a bit atypical. Normally, E28 cages head straight to the wheel well arch, forward of the strut tower. It's very easy to access and mount to, and it's very strong. I wanted to attach directly to the strut tower, and thus had to remove a sement of the rear bulkhead on each side. The sheet metal is in the way, normally. On the to-do list, to this day, is to rivet in some nice aluminum covers to seal it back off. It's the only part of the car I feel is "unfinished" in its current state.
My good friend Riley Stair joined in for the weekend to help knock out the cage, since my SEMA clock was ticking.
Following the cage build, and a WHOLE lot more interior cleanup, we were finally ready to prep and paint the interior of the car. A few of us did prep work, but it was my good friend Cory Hutchison that did the paintwork itself, and the outcome is honestly better than I ever expected. Masking took an impressively long time, with lots of paper, tape, and foil used to keep everything clean. We had to paint in stages, masking the floor off first to paint the cage, and then the cage to paint the floor, all in an effort to prevent overspray problems and to ensure a factory-like finish.
Here you can see the cage dropped down, so that the top could be painted. This was another reason for painting the floor separately - I had to lift the cage back into place, and weld it up.
Here's where things finally started to come together. Also in the mix was dying the headliner to black, to keep things true to the "M5" theme. I also, after everything was said and done, took the time to re-wrap the whole harness with black cloth tape, to clean up the inside of the car.
And a few final photos:
I wish I had a good photo to show off the paintwork on the floor, but it really did come out beautifully. I feel bad trampling all over it when I get in and out of the car. Overall, aside from a couple small details, the interior is really where I want it to be. I'll add another short post about my choice of interior amenities.
Re: Eggenberger Group A E28 Tribute Build Thread
I guess specifically, info on how to purchase and pricing.SpasticDwarf wrote:What more can I tell you? Happy to answer any questions. I could carry on all day about them, but I'll save you.Karl Grau wrote:Very nice!
I would love to know more about the H&R coilovers...
-
- Posts: 247
- Joined: May 16, 2007 9:38 AM
- Location: United Kingdom
Re: Eggenberger Group A E28 Tribute Build Thread
How have you finished the rear bulkhead around the rear strut mounts? It looks open (and painted) in this pic, which (in the UK at least) wouldn't pass scrutineering for racing.SpasticDwarf wrote:
My cage is similar in concept, where the rear strut mounts are part of the cabin rather than the trunk.
-
- Posts: 1222
- Joined: Feb 12, 2006 12:00 PM
- Location: Netherlands
- Contact:
Re: Eggenberger Group A E28 Tribute Build Thread
Really nice build! The coilovers are outstanding!
Only one little thing; the engine sits at a wrong angle on the paintwork....
-
- Posts: 513
- Joined: Mar 01, 2007 12:06 AM
Re: Eggenberger Group A E28 Tribute Build Thread
PM me.Karl Grau wrote:
I guess specifically, info on how to purchase and pricing.
At this point, I have not. I have some templates made but have not finished building some riveted-in sealing panels. I haven't had a problem with tech inspection yet, but I understand why some sanctioning bodies would have a problem with it. It's very much on the to-do list, and as we all know, our cars are never finished.dan101smith wrote:
How have you finished the rear bulkhead around the rear strut mounts? It looks open (and painted) in this pic, which (in the UK at least) wouldn't pass scrutineering for racing.
My cage is similar in concept, where the rear strut mounts are part of the cabin rather than the trunk.
There are plenty of things on the livery to nitpick, if you're keen. Thanks.Jelmer538i wrote:Really nice build! The coilovers are outstanding!
Only one little thing; the engine sits at a wrong angle on the paintwork....
-
- Posts: 247
- Joined: May 16, 2007 9:38 AM
- Location: United Kingdom
Re: Eggenberger Group A E28 Tribute Build Thread
My fuel tank is in the trunk, so they take bigger issue with it as they want a fire-proof bulkhead between it and the driver compartment. If yours is in the stock location then it may not be such an issue.SpasticDwarf wrote: At this point, I have not. I have some templates made but have not finished building some riveted-in sealing panels. I haven't had a problem with tech inspection yet, but I understand why some sanctioning bodies would have a problem with it. It's very much on the to-do list, and as we all know, our cars are never finished.
Re: Eggenberger Group A E28 Tribute Build Thread
Very cool. I envy the photographic skills, Mike. But of course we all know you are very good at that, as well.
Are you running an A100 (Evo Exhaust Gear) with that Jim C chip? Advanced I would imagine if so.
Keep it coming
Are you running an A100 (Evo Exhaust Gear) with that Jim C chip? Advanced I would imagine if so.
Keep it coming
-
- Posts: 513
- Joined: Mar 01, 2007 12:06 AM
Re: Eggenberger Group A E28 Tribute Build Thread
Thank you. I am not running any engine modifications, just the euro headers.Pavel wrote:Very cool. I envy the photographic skills, Mike. But of course we all know you are very good at that, as well.
Are you running an A100 (Evo Exhaust Gear) with that Jim C chip? Advanced I would imagine if so.
Keep it coming
Mine is as well. As said, the patches are on the to do list!dan101smith wrote:My fuel tank is in the trunk, so they take bigger issue with it as they want a fire-proof bulkhead between it and the driver compartment. If yours is in the stock location then it may not be such an issue.SpasticDwarf wrote: At this point, I have not. I have some templates made but have not finished building some riveted-in sealing panels. I haven't had a problem with tech inspection yet, but I understand why some sanctioning bodies would have a problem with it. It's very much on the to-do list, and as we all know, our cars are never finished.
Re: Eggenberger Group A E28 Tribute Build Thread
I just read about your Tarox big brakes.
http://www.stanceworks.com/2017/07/taro ... t-install/
They look awesome! I'm looking them up now. Of the upgrade options, they look to be a cut above most - performant and aesthetic.
http://www.stanceworks.com/2017/07/taro ... t-install/
They look awesome! I'm looking them up now. Of the upgrade options, they look to be a cut above most - performant and aesthetic.