M5 oil leak---FOUND
M5 oil leak---FOUND
First I did a search and didn't find anything specific to my problem after reading 9 pages of text. I'll begin with -this E28 M5 has 226k miles and compression of 170-170-165-155-170-170. Recent oil consumption has been about 1/2 quart in 2500 miles on 15w 50 M1. Also all fluids have been changed using Redline, BMW Coolant plus a dealer valve adj. I went for a 15 mile drive today (28F) and through the rear view mirror saw smoke. Temp was reading perfect and no noises. I noticed a small amount of oil on the frame rail, the first exhaust header and on a round item below the hose that connects to the cooling rail on the head. There are no issues with idling or general performance. I'm new to this site and M5s but owned an '86 535i from 1995 thru 2003 performing all the maintenance and repairs using Bentleys. Any suggestions about the leak or is it time for a new head gasket? Thanks.
Last edited by johne on Jan 11, 2010 8:44 PM, edited 1 time in total.
-
Rich Euro M5
- Posts: 6098
- Joined: Mar 10, 2006 6:20 AM
- Location: Klein, Texas
That little round thing under the coolant pipe on the right front of the engine is an accumulator for the timing chain tensioner. They have a couple cooper gaskets and are known for leaking.
FWIW: 1/2 quart of oil consumption in 2500 miles is well within what BMW considers normal oil consumption.
The smoke you saw might be nothing more than moisture in the crankcase and exhaust system being converted to steam. Did you notice this right after start up on a cold morning ?
Rich
FWIW: 1/2 quart of oil consumption in 2500 miles is well within what BMW considers normal oil consumption.
The smoke you saw might be nothing more than moisture in the crankcase and exhaust system being converted to steam. Did you notice this right after start up on a cold morning ?
Rich
M5 Oil Leak
It started fine with no issues and very little water vapor. I went about 6 miles and stopped at a store. An hour later I merged on to 95 I noticed it thinking it was salt, cinders, and dust left over from our recent snow. The smoke and smell increased as I approached 80 and then exited to go home. At 30 to 40 I couldn't see anything. I opened the hood and that's when I noticed the frame rail, the first exhaust header and the small mess beneath the hose described earlier. I think its the oil burning off of the manifold. What's involved to replace the gaskets??
M5 oil leak
Thanks I'll look into that. I won't be doing anything till Friday. I have meetings in NYC the next 2 days. Are there any manuals/written instructions/ or pictures of this motor? Realoem is helpful but you cant see much with all of the hoses in the way.
M5 oil Leak
Using M 1 15W-50. This oil leak started yeasterday- meaning pushing enough oil out sending it to the first exhaust header causing the "smoke" I mentioned above. Is there a written procedure/internet description for putting in new seals in the tensioner??
Thanks
Thanks
M5 oil leak
Thanks-- I looked at the leak again and the oil is only on #1 header. The oil accumulator on the tensioner is wet with oil. I snugged the valve cover nuts. I set my torque wrench to 90 inch lbs but stopped short of that setting not wanting to ruin anything further. First warmer day I'll pull the vc and check the tray. What is the torque setting for the vc nuts and tray bolts?
Thanks.
Thanks.
Korman said 84 inch lbs for the valve cover nuts. I tighened them and sprayed off the tensioner/accumulator with brake clean. I went for a drive and within 3 miles she was smoking.
I checked the tensioner/accumulator with the engine running and it was dripping oil. Questions -based on Realoem I don't see a part that looks like the accumulator however I do see the tensioner. What parts are needed to repair this. Also I assuming the d-cap needs to be removed for access. Does the the water manifold need to be removed also? Does someone have an efficient method of R & R this problem?
Any info/suggestions are appreciated. Thanks
-
Rich Euro M5
- Posts: 6098
- Joined: Mar 10, 2006 6:20 AM
- Location: Klein, Texas
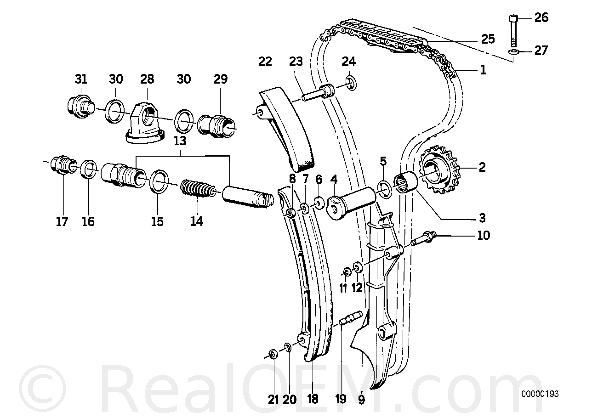
Item 28 in the image below is the accumulator, in BMW speak it's called a diaphram. The copper crush washers are item #30.johne wrote:Korman said 84 inch lbs for the valve cover nuts. I tighened them and sprayed off the tensioner/accumulator with brake clean. I went for a drive and within 3 miles she was smoking.
I checked the tensioner/accumulator with the engine running and it was dripping oil. Questions -based on Realoem I don't see a part that looks like the accumulator however I do see the tensioner. What parts are needed to repair this. Also I assuming the d-cap needs to be removed for access. Does the the water manifold need to be removed also? Does someone have an efficient method of R & R this problem?
Any info/suggestions are appreciated. Thanks
Rich

Thank you very much. Can this part be removed without taking off any other parts such as the water manifold or is it better to do that for ease of removal and assembly?? I would assume this screws into the block with just enough torque to set the seal rings. Are there any related adjustments etc.? Other suggestions?
-
Rich Euro M5
- Posts: 6098
- Joined: Mar 10, 2006 6:20 AM
- Location: Klein, Texas
johne wrote:Thank you very much. Can this part be removed without taking off any other parts such as the water manifold or is it better to do that for ease of removal and assembly?? I would assume this screws into the block with just enough torque to set the seal rings. Are there any related adjustments etc.? Other suggestions?
I looked up the tensioner service procedure and the accumulator can be removed from the tensioner assembly. The tightening torque for the plug which holds on the accumulator is 18 +/- 2 lb.ft.Rich Euro M5 wrote:I don't recall if the tensioner come apart or if the accumulator will come off leaving the spring and piston insitu. There is a torque spec, but I don't know what it is (I'm at work).
Rich
HTH
Rich
It's a very simple job and nothing else needed to be removed. I pulled mine some time ago to inspect the passage and piston for sludge or accumulation that might make it stick. (none btw) Where you need to be careful is that you get the piston keyed into the guide rail before installing it the rest of the way. Might take a slight twisting to feel it drop in.
OK - I haven't been underneath yet. Based on what Rich said above, can the diaphram be removed leaving the tensioner and its assembly attached to the motor? If so, then you are saying that the tensioner itself will become dislodged and must be reset just before tightening the the diaphram to it.
Is this correct??
Thanks for your help.
Is this correct??
Thanks for your help.
That's why I passed you in the roundabout. ROFLderrith wrote:My M5 did this when I got it, as anyone who had to drive behind me at 5erfest 2008 remembers. My problem happened to be the allen bolts that hold the cam tray to the head had loosened, allowing oil to escape and then dump onto the exhaust headers.
thread fork -- a few years ago, using a hand allen key, i over-torqued one of those two bolts and created a hairline crack in the cam tray [or might have been on the head side.. i don't remember].derrith wrote:My M5 did this when I got it, as anyone who had to drive behind me at 5erfest 2008 remembers. My problem happened to be the allen bolts that hold the cam tray to the head had loosened, allowing oil to escape and then dump onto the exhaust headers.
I smeared JB weld over it and that lasted for a while. But now I'm leaking pretty good again.
What sort of repair procedure can be done on the head/cam tray to eliminate the hair-line cracking? Would brazing be low-heat enough to not require shaving the head or other crazy machining work?
-
Rich Euro M5
- Posts: 6098
- Joined: Mar 10, 2006 6:20 AM
- Location: Klein, Texas
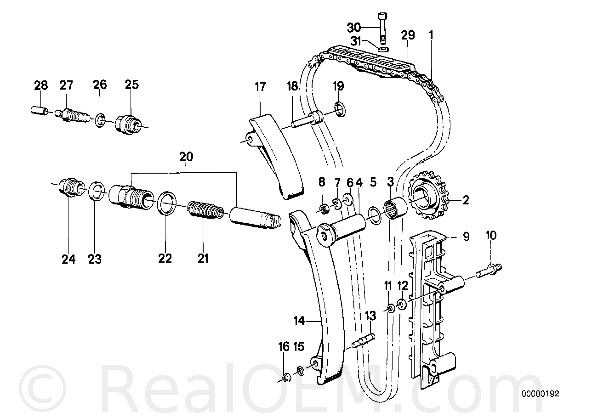
The diaphram can be removed leaving the tensioner in place. Originally the M88/3 engines did not have the diaphram, it was added as part of a BMW campaign which included replacement of the single valve springs with dual valve springs. That's one reason the illustration is confusing. I don't believe you'll find item #17, if it's missing, it was replaced by item #29 as part of the campaign.johne wrote:OK - I haven't been underneath yet. Based on what Rich said above, can the diaphram be removed leaving the tensioner and its assembly attached to the motor? If so, then you are saying that the tensioner itself will become dislodged and must be reset just before tightening the the diaphram to it.
Is this correct??
Thanks for your help.
The diaphram (#28) slips over #29, and is held in place by #31. I don't recall if the spring is held in place by #31 or if it's held captive by #29. Regardless, be careful when you remove #31, the spring may fly out.
If you don't disturb the piston (#14) you shouldn't have to worry about notch engaging into the tensioner rail.
Rich
-
JW in VaBeach
- Posts: 670
- Joined: Aug 23, 2008 9:42 AM
- Location: Virginia Beach Va.
post topic
If you're gonna remove it, install a new S50 tensioner. My .02
Here's a little ditty I found awhile ago. I will be going with this tensioner when I get around to it.
http://www.e30m3project.com/e30m3perfor ... /index.htm
Great site BTW, just look around.
http://www.e30m3project.com/e30m3perfor ... /index.htm
Great site BTW, just look around.
I replaced parts 13, 14, 15, 16, 28, and 30. The tensioner was loose where it attaches to the head causing the leak. Given the amount of gunk it had been seeping for some time. Once I figured out how to position my self under the car I was able to put it in the new assembly without too much trouble. I used "stock" parts since in a previous "tensioner" thread there was not universal agreement about the effectiveness of the S50/52 tensioner. The OEM spring was slightly longer than the one I removed. Thanks to everyone for their input and suggestions. John
-
scottiesharpe
- Posts: 187
- Joined: Feb 12, 2006 12:00 PM
- Location: San Jose CA
- Contact:


