What did you do to your E28 today?

General conversations about BMW E28s and the people who own them.
C.R. Krieger
Posts: 14507
Joined: Feb 12, 2006 12:00 PM
Location: Halfway up the left side of Lake Michigan
Contact:

Post by C.R. Krieger »

A quick one:

Pulled the left front seat belt assembly from the Lachs Beast yesterday preparing to do this today.

The Kelvinator had no belt latch button to keep the latch from falling to the floor - where it's a PITA to pick it up every time. I figured I'd swap the belts.

Well, today as I was picking up some other stuff, the rubber seal for the front door parted company with the welting around the door and I discovered it's not a press fit; it came unglued. So I once again poached a good rubber part off the Lachs Beast to replace a bad one on the Kelvinator. In the process, I unscrewed the B pillar cover to get the welting off - and to replace the belt. Had the Lachs parts been good, I might have swapped the whole thing as a clumsy, but complete, assembly, but the latch had been slammed in the door breaking the edge of the trim panel in the parts car, so I slid all the parts out of it. They do fit through the hole. ;)

As always, though, the 'butcher' had broken something inconvenient. The plastic slot cover where the belt emerges from the pillar trim cover had holes busted because someone doesn't know how to tighten screws properly. This meant that the belt had to come off the retractor reel. If you've ever changed the tape in a measure, you know how this goes. You have to unreel it all the way and then DON'T LET GO or it'll unwind the spring and then, good luck getting back the proper number of turns. When I got the belt all the way off the reel, it looked to be simply inserted through it. So I gathered a little slack and pushed it further through the slot. Lo and behold, an elegantly simple thing: a short plastic lug is inserted through a sewn loop at the end of the belt. Push the lug out and the belt can be withdrawn through the slot. [Right here, you'll notice a plastic sliding slot thing that's part of the retractor assembly. It comes out by lifting in the center so it comes out from under the slots on the sides. Since the sewn end won't fit through it, it stays with the belt.] Once that's out, you will want to stick a screwdriver into the slot so it doesn't reel up. I did the same thing to the other belt and then assembled the good cover onto the belt with the good latch button and put everything back through the good pillar trim cover. So now, when I reach for the belt latch, it'll be where I expect it to be. :cool:
cddallara
Posts: 3513
Joined: Apr 03, 2010 8:45 AM
Location: Lagunitas, Ca

Post by cddallara »

I started the 533. After a monthanahalf of sitting, collecting mucho dust as we are working in the front yard, it fired right up. Okay, well, it cranked for about 5 seconds, but then, vroom. Idled it down my road, parked it at the neighbors so we could get the tractor where the car was to finish a retaining wall.

The euro gets driven on short errands in town every coupla days.
107octane
Posts: 9
Joined: Jun 27, 2010 4:06 PM
Location: SE PDX

Post by 107octane »

cleaned off the overspray on the windows that the db before me left when he did a drippy job of painting the trim!
disco stu
Posts: 1897
Joined: Mar 27, 2007 8:05 AM
Location: Bham, Alabama

Post by disco stu »

missed it :(
TerryIS
Posts: 12
Joined: Sep 05, 2010 12:43 PM
Location: NORCAL

Post by TerryIS »

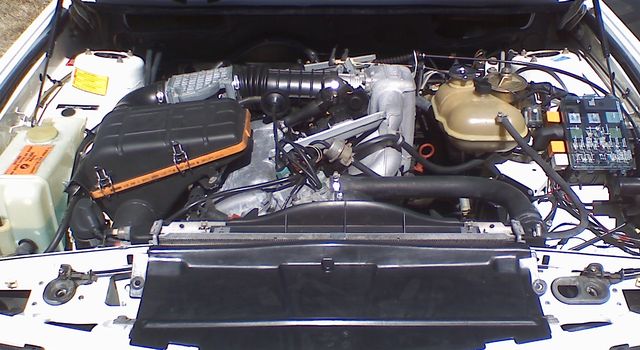
cleaned my engine bay
Image
davintosh
Posts: 13948
Joined: Jan 28, 2009 1:05 AM
Location: Sioux Falls, SD
Contact:

Post by davintosh »

Finished cleaning up the trans prepping to put it back together, then used some of the brake cleaner that dripped off it into a bucket as an accelerant for our firepit in the back yard. Made a heck of an impression on the 11 year old... "And that, son, is why you don't play with matches around flammable liquids." He was duly impressed. :shock:

Also cleaned up some miscellaneous parts that are going back on the 528; trans mounts & brace, frame brace, exhaust bracket, etc... Nice & clean now & ready for some black paint before reassembly.

Soon.
Sparkeysf
Posts: 171
Joined: Feb 09, 2010 4:11 PM
Location: San Francisco, CA

Post by Sparkeysf »

Replaced all the old crappy plastic fuses with new ceramic ones.

Painted the front grills with SEM trim paint, and replaced the kidney with a brand new one :) Now, the grill looks out of place when compared to the rest of the trim. Looks like I'll eventually be renewing it all ;)
C.R. Krieger
Posts: 14507
Joined: Feb 12, 2006 12:00 PM
Location: Halfway up the left side of Lake Michigan
Contact:

Post by C.R. Krieger »

Not today; Saturday-Sunday.

I stripped the crappy tint from all the side windows last year. Finally decided to face the PITA job of getting it off the defroster grid and out of the back. Holy hell. What a pain. I used liberal applications of a Windex equivalent and got a start with a razor knife blade, but it wasn't coming off in the big patches that it had on the side windows. Turns out that the adhesive seems to have a special attachment to the defroster grid lines. Seriously. It would loosen everywhere else but there. So I finally resorted to slicing it on long diagonals between the lines and soaking it with the cleaner. I finally gave out around 10:00 Saturday and let it soak overnight. That helped a lot, but the lines still tenaciously clung to the stuff. Another hour or so of scraping with fingernails and it was nearly gone. The last little bit was under the third brake light. I pulled it off and the tint was gone. I love the look.
TSMacNeil
Posts: 7014
Joined: Jan 22, 2009 5:37 PM
Location: Phoenix, Arizona

Post by TSMacNeil »

Shit. I have been thinking of projects I'd tackle while I can't fly for awhile...this WAS on the list....

Not sure I'm in the mood if it's dug in like a Texas tick.
C.R. Krieger
Posts: 14507
Joined: Feb 12, 2006 12:00 PM
Location: Halfway up the left side of Lake Michigan
Contact:

Post by C.R. Krieger »

V1cut wrote:Shit. I have been thinking of projects I'd tackle while I can't fly for awhile...this WAS on the list....

Not sure I'm in the mood if it's dug in like a Texas tick.
Do the soak thing for at least a full day and it should go a lot better. I got cuts within an inch or two of one another from top to bottom except below the grid. Enough of the stuff runs down to soak under it.
TSMacNeil
Posts: 7014
Joined: Jan 22, 2009 5:37 PM
Location: Phoenix, Arizona

Post by TSMacNeil »

Will do....thanks man.
John in VA
Posts: 5297
Joined: Feb 12, 2006 12:00 PM
Location: Leesburg, VA

Post by John in VA »

C.R. Krieger wrote:...I stripped the crappy tint from all the side windows last year...
http://www.tintdude.com/remove.html
Patrick McHugh
Posts: 4163
Joined: Feb 12, 2006 12:00 PM
Location: Richmond, VA

Post by Patrick McHugh »

Just bought $400 worth of steering gear and control arms, the PO decided ebay would be a great place to buy this stuff. Lemforder and TRW only folks. Come on!
1st 5er
Posts: 21865
Joined: Jun 13, 2008 12:15 AM
Location: Cypress
Contact:

Post by 1st 5er »

swatterssr wrote:E12 content:

Removed everything necessary, and then dropped the 4 speed box.
Tomorrow, in goes the 5 speed.
Last Monday it rained like heck here.
Good thing, I needed a new flex disc anyway.
Sourced one, and after a few more days of rain,
then high heat and humidity,
I finally got the G265/6 5 speed stabbed in and buttoned up in time for BimmerBoost's Sept-11th-Houston-Meet
Image
GregB
Posts: 422
Joined: Feb 12, 2006 12:00 PM
Location: Marietta,GA & Beaufort,SC

Post by GregB »

fired it up for the first time in over 2 years
Justin_FL
MyE28 IT Guru
MyE28 IT Guru
Posts: 2837
Joined: Feb 12, 2006 12:00 PM
Location: Palm Beach
Contact:

Post by Justin_FL »

C.R. Krieger wrote:I stripped the crappy tint from all the side windows last year. Finally decided to face the PITA job of getting it off the defroster grid and out of the back. Holy hell. What a pain. I used liberal applications of a Windex equivalent and got a start with a razor knife blade, but it wasn't coming off in the big patches that it had on the side windows. Turns out that the adhesive seems to have a special attachment to the defroster grid lines. Seriously. It would loosen everywhere else but there. So I finally resorted to slicing it on long diagonals between the lines and soaking it with the cleaner. I finally gave out around 10:00 Saturday and let it soak overnight. That helped a lot, but the lines still tenaciously clung to the stuff. Another hour or so of scraping with fingernails and it was nearly gone. The last little bit was under the third brake light. I pulled it off and the tint was gone. I love the look.
I used a steam cleaner to remove the tinting from the rear window on my 535is last winter (wouldn't want to work that way this time of year down here). Worked great, as it removed both layers of tint at the same time using the heat + pressure to peel the material off in one piece. Afterward, I just washed the glass down using Windex with ammonia to get the glue residue off (have gallons of it from the old people that were the previous owners of the house). It was slow progress with the steamer but a piece of cake with no scraping.
C.R. Krieger
Posts: 14507
Joined: Feb 12, 2006 12:00 PM
Location: Halfway up the left side of Lake Michigan
Contact:

Post by C.R. Krieger »

Justin_FL wrote:
C.R. Krieger wrote:I stripped the crappy tint from all the side windows last year. Finally decided to face the PITA job of getting it off the defroster grid and out of the back. Holy hell. What a pain. I used liberal applications of a Windex equivalent and got a start with a razor knife blade, but it wasn't coming off in the big patches that it had on the side windows. Turns out that the adhesive seems to have a special attachment to the defroster grid lines. Seriously. It would loosen everywhere else but there. So I finally resorted to slicing it on long diagonals between the lines and soaking it with the cleaner. I finally gave out around 10:00 Saturday and let it soak overnight. That helped a lot, but the lines still tenaciously clung to the stuff. Another hour or so of scraping with fingernails and it was nearly gone. The last little bit was under the third brake light. I pulled it off and the tint was gone. I love the look.
I used a steam cleaner to remove the tinting from the rear window on my 535is last winter (wouldn't want to work that way this time of year down here). Worked great, as it removed both layers of tint at the same time using the heat + pressure to peel the material off in one piece. Afterward, I just washed the glass down using Windex with ammonia to get the glue residue off (have gallons of it from the old people that were the previous owners of the house). It was slow progress with the steamer but a piece of cake with no scraping.
I don't think I'd risk steam on a window. Seems like it would be very likely to crack. I did not have to resort to straight ammonia (which I hate from working with concentrated stuff 30-odd years ago) for any of these strippings. Maybe mine was one layer because I never saw a second layer separated anywhere. From working on the side windows, I knew the adhesive would dissolve pretty well in the cleaner. Contrasting to the linked procedure with the trash bag to hold in the moisture, my multiple slits were calculated to achieve the same effect. Once the liquid finds a slit, it softens the adhesive and the film raises slightly, letting in more liquid - and the effect amplifies. Once there's liquid under the film, it won't dry out unless you hit it with sun or heat, so I left it over a cool night to soak in. From many years working on plastic models and such, I have a pretty deft touch in working around defroster lines with a blade. I actually managed to use them as index lines, putting slits just above them in the hope that the liquid would free them better.

Today, applying more of this cleaner liquid technology, I reapplied some of the vinyl cling window stickers I had on the car. With these, pliability is key, so, if yours are kind of old, just run them under hot water for a minute or two. That cleans and softens them up nicely. Then, spray some cleaner on the surface to be applied to the window. This allows you to squeegee out the bubbles and to move it around before letting it dry in place.
foamy
Posts: 1527
Joined: May 29, 2007 6:39 PM
Location: North Branford Connecticut

Post by foamy »

regreased the window tracks. windows now go up and down smothly.
CJ_LBC
Posts: 53
Joined: Sep 10, 2010 1:08 AM
Location: Long Beach, CA

Post by CJ_LBC »

changed out o-rings on injectors, adjusted valve lash, changed plugs, changed out several large rubber intake parts - still has a noisy idle with a serious miss that goes away on throttle :cry:
belch9
Posts: 32
Joined: Apr 06, 2010 6:09 PM
Location: Harrisburg PA

Post by belch9 »

Installed a new (used) blower motor. Now I will have some heat blowing for the cold months.

Thinking about changing the coolant in a couple of weeks.
a
Posts: 12473
Joined: Feb 12, 2006 12:00 PM
Location: Marshfield ,MA

Post by a »

Last weekend, I checked Marina's super e out for its over due safety only inspection. ( it is soooo nice not to have to muck around with emissions any more!) The parking brake was MIA. I tightened up the cables and it still wouldnt hold. Off with the rotors, revealing , just as I had feared, no lining left on the shoes. The rotors were shot too, I had a better set and some good shoes. I put the brakes back together after I cleaned up and greased the hardware and pivot points. I adjusted the brake per Bentley and BB Shiftless passed inspection without issue on Monday.
ChefShawn
Posts: 2653
Joined: Feb 12, 2006 12:00 PM
Location: 94952 Petaluma CA.

Post by ChefShawn »

water pump, new belts, removed stupid AC belt since i dont use it.
cddallara
Posts: 3513
Joined: Apr 03, 2010 8:45 AM
Location: Lagunitas, Ca

Post by cddallara »

Guess I better load it up for tomorrow!

If all goes well, a new radiator will be installed.

Still not getting a bath yet, though!
1st 5er
Posts: 21865
Joined: Jun 13, 2008 12:15 AM
Location: Cypress
Contact:

Post by 1st 5er »

Parked it, the 85 eta, I think the head gasket finally gave up the ghost.

My wife is certainly happy I got the a/c fixed, new evaporator core, in the T.
C.R. Krieger
Posts: 14507
Joined: Feb 12, 2006 12:00 PM
Location: Halfway up the left side of Lake Michigan
Contact:

Post by C.R. Krieger »

Well, Thursday night, I slapped in a set of Pagid pads in the rear. I surprised the heck out of myself. I didn't remember I could change pads that fast. Maybe 20 minutes.

Friday, I popped off the inner door liner on the left rear where the latch rod was loose and making noise. I vaguely remembered the Bentley saying something about sliding the latch assembly forward to put it under tension and realized I hadn't done that. So, I eradicated one more rattle.

Today, I puttered with a handful of 'quality of life' issues. First, I pulled off my O'Fest window numbers. Finally. Even cleaned off the old residue from the '08 stickers with a razor knife I'd purposely left on the package shelf after the window tint removal.

After that, I suspected that subtle bump in the front was a loose strut nut - and it was. Unfortunately, I remembered to put the boot on, so I had to find the indents by feel and then used a big screwdriver and hammer to drive it about a half turn tighter. Still can't see it, but now I can't hear it, either.

Next, it was dropping the airdam far enough to pull the remaining fog lamp bucket since the black tape I had holding the wires in it was coming loose. So a bit of cussing later, I had a matching big hole where that light once lived. French lamps next year - maybe.

Then I popped the hood to look things over. First, I found my battery caps off. Apparently, they'd pulled them during my work last month and left them off. Luckily, one had fallen down beside the battery and the other was lying on top upside down. As well, they'd left off the hold down which, on this car, actually works. It, too, was lying beside the battery in the tray and screwed in nicely.

Up on top, I found my cruise control grommet crumbling and the cable slipping out of the bracket. I didn't have a spare grommet, but I noticed the bracket was bent toward the throttle. Bending it back tensioned the cable enough that I didn't need to mess with it. Response is a little quicker since it doesn't have to take up the slack.

I noticed that I have another better window seal on the Lachs Beast to swap over when I get inspired.

Over on the other side of the engine, I reconnected my washer level sensor wires so that damned light on the check panel is out without me pushing the button every time. Finally, after moving some of the coil wires below the air intake tube (from above them), I noticed this connector - and I have no idea what the hell it is ...

Image

Image
DURPILOT
Posts: 530
Joined: Nov 05, 2009 10:29 AM
Location: Jacksonville, FL

Post by DURPILOT »

Replaced my ECU that took me about 5 months to find......yes 5 months, very-very hard ECU to find. Australia was the continent with the 0261200011 treasure. Looks and works perfect for a fraction of the cost of new one. I could have gotten a new one from Bosch for 2900.00....glad I waited. :D
edlocke
Posts: 1335
Joined: Jul 06, 2006 3:36 PM
Location: Portland Or.
Contact:

M5

Post by edlocke »

Drove the 535i to Church. The ol'e story...."he just drove on it Sundays"
:laugh:
cddallara
Posts: 3513
Joined: Apr 03, 2010 8:45 AM
Location: Lagunitas, Ca

Post by cddallara »

cddallara wrote:Guess I better load it up for tomorrow!

If all goes well, a new radiator will be installed.

Still not getting a bath yet, though!
Thanks to some very helpful people at the Norcal wf, the radiator got installed in what was (to me) nascar time. The ol beast kept cool all the way home, and I scored points for making it home on time. Thanks Guys!!

Now, who wants to change my fan clutch? :D
1st 5er
Posts: 21865
Joined: Jun 13, 2008 12:15 AM
Location: Cypress
Contact:

Post by 1st 5er »

Sparkeysf
Posts: 171
Joined: Feb 09, 2010 4:11 PM
Location: San Francisco, CA

Post by Sparkeysf »

Replaced water pump, thermostat, fan clutch, radiator hoses, heater hoses, & heater control valve. Unfortunately, I didn't finish-up in time to make it to the Norcal WF.
Post Reply