Getting my car painted. 10-22-10 update: DONE!!!!

Post your photos and videos here!
stuartinmn
Posts: 9462
Joined: Feb 12, 2006 12:00 PM
Location: Minneapolis

Post by stuartinmn »

Here's a bunch more photos of the progress.

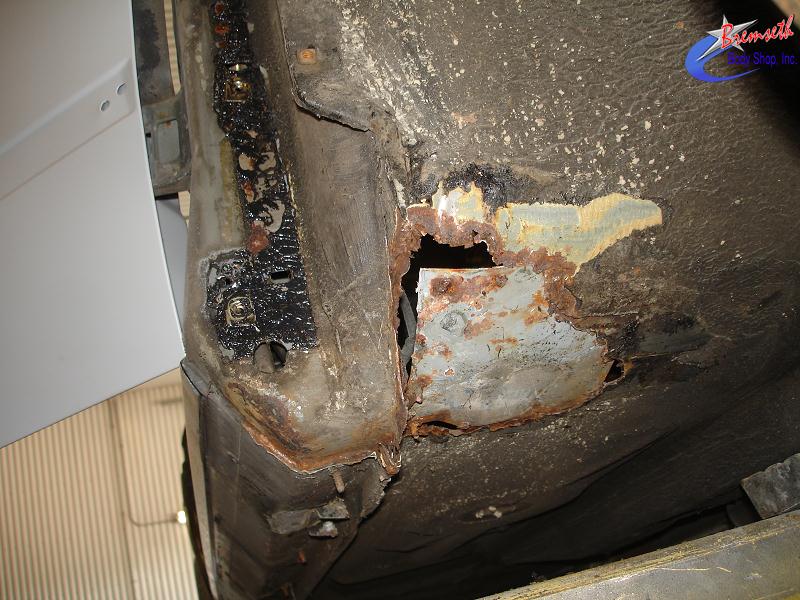
Funky hole in the passenger floor. This had been patched sometime before I owned the car, with a piece of tin, some Great Stuff foam and undercoating. All cut out and replaced with new metal.
Image

Image

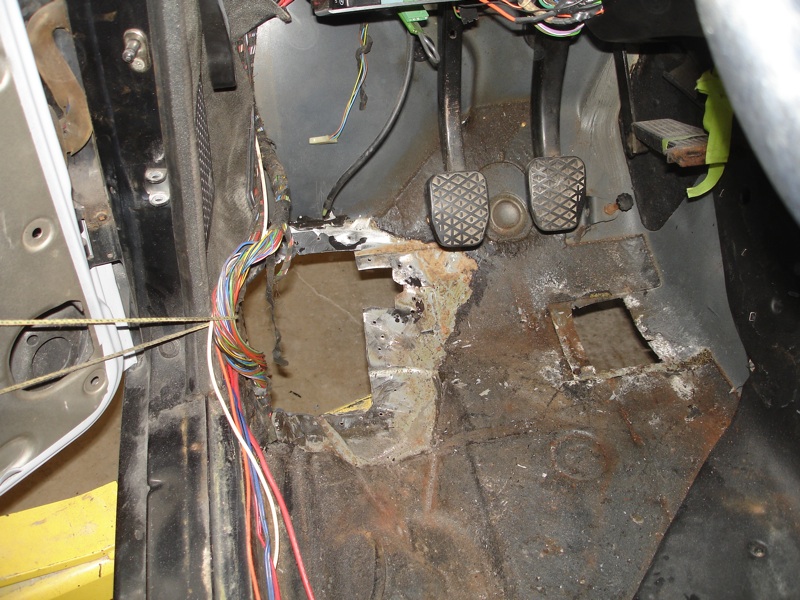
Heinous holes in the driver's floor. I didn't know about the one under the gas pedal until the other day; it was invisible from underneath but when they pulled out the carpet there was no metal left there, just the undercoat. :) The gas pedal bracket was totally gone so they fabricated a new one to weld in.

I had had the hole on the outside edge patched a couple years ago, and I thought the shop that did that work were competent but it ended up being just held in place with a bunch of screws and then covered up with undercoat.

They're working on filling these with new metal now, they're mostly done but haven't sent photos yet.
Image

The right front fender initially looked good, but they found the bottom edge behind the wheel was pretty rotted. This could have been fixed, but it ended up being just as cheap to buy a whole new fender.

Image

New fender goodness. :banana:

Image

There was a bunch of other little rust spots that have been patched in, around door seams, in the rocker panels, the doglegs behind the passenger doors, around the taillights, some bubbles around the rear window. They've been fixed with new metal.

Finally, they're about done with the repair work and the fun stuff starts: In these photos there's several coats of wash primer (an acid etch that bites into metal for good adhesion between the metal and the epoxy sealer), 2 lights coats of epoxy sealer, and several coats of sanding primer.

Image

Image

Image

Image

Image
Adam W in MN
Posts: 5052
Joined: Feb 12, 2006 12:00 PM
Location: Don't waste my motherf***in' time!
Contact:

Post by Adam W in MN »

Love it Stuart! Thanks for sharing.
alijonny
Posts: 5612
Joined: Apr 09, 2008 5:05 PM
Location: Chicago, IL

Post by alijonny »

HQ my friend. great for motivation!
Last edited by alijonny on Jul 17, 2010 3:25 AM, edited 1 time in total.
PROJECT. E28
Posts: 1323
Joined: Feb 12, 2006 12:00 PM

Post by PROJECT. E28 »

did you leave the gutter trim on?? i cant really tell but it looks like it
wkohler
Posts: 50924
Joined: Oct 05, 2006 11:04 PM
Location: Phönix, Arizona, USA
Contact:

Post by wkohler »

I like the progress. Someday soon, I'll be doing this with my M535i, though it won't be sitting on it's wheels. ;)
stuartinmn
Posts: 9462
Joined: Feb 12, 2006 12:00 PM
Location: Minneapolis

Post by stuartinmn »

PROJECT. E28 wrote:did you leave the gutter trim on?? i cant really tell but it looks like it
They're probably going to stay on the car. I tried to buy new ones but they're NLA, and trying to remove them and put them back on without damaging them is pretty hard. The shop reckoned they could mask them off and still get a decent paint job.
Bill in MN
Posts: 1718
Joined: Feb 12, 2006 12:00 PM
Location: The Boonies, Mn
Contact:

Post by Bill in MN »

Stuart

Are you going to replace the jacking points? I had to do the same repair job you are doing and didn't mess with them

Looking nice :banana:
Adam W in MN
Posts: 5052
Joined: Feb 12, 2006 12:00 PM
Location: Don't waste my motherf***in' time!
Contact:

Post by Adam W in MN »

alijonny wrote:
HQ my friend. great for motivation!
Please don't quote all the pictures in his post. :roll:

Hey Stuart, thought of one more thing. Are you sure you want them doing all the work with your nice wheels on there? I have some E28 bottlecaps you can borrow with shit tires so if they get overspray or ding them, you won't care. Let me know.
stuartinmn
Posts: 9462
Joined: Feb 12, 2006 12:00 PM
Location: Minneapolis

Post by stuartinmn »

I told them to leave the jacking points off, as far as I'm concerned all they do is provide a place for dirt and mud to collect. I don't use them for lifting the car anyway.

After I dropped off the car it occured to me I should swapped on my set of TRX's, but I'm not worried about the wheels - they're doing a good job of masking things off when painting. They'll need a good clean when it's all done, but that's no big deal.
legolas120
Posts: 378
Joined: Jul 14, 2006 3:04 PM
Location: Waikoloa, HI

Post by legolas120 »

Car is looking great Stuart! I always loved your ride. Glad I took a couple shots of those wheels when we were up that year. I love those wheels!

Good luck with the rest of the project. :alright:
stuartinmn
Posts: 9462
Joined: Feb 12, 2006 12:00 PM
Location: Minneapolis

Post by stuartinmn »

I stopped down to the body shop today, the body work is done and the car is in primer. :banana: They're going to let it sit out in the sun for another week or two, to make sure the primer is fully cured, then it will go through a couple rounds of block sanding before the color starts going back on.

Image

Image

This is interesting...when this car was Federalized back in 1986, here's how they reinforced the bumpers:

Image

These are two great big pieces of strap iron, bent and welded to roughly follow the shape of the bumpers. They weigh a ton, and look like something off a piece of farm equipment.

They were installed in place of the normal rubber trim on euro bumpers, with the Mtech bumper covers over the top. They're not going back on the car. :)
stuartinmn
Posts: 9462
Joined: Feb 12, 2006 12:00 PM
Location: Minneapolis

Post by stuartinmn »

Here's a series of photos showing the rust in the lower left corner of the rear window channel, and how it was repaired. The interesting thing here is that before the paint was stripped off, all that was visible was one small bubble that was maybe 3/16" in diameter. It turned out to be a little bigger than that...

Image

Image

Image

Image

Image

There were similar rust spots by the left taillight, as well as in the trunk lip. Both those spots were repaired in a similar manner.
cddallara
Posts: 3513
Joined: Apr 03, 2010 8:45 AM
Location: Lagunitas, Ca

Post by cddallara »

That is similar to my 533's back window, but my car is so shot, it just got a gob of silicone :rofl: Neat to see how it's actually repaired though!
5280 JB
Posts: 733
Joined: Apr 15, 2008 10:39 PM
Location: 5280' altitude: Denver, CO

Post by 5280 JB »

You are wise to rid your car of those hideous pieces of iron installed inside the bumper covers during federalization. Its amazing how different the various shops performed that "strengthening" process.

I discovered mine on the inside of the rear bumper cover recently when I had it off for paint - it also weighed a ton.

Thanks for the updates on your car's progress. It's going to look great!

Jim
alijonny
Posts: 5612
Joined: Apr 09, 2008 5:05 PM
Location: Chicago, IL

Post by alijonny »

Adam W in MN wrote:
alijonny wrote:
HQ my friend. great for motivation!
Please don't quote all the pictures in his post. :roll:

Hey Stuart, thought of one more thing. Are you sure you want them doing all the work with your nice wheels on there? I have some E28 bottlecaps you can borrow with shit tires so if they get overspray or ding them, you won't care. Let me know.
fixed
lol, sorry. I was extremely excited to see all this rust work being done, I didn't realize there were so many pictures joining the quote...
It won't happen again :lol:
Adam W in MN
Posts: 5052
Joined: Feb 12, 2006 12:00 PM
Location: Don't waste my motherf***in' time!
Contact:

Post by Adam W in MN »

alijonny wrote: fixed
lol, sorry. I was extremely excited to see all this rust work being done, I didn't realize there were so many pictures joining the quote...
It won't happen again :lol:
thanks! This thread is full of win.
stuartinmn
Posts: 9462
Joined: Feb 12, 2006 12:00 PM
Location: Minneapolis

Post by stuartinmn »

5280 JB wrote:Its amazing how different the various shops performed that "strengthening" process.

Jim
I've examined a number of euro cars over the years, and wondered about the same thing. You'd think they would have come up with a standardized process.

In most respects I think this particular car was less buggered than others I've seen - for instance, somehow they got away with not putting big ugly trailer lights on the fenders to meet US spec for side marker illumination.
5280 JB
Posts: 733
Joined: Apr 15, 2008 10:39 PM
Location: 5280' altitude: Denver, CO

Post by 5280 JB »

Regarding the different methods used to federalize the grey market cars in the 80's, I just saw another local M535i Thursday night and its charcoal air canister (under the hood) is a completely unit than what I've seen. A long, rectangular black box that was used on Mercedes cars! Mine's about the size and shape of a classic oil filter.

Musta' been nice to run one of the shops. "Hmmm, it says here we need to install side marker lights. Hey Bob - go pull those ones off that there Toyota and fix 'er up."

:)
stuartinmn
Posts: 9462
Joined: Feb 12, 2006 12:00 PM
Location: Minneapolis

Post by stuartinmn »

5280 JB wrote:I just saw another local M535i Thursday night and its charcoal air canister (under the hood) is a completely unit than what I've seen. A long, rectangular black box that was used on Mercedes cars! Mine's about the size and shape of a classic oil filter.
The charcoal canister on my car is a big round AC Delco thing, about the size of a 2lb. coffee can. It really gets in the way.
stuartinmn
Posts: 9462
Joined: Feb 12, 2006 12:00 PM
Location: Minneapolis

Post by stuartinmn »

Getting closer...the block sanding is done, and the final primer coat went on today. Another week for the primer to cure, and then it's time to start squirting on some color. :banana:

Image

Image

Image

Image
JoshInAtlanta
Posts: 4434
Joined: Apr 22, 2006 11:35 PM
Location: Holly Springs, GA

Post by JoshInAtlanta »

Nice!
5280 JB
Posts: 733
Joined: Apr 15, 2008 10:39 PM
Location: 5280' altitude: Denver, CO

Post by 5280 JB »

Oh ya baby! :banana:
FABEL
Posts: 146
Joined: Jun 10, 2010 4:07 PM

Post by FABEL »

wow!

I've been glued to every photo!

& INTENTLY read every word all of you wrote.

seems so intense.

seems so awesome.

seems so admirable to follow through with.

seems like dedication!

seems so right!
Slaytanic-666
Posts: 861
Joined: Oct 05, 2008 1:42 AM
Location: Van Isle, BC, Canada

Post by Slaytanic-666 »

SO WICKED!! I'm loving the progression, what a great shop they really look like the love their job! That is a bonus! :banana:
wkohler
Posts: 50924
Joined: Oct 05, 2006 11:04 PM
Location: Phönix, Arizona, USA
Contact:

Post by wkohler »

Stuart, it's great to see. Worth the wait.
Post Reply