And so it starts, Maeve
Re: And so it starts
Thanks for the suggestions.
The great thing about forums like this one is that pretty much whatever you run into with your own car, someone somewhere has had the same issue and solved the problem.
The great thing about forums like this one is that pretty much whatever you run into with your own car, someone somewhere has had the same issue and solved the problem.
Re: And so it starts
This is what happened to my paint some years ears back when my father had the car "buffed" multiple times in a short time span.garageboy wrote: Dec 19, 2021 7:17 PM
Personally, before I attempted something like that, because it is single-stage (not 2-stage metallic), you know because of the paint on the rag and pad, I would get a paint meter on that paint to know how much is there. If you take off too much, you won't have a choice about a respray.
I agree that your results look very good compared to the state of the car before your efforts. Thanks for keeping us posted!
Re: And so it starts
Thanks for the help as I've never heard of a paint meter before. The only other car I've had painted is my tii and it didn't mater how much paint was on the car as it was basically stripped down to the factory primer before painting.garageboy wrote: Dec 19, 2021 7:17 PM Looks much improved. Congratulations.
Personally, before I attempted something like that, because it is single-stage (not 2-stage metallic), you know because of the paint on the rag and pad, I would get a paint meter on that paint to know how much is there. If you take off too much, you won't have a choice about a respray.
And those grills on the hood pop out trivially. I'd remove them before doing this. No taping necessary. Good luck!
I am very much a babe in the woods with some things and competent in other things.
With this car, it is very much going to be a daily driver and not a concours type of car. I do appreciate things being done correctly the first time so with the paint, I'll do what is necessary to have the car look good, and as it should. I anticipate finding some rust perhaps under the front and rear windshield gaskets, and hope that's it.
Re: And so it starts
More good news!
I've come up with what I think is a proper name for my car.
My heritage is German/Scottish, and I've settled on one of two names, both Gaelic:
Maeve
Origin: Gaelic, Irish
Meaning: Intoxicating woman
This is what a car should be, no?
or
Kade
Origin: Gaelic, Scottish
Meaning: From the wetlands
(since I live in the PNW where it is wet pretty much all the time)
Edit: Maeve it is, thinking I like the idea of a car being named after a girl, like a boat should be. This is the only car I have owned so far that has a name.
Re: And so it starts
As much as it will hurt initially to do it, you should plan to paint the whole car. Do it once do it right. I would also recommend going for the single stage paint (which will lower your potential shops that will do it) over the waterborne base/clear options. That’s more personal preference to me since the original paint was single stage and I don’t like how the red looks under the clear compared to an original. Add to that various issues the car does have which all seem fine together, when you put new paint in one area it will magnify the faults, particularly with laser straight bodywork on the areas you have addressed.
Going over it with the buffer as you have will certainly make it look better and inspire you (it does to me all the time) but that car has already been burned through on the edges in spots to bare metal by a kid who thought he could double the price of the car in a weekend with a buffer when in reality all he did was do damage. For a daily driver that could still be perfectly fine as the paint is largely original. Just keep it protected and it should retain its shine for a good amount of time. When that car is fully polished though the color difference on the driver door does dissipate.
Paint meters are helpful tools when used properly in a case like this mostly for comparison across the car but once the paint gets thin all bets are off. It is tougher to get a feel for paint with the single stage over a base/clear since the clear layer is the majority of the millage. They are excellent at determining if the car has had work done.
Also if you plan to keep the Euro bumpers you should take the opportunity to really finish the conversion. I wouldn’t bother changing the tail panel, just fill the holes. Tail panel is a lot of work to do it right and then you have to fix the exhaust because the pipes don’t line up.
Re: And so it starts
Thanks Chris.
I'm a big believer in doing things correctly the first time instead of half way. And in looking at the areas the PO over-polished its pretty obvious that with the amount of feathering that would need to be done when respraying different areas of the car that you might as well go ahead and respray the entire body.
Can you or anyone explain the difference between single stage paints and other types? My intent would be to use Glasurit as it came from the factory.
One big regret I have is when I refinished the tii I own. The shop used a Dupont based paint that spec'd to Colorado, the original color of the car. It came out a darker shade than Glasurit Colorado. Steve Petersen (Blunt) and I had our cars side by side at Vintage at the Vineyards and mine looked like Inca, until I parked my car by an Inca car. His had been painted with Glasurit. Now to get it correct I'd have to completely disassemble the car once again and have it painted correctly.
Last edited by gwb72tii on Dec 21, 2021 8:58 PM, edited 1 time in total.
Re: And so it starts
I am a paint snob. Surprise, surprise. 
Glasurit 55 is the best product to use when going basecoat/clearcoat painting on E28s. It's called 2-stage because the first mils (1 mil = 1/1000th inch) are put down in basecoat, then the robot mixes base and clear for a spin or two around the car, and then it paints only clear.
BMW spec is between 4 and 6.5 mils for everything. To be clear (haha, punny), that includes primer, of course.
It might seem sensible that more paint is better, but then it can have more trouble sticking, and may be more susceptible to chipping.
Single-stage paints, like schwarz (black) and Alpineweiss (white) and cinnabarrot (red) do not have clearcoat. Clearcoat is very strong, and for folks that run their cars through the carwash, it's a fine option. With single stage, the color is throughout, which is why you see it on your buffer wheel. But the ability to bring the paint back, if it is in good condition, is mind-boggling. My detailer did my car when I bought it in 2010, and it's due for his magic again, twelve years later, and it looks like it just rolled off the showroom floor when he's done. That's simply not possible with a two-stage paint. Come to think of it, I'm not sure what lacquer-based single-stage paint the resto shop used... let me find out...
As Chris points out, there are few places that will shoot single-stage anymore. When I needed it on one panel, I went to a restoration shop. It was worth every penny because the paint is in such good condition that it's nearly impossible to see any difference. Only paint nerds like me and Chris can tell.
Yes, a paint meter is a truth-teller. I found mine on eBay years ago at a sick discount. They're cheaper now and more available. It's a great investment. When I look at a car for a friend, it's the most important tool in my toolbox.
Re: And so it starts
Well finally I got some terrific news. I think.
A friend of mine has run a car repair shop close by for 30 years and is very particular about his cars. He referred me to a body shop close by and I just talked to the owner. He's perfectly ok with Glasurit single stage paints, has been in the business for 40+ years and just completed a full 7 bay workshop on his 15 acres after "retiring" from his previous employer. His estimated cost is about 1/2 of what other shops have talked about. He's 2 months out which gives me time to disassemble the car before trailering it too him.
hooray!
-
Blue Shadow
- Posts: 10292
- Joined: Feb 12, 2006 12:00 PM
- Location: SE PA
Re: And so it starts
That is a good way to get a nice paint job, use someone who is doing work on the side at home or in your case instead of at an employer, starting out on his own but that 7 bays is a bit more than most of the good places in the east, out buildings in the sticks with folks that can lay down a great coat of paint and don't get concerned with the need to use the most modern stuff.
Re: And so it starts
As someone who is set to get his car painted soon, the direction this conversation has gone in has been very helpful. I love this forum!
Re: And so it starts
Prices for painting are just crazy. I guess it just costs what it costs, I'm not aware of a bunch of wealthy, retired body shop owners, but jeez, it's just so much. I checked with a local place, not high end, not chain, just the local body shop, to repaint the hood on my Datsun where the clear I'd applied had shrunk. A quick sand, maybe a touch of primer touch up, base and clear on a hood, super easy masking etc, was $900. I said, "Thank you for your time on the estimate, but I think I'll pass." Maybe they just weren't interested? WTF would a whole car be? 
Re: And so it starts
I have been getting estimates starting at $15k, and from more than just one shop. That has me excited about the guy I was just referred to whose estimate is about $6k, but I expect that number to rise with some of the required body work needed. I’d hesitate to use this guy because his estimate is so low, but my friend who referred me is very anal about his cars and has used this guy for a long time. Maybe being in business for himself, not working as an employee for someone else, allows him to be paid better while charging less?
Mind you I will be trailering and delivering the car to him completely disassembled, all the glass/trim/interior/headliner/ everything removed. All the body guy will have to do is tape off the engine bay and wiring harnesses before working on the car. That alone is a time consuming job.
Mind you I will be trailering and delivering the car to him completely disassembled, all the glass/trim/interior/headliner/ everything removed. All the body guy will have to do is tape off the engine bay and wiring harnesses before working on the car. That alone is a time consuming job.
-
John in VA
- Posts: 5295
- Joined: Feb 12, 2006 12:00 PM
- Location: Leesburg, VA
Re: And so it starts
Handymen are charging $100/hr here. What skills does that require vs. bodywork/painting?Mike W. wrote: Dec 22, 2021 6:31 PM Prices for painting are just crazy. I guess it just costs what it costs, I'm not aware of a bunch of wealthy, retired body shop owners, but jeez, it's just so much.
Re: And so it starts
First of all, kudos to you for considering carefully how to proceed. We're all a bit OCD here, and when it comes to painting and prepping cars for paint, OCD is a good thing.gwb72tii wrote: Dec 22, 2021 6:48 PM I have been getting estimates starting at $15k, and from more than just one shop. That has me excited about the guy I was just referred to whose estimate is about $6k, but I expect that number to rise with some of the required body work needed. I’d hesitate to use this guy because his estimate is so low, but my friend who referred me is very anal about his cars and has used this guy for a long time. Maybe being in business for himself, not working as an employee for someone else, allows him to be paid better while charging less?
Mind you I will be trailering and delivering the car to him completely disassembled, all the glass/trim/interior/headliner/ everything removed. All the body guy will have to do is tape off the engine bay and wiring harnesses before working on the car. That alone is a time consuming job.
I think you need to ask, clearly, his hourly rate. The reason is simple: is his price low because he is incorrectly estimating the number of hours it will take to properly prepare the car for paint (this is the biggest labor expense), which would be bad, or is his price low because he is, as you point out, newly in business for himself and doesn't have the overhead yet so he can charge a great rate, which would be a huge bonus for you, and likely the reason you should go with him. But you absolutely need to know that to make an informed decision, right?
I could wax on about my decision to restore an Opel Manta back in 1985 (it was a 74), but let's just say, I never even came close to finishing and I learned a valuable and expensive lesson when I donated the entire project to an electric car company in the mid 1990s -- that car restoration is an elephant I can not eat small pieces at a time. I can preserve an E28 that came to me in factory original condition, like I'm doing now with my daily driver E28, but I'm not the guy to take it completely apart and ever get it back together again. You have to have the brain (and camera shots) to disassemble that and reassemble it months/years later.
Back to your situation. The more you do that the bodyshop guy DOESN'T have to do will save you money. And that's another thing my attempted restoration taught me. I can remove the windshield and trim. I am NOT the guy to install it in the way it needs to be installed to ensure it won't leak, crack, or otherwise. With hope, you ARE that guy. Hope this answers your questions a bit...
Re: And so it starts
Appreciate your input and advice.
I would have done the motor myself but I’m still running a business that demands a fair amount of time. I know I can remove/install a motor and tranny etc, and can do the trim pieces as long as their design is not light years removed from my tii. That is a car I took apart and put back together, including the motor, some years ago. My first BMW was a 1970 2002, 1 barrel carb, that hooked me into working on cars. I rebuilt that motor in 1978 and it ran like an electric motor, no vibration all then way to redline. I miss that car.
What I don’t know how to do is bodywork. It’s your advice and others re single stage paint that I have no knowledge of and appreciate what you and others have to say. I will have a eye ball to eye ball conversation with this body guy about what to expect. In our only conversation he mentioned a few things, like painting older Porsches with single stage paint that gives me some confidence he knows his craft.
Re: And so it starts
I could use a little help from you that have done the euro bumper/front valance installation.
Looking at pics from cek's install, the front valance on my car is different than the part installed on cek's
is this a euro valance?
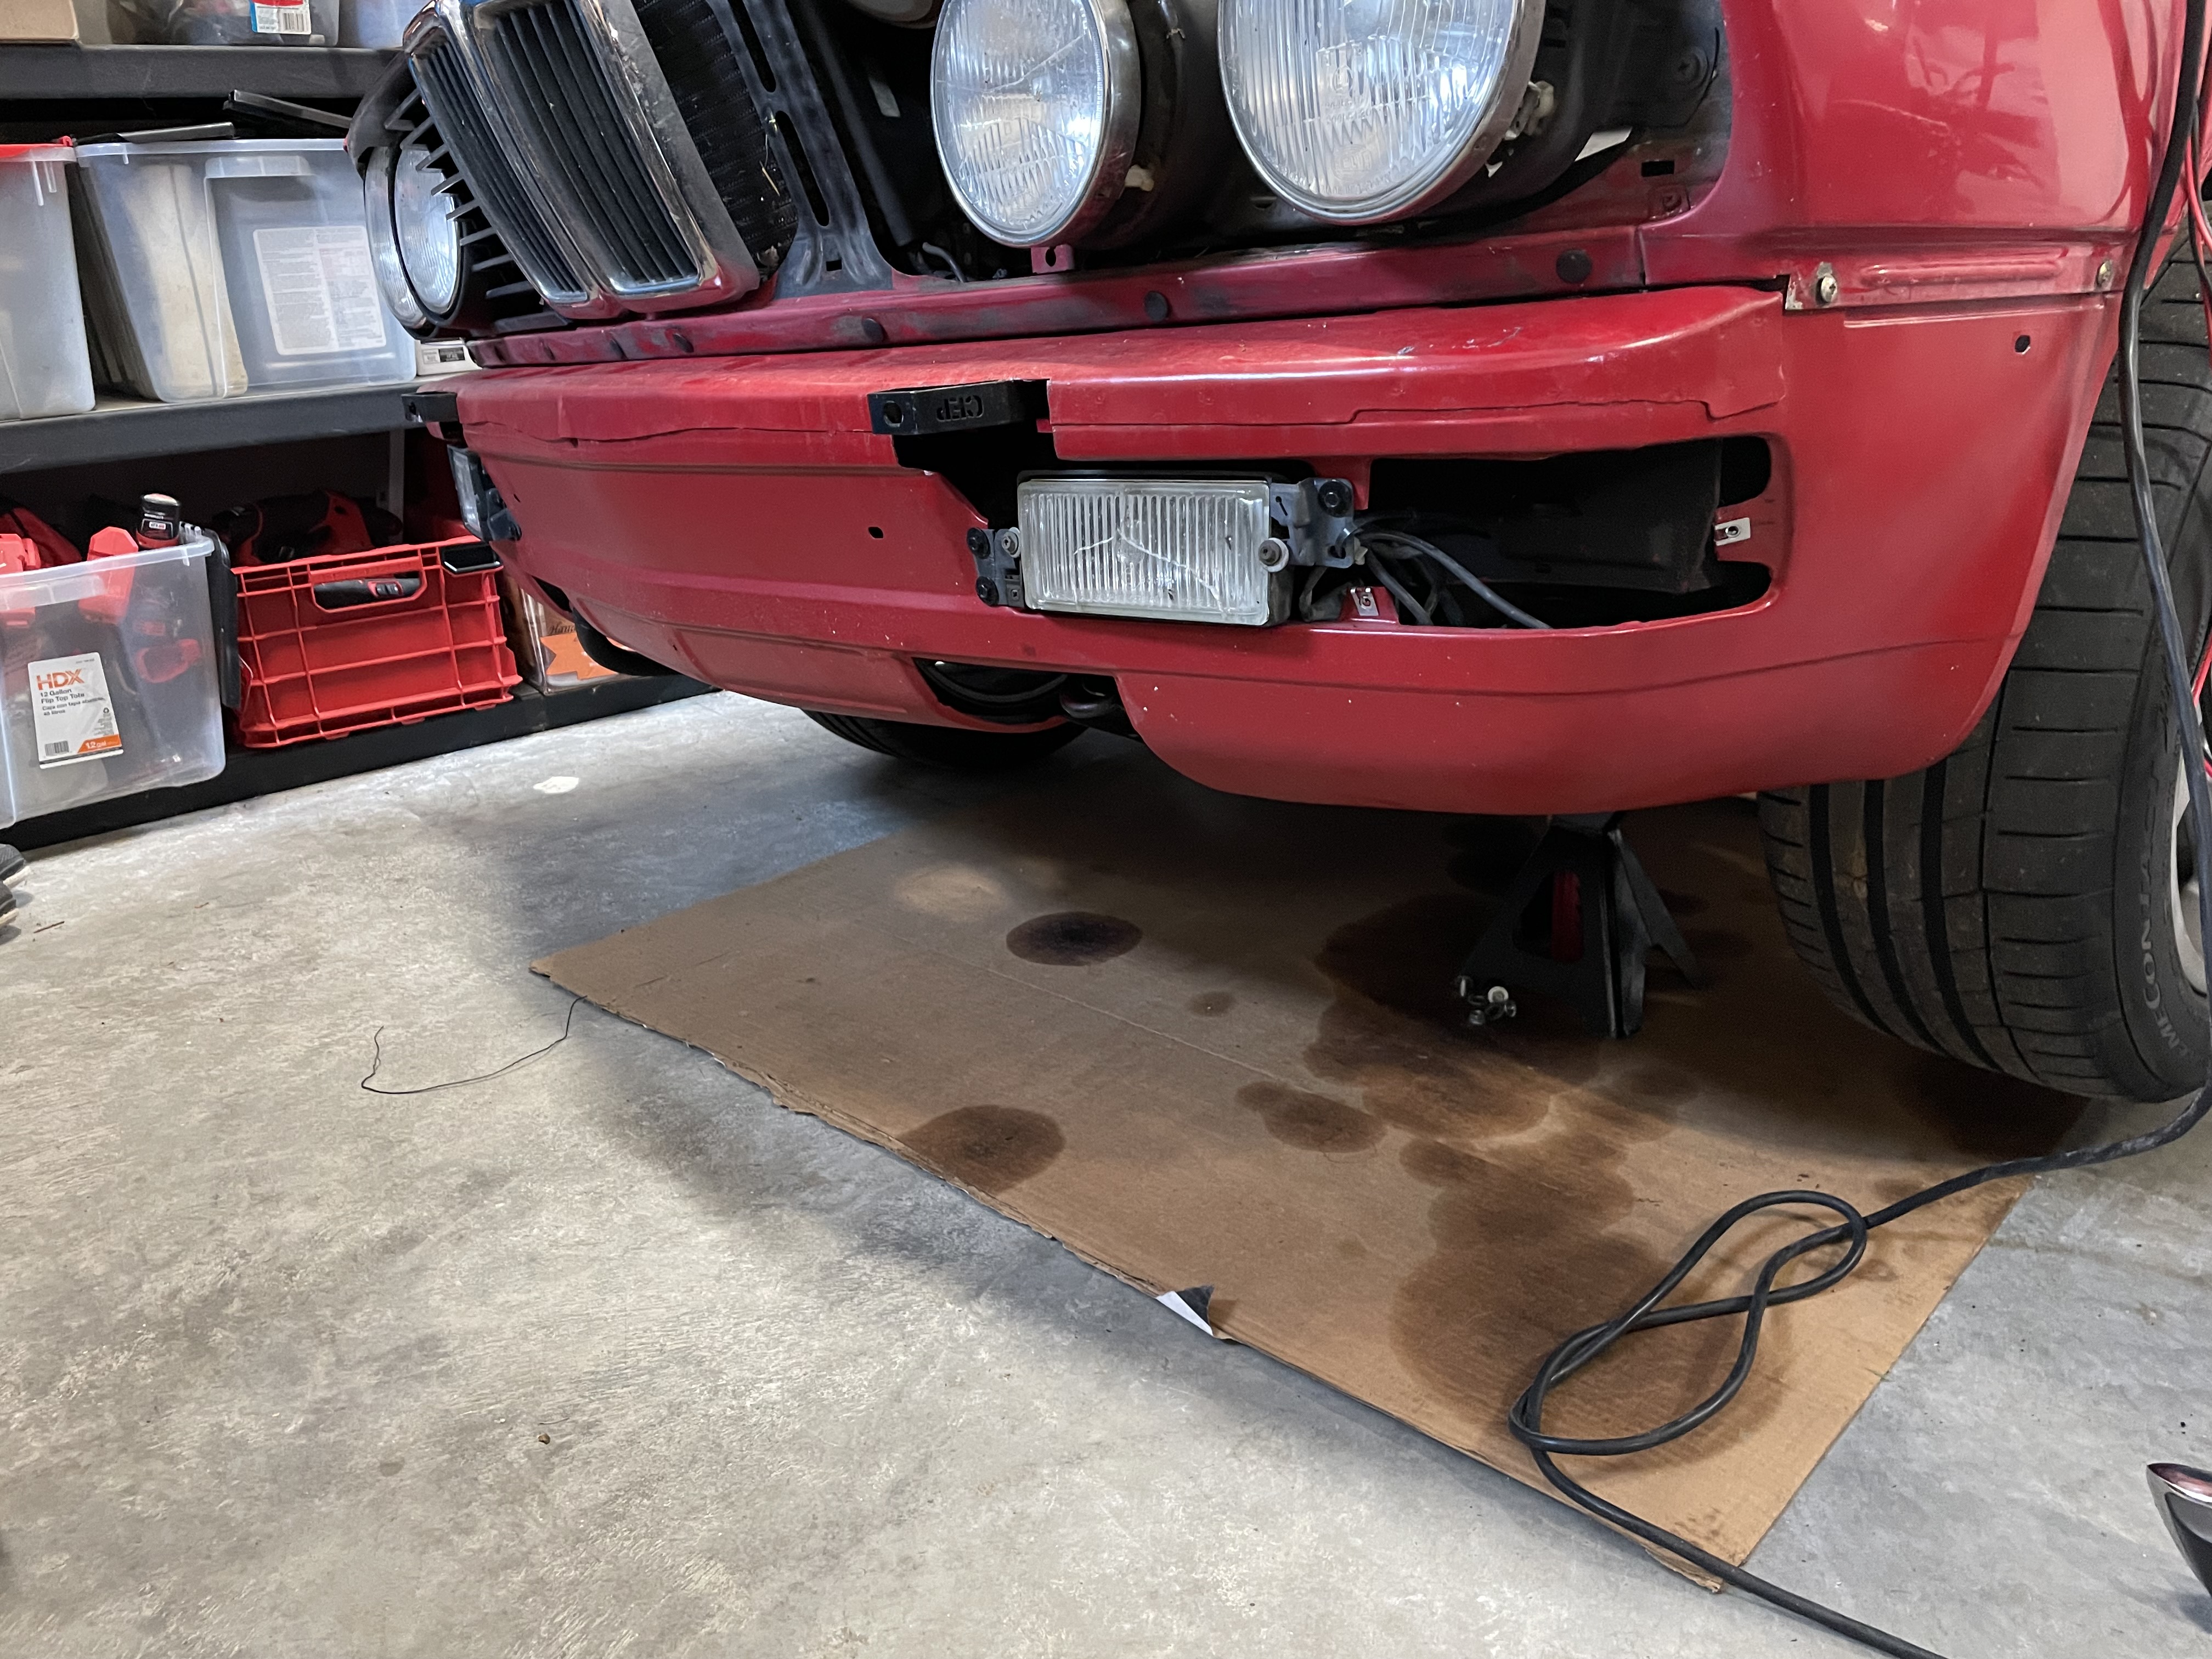
and then these brackets were used to hold the front bumper on. Any idea who made these?
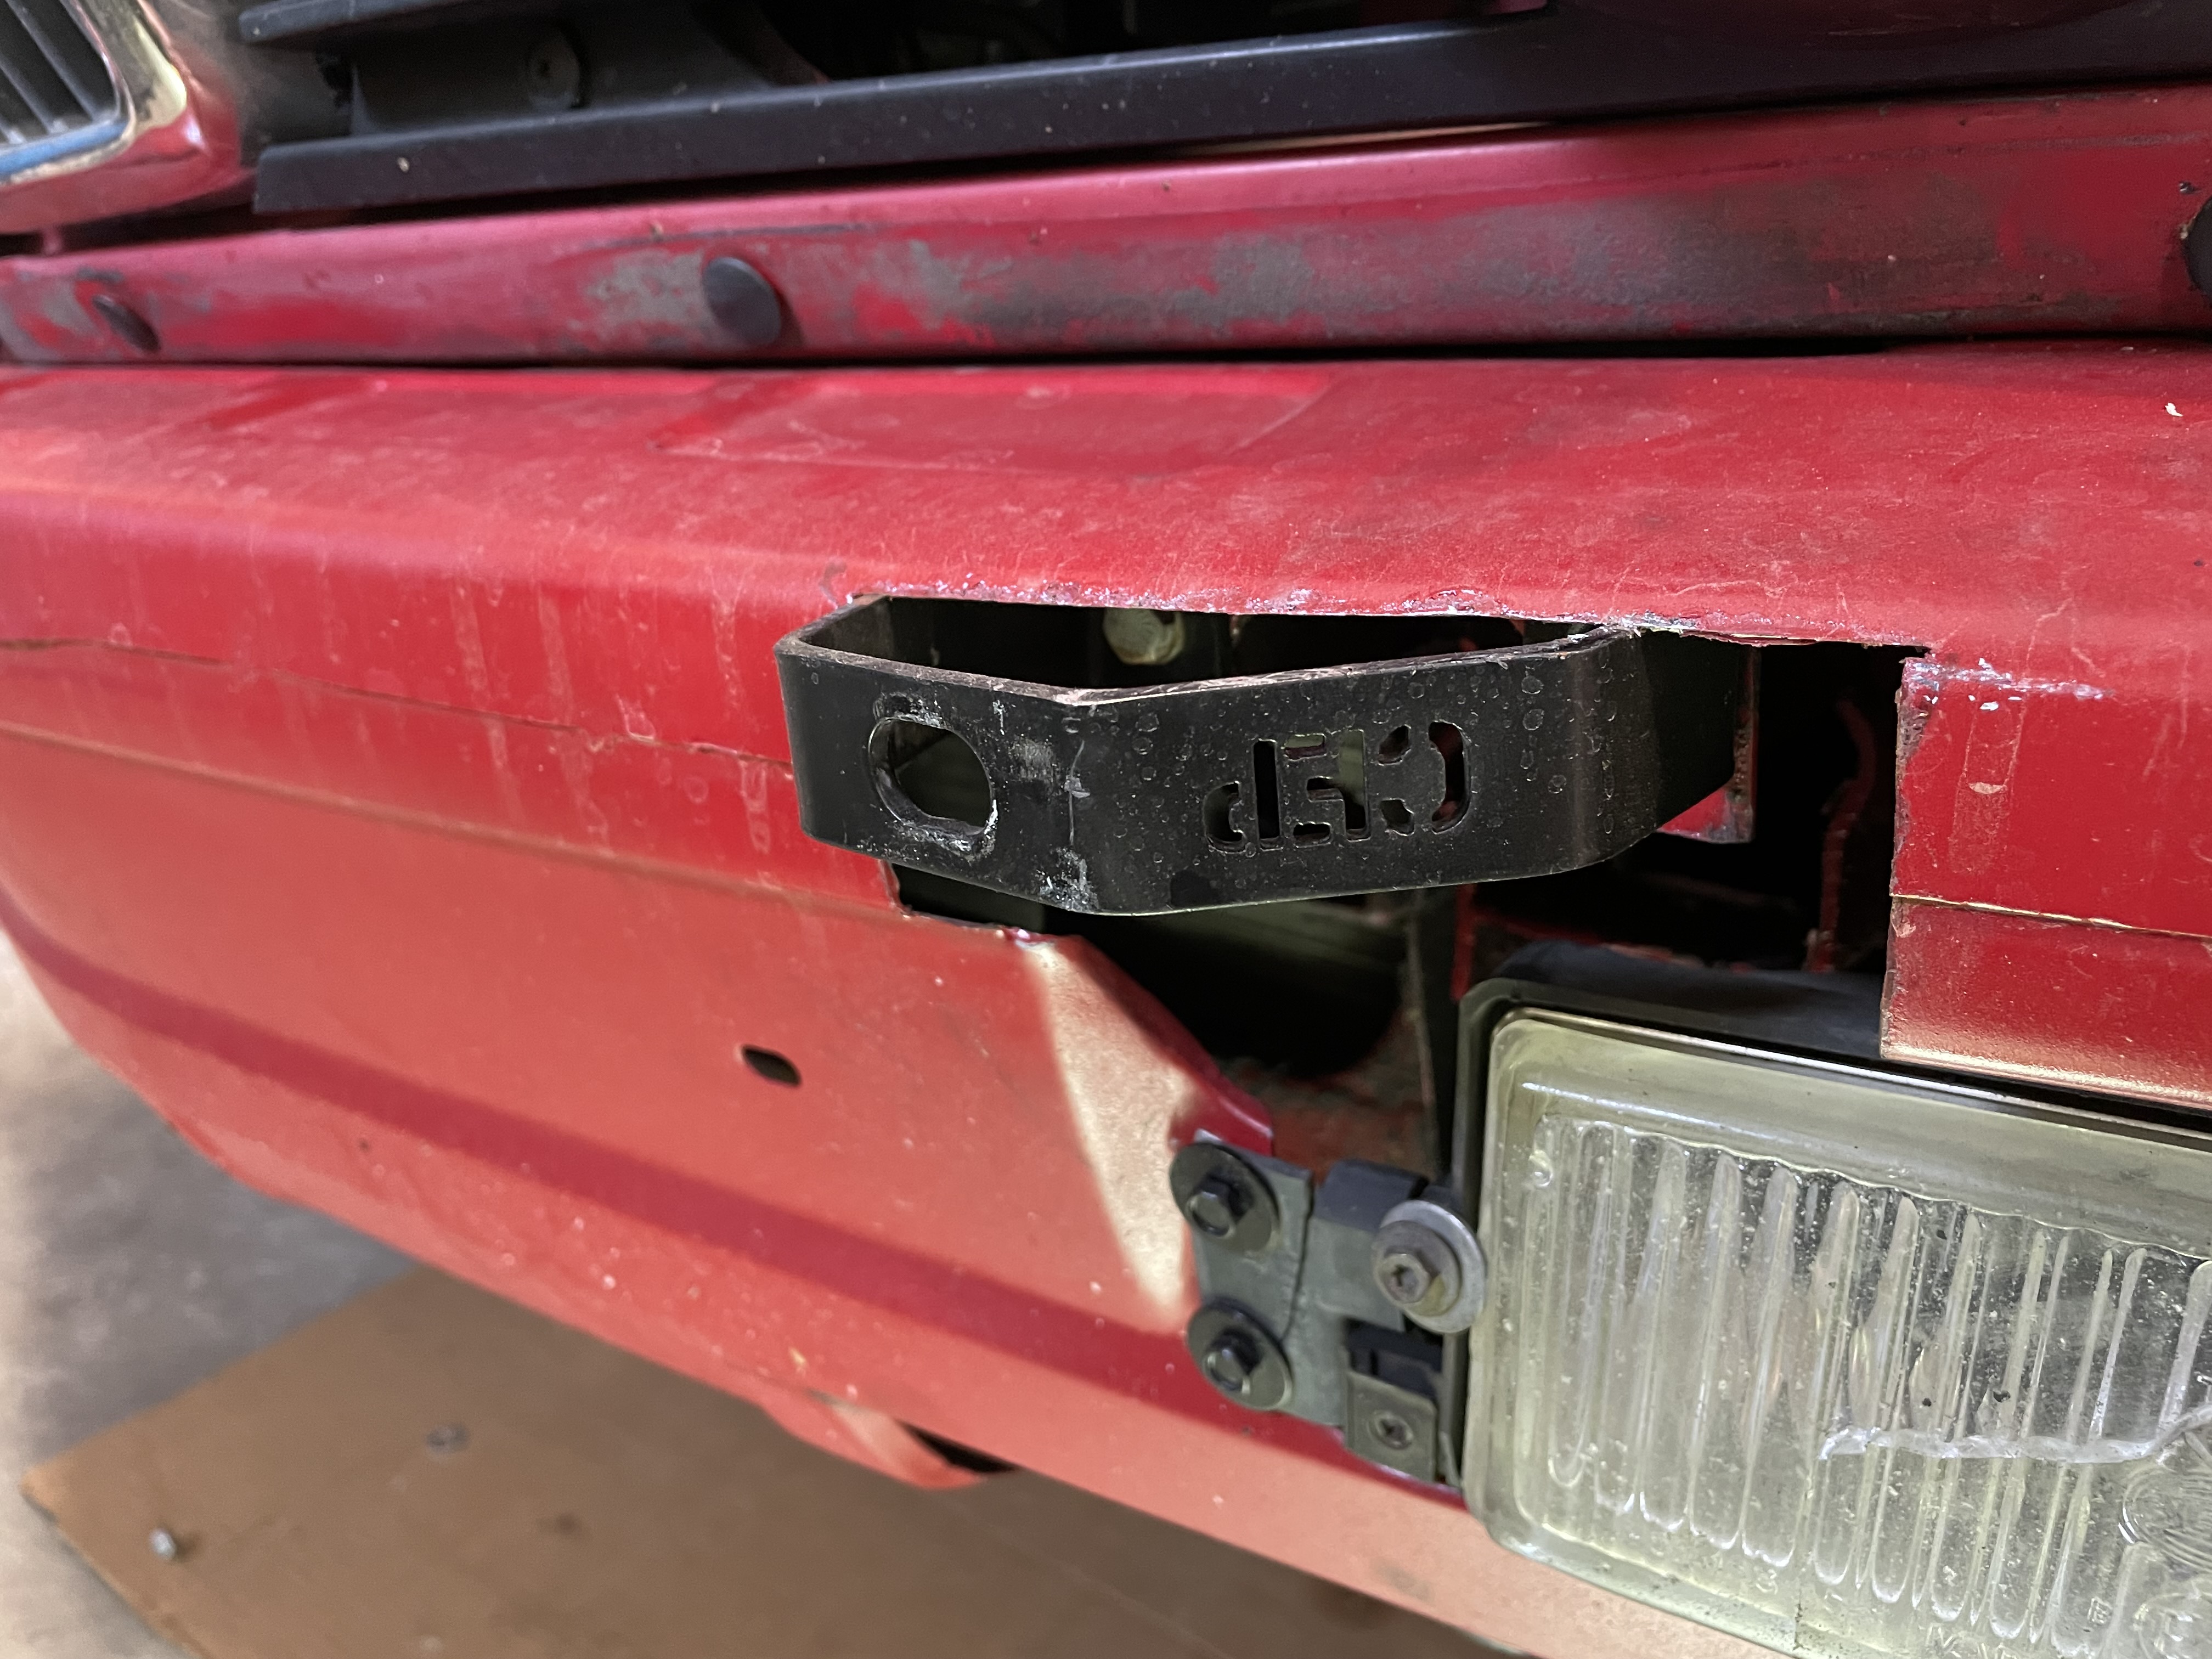
The installation done on these parts leaves a lot to be desired. One more thing to correct added to the list.
One pet peeve of mine is oil/fluid leaks. Hate them. Fortunately this car has the typical 31 year old power steering fluid leak, but no oil from the oil pan or diff. I plan on refreshing all of the power steering bits so that should take care of the leak.
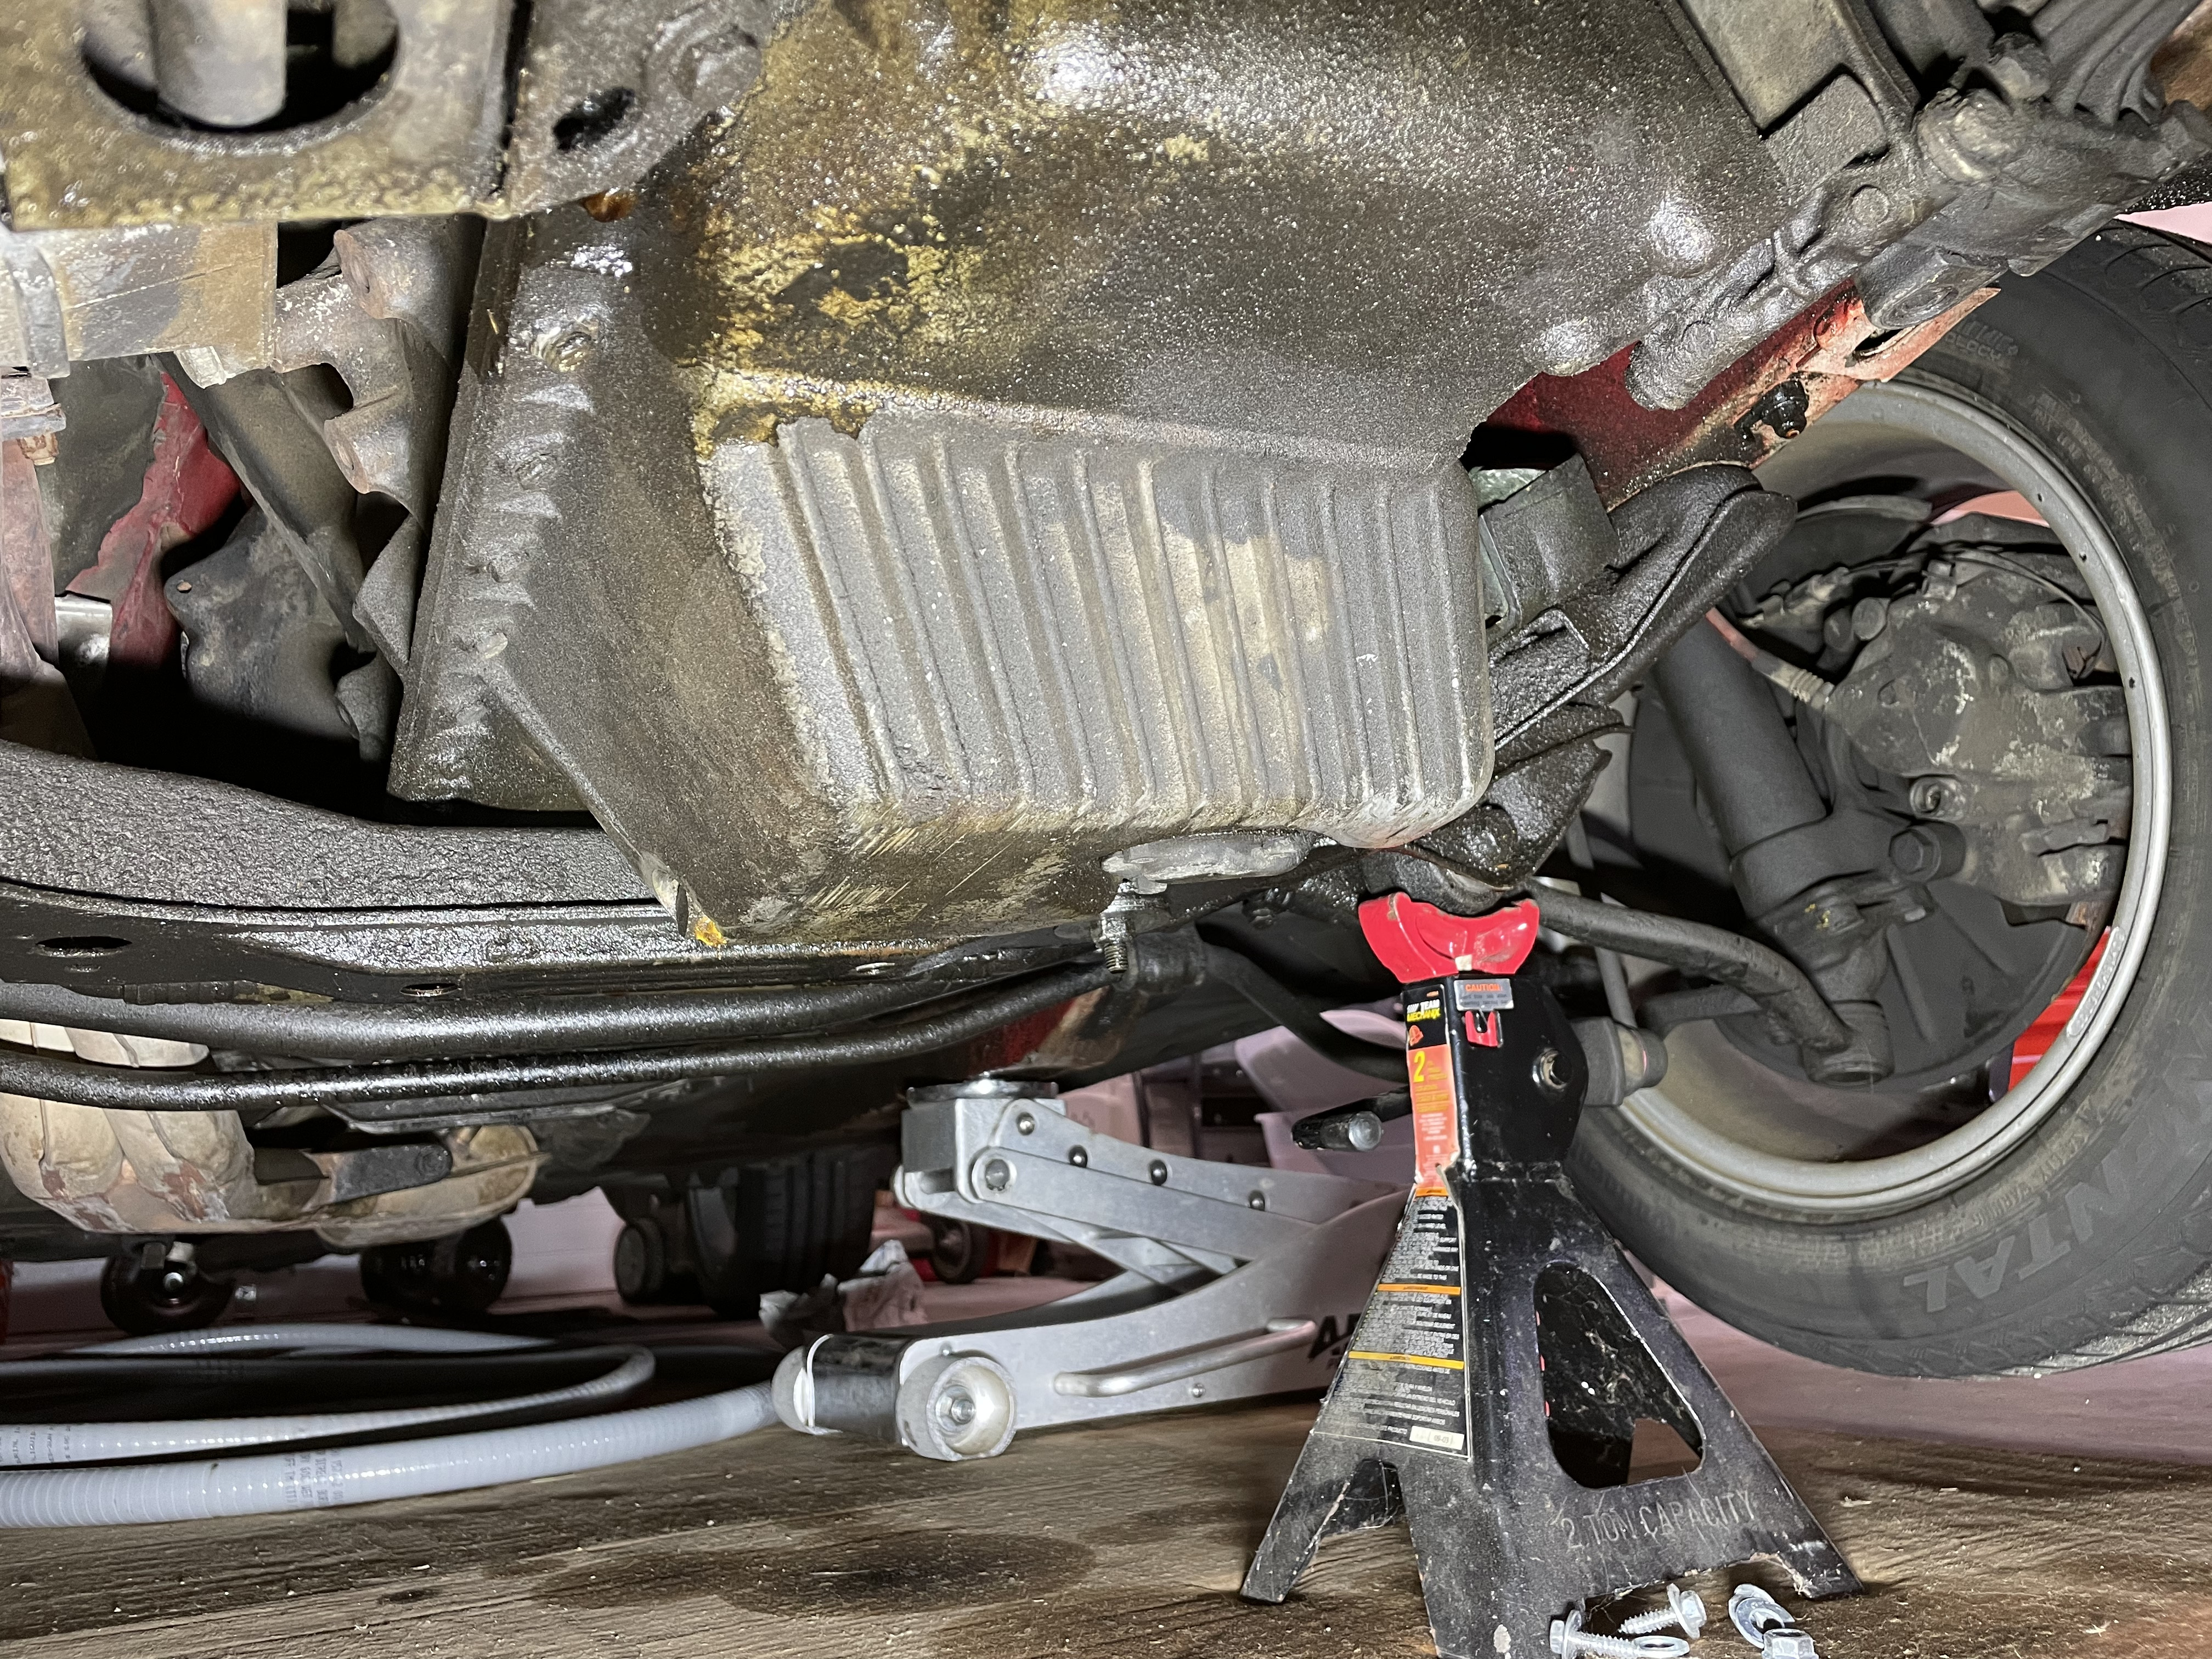
Looking at pics from cek's install, the front valance on my car is different than the part installed on cek's
is this a euro valance?

and then these brackets were used to hold the front bumper on. Any idea who made these?

The installation done on these parts leaves a lot to be desired. One more thing to correct added to the list.
One pet peeve of mine is oil/fluid leaks. Hate them. Fortunately this car has the typical 31 year old power steering fluid leak, but no oil from the oil pan or diff. I plan on refreshing all of the power steering bits so that should take care of the leak.

Last edited by gwb72tii on Dec 27, 2021 4:15 PM, edited 1 time in total.
Re: And so it starts
A little good news to go with the not so good news.
The suspension bits are H&R/Bilstein, so now I don't need to purchase these parts, plus the PIO installed stainless steel brake lines. hooray.
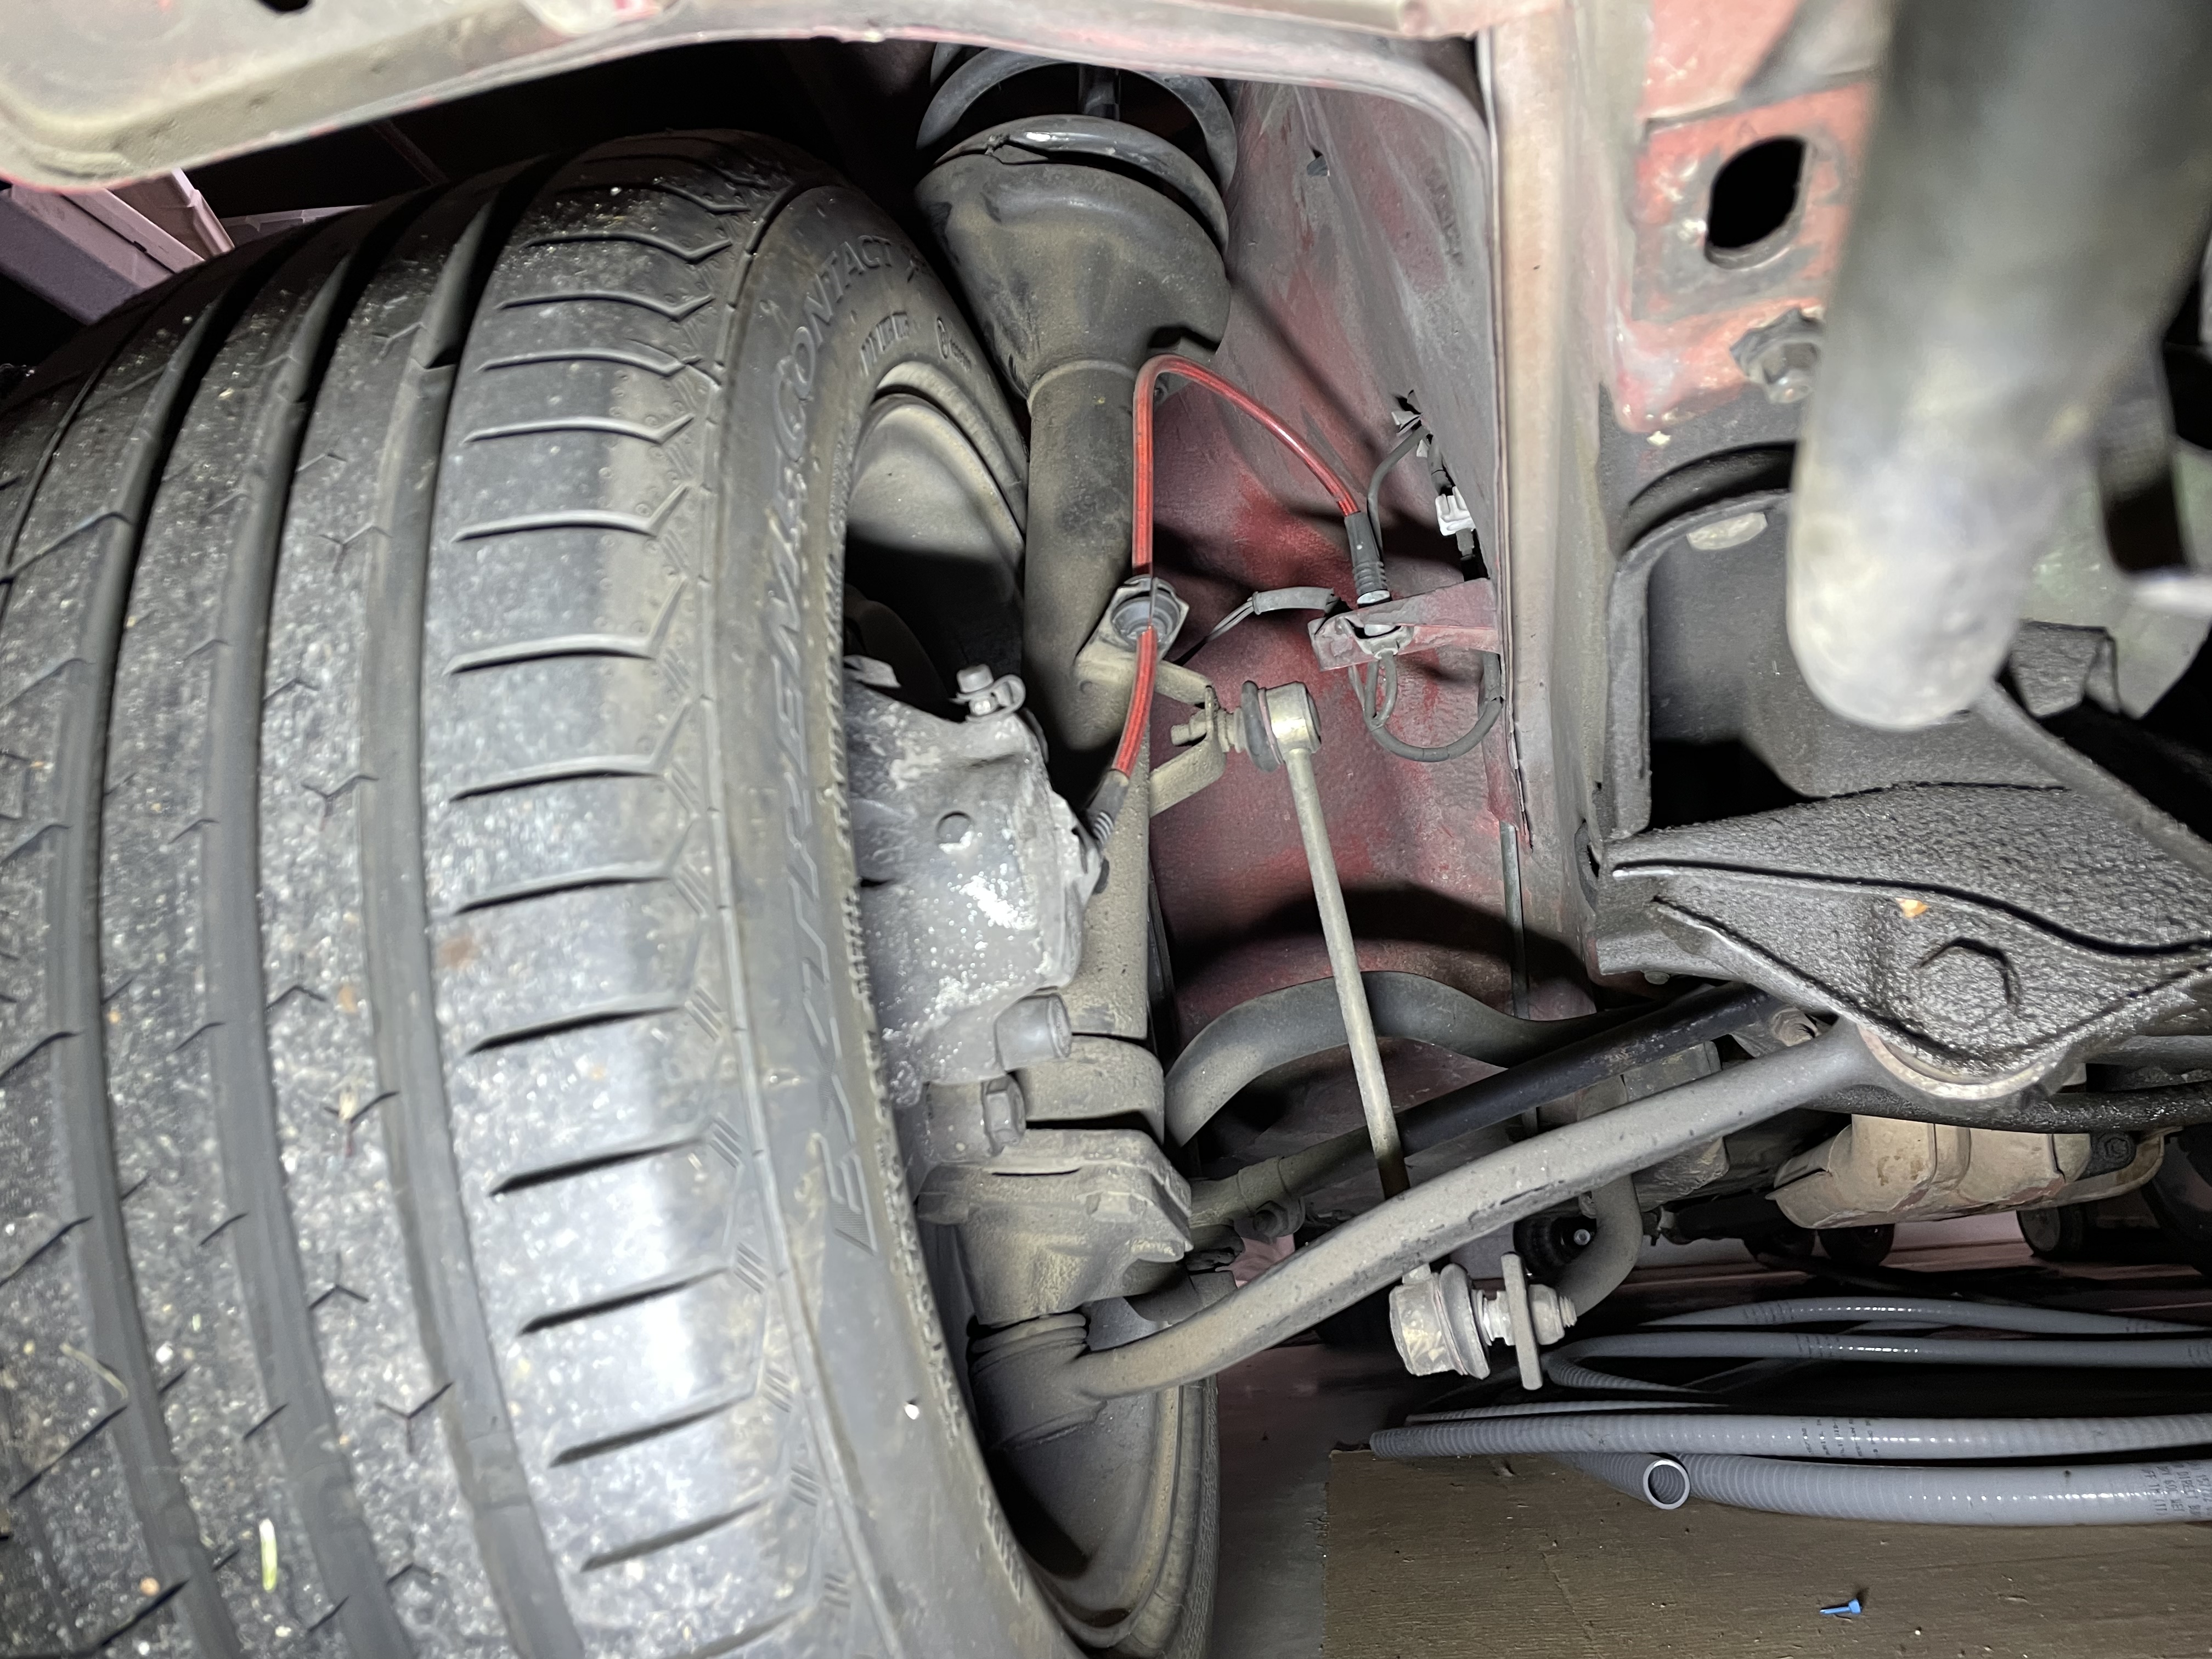
The suspension bits are H&R/Bilstein, so now I don't need to purchase these parts, plus the PIO installed stainless steel brake lines. hooray.

Re: And so it starts
That’s a Taxi valance with the rip-offs of the guten parts brackets. The original bracket design was done with a US valance so he never factored in for the smaller opening for the stock bumper brackets on the Euro valance. They just hacked that out here. Was an incomplete install anyway. Would be easy to go back to the stock bumpers if you wanted.
535is was originally equipped with Bilsteins so it would be a good idea to verify they are somewhat recent. They haven’t made black H&Rs in several years.
535is was originally equipped with Bilsteins so it would be a good idea to verify they are somewhat recent. They haven’t made black H&Rs in several years.
Re: And so it starts
Honestly Chris my plan was to install euro bumpers on whatever car I purchased.
How bad is this? Do I need to get the oem parts?
I think I'll leave the springs/shocks on until I get a chance to drive it. The way we limped home from Mesa there was never a chance to push it. Changing out the shock and springs later is a pretty easy job.
How bad is this? Do I need to get the oem parts?
I think I'll leave the springs/shocks on until I get a chance to drive it. The way we limped home from Mesa there was never a chance to push it. Changing out the shock and springs later is a pretty easy job.
Re: And so it starts
The valance is an OE part as I don’t think they’ve been selling aftermarket copies of that. I prefer the other style of course. You can cut the openings out of the one you have as well but I’d recommend replacing it. There are lots of aftermarket ones floating around and they don’t fit well (some even here advertise them as though they’re real), so avoid those. They don’t fit the fender properly and have a crappy paint on them instead of a true e-coat like factory parts. Honestly that bracket design is the simplest thing you’re going to get compared to actually getting the front of the frame rails from a Euro car. Perhaps that Russian kid would do that for you but it is a lot of work to get to them. If you replace the valance you will have to make the same modification to use the brackets you already have, just do it more cleanly. Unless someone really looks at it, they’ll never know.
Re: And so it starts
Finally looking closely in the engine bay and seeing more than a couple things that will go on the list, besides restoring the oem look of various bits and pieces.
Not sure why someone would just cut the bowden cable for the cruise control?
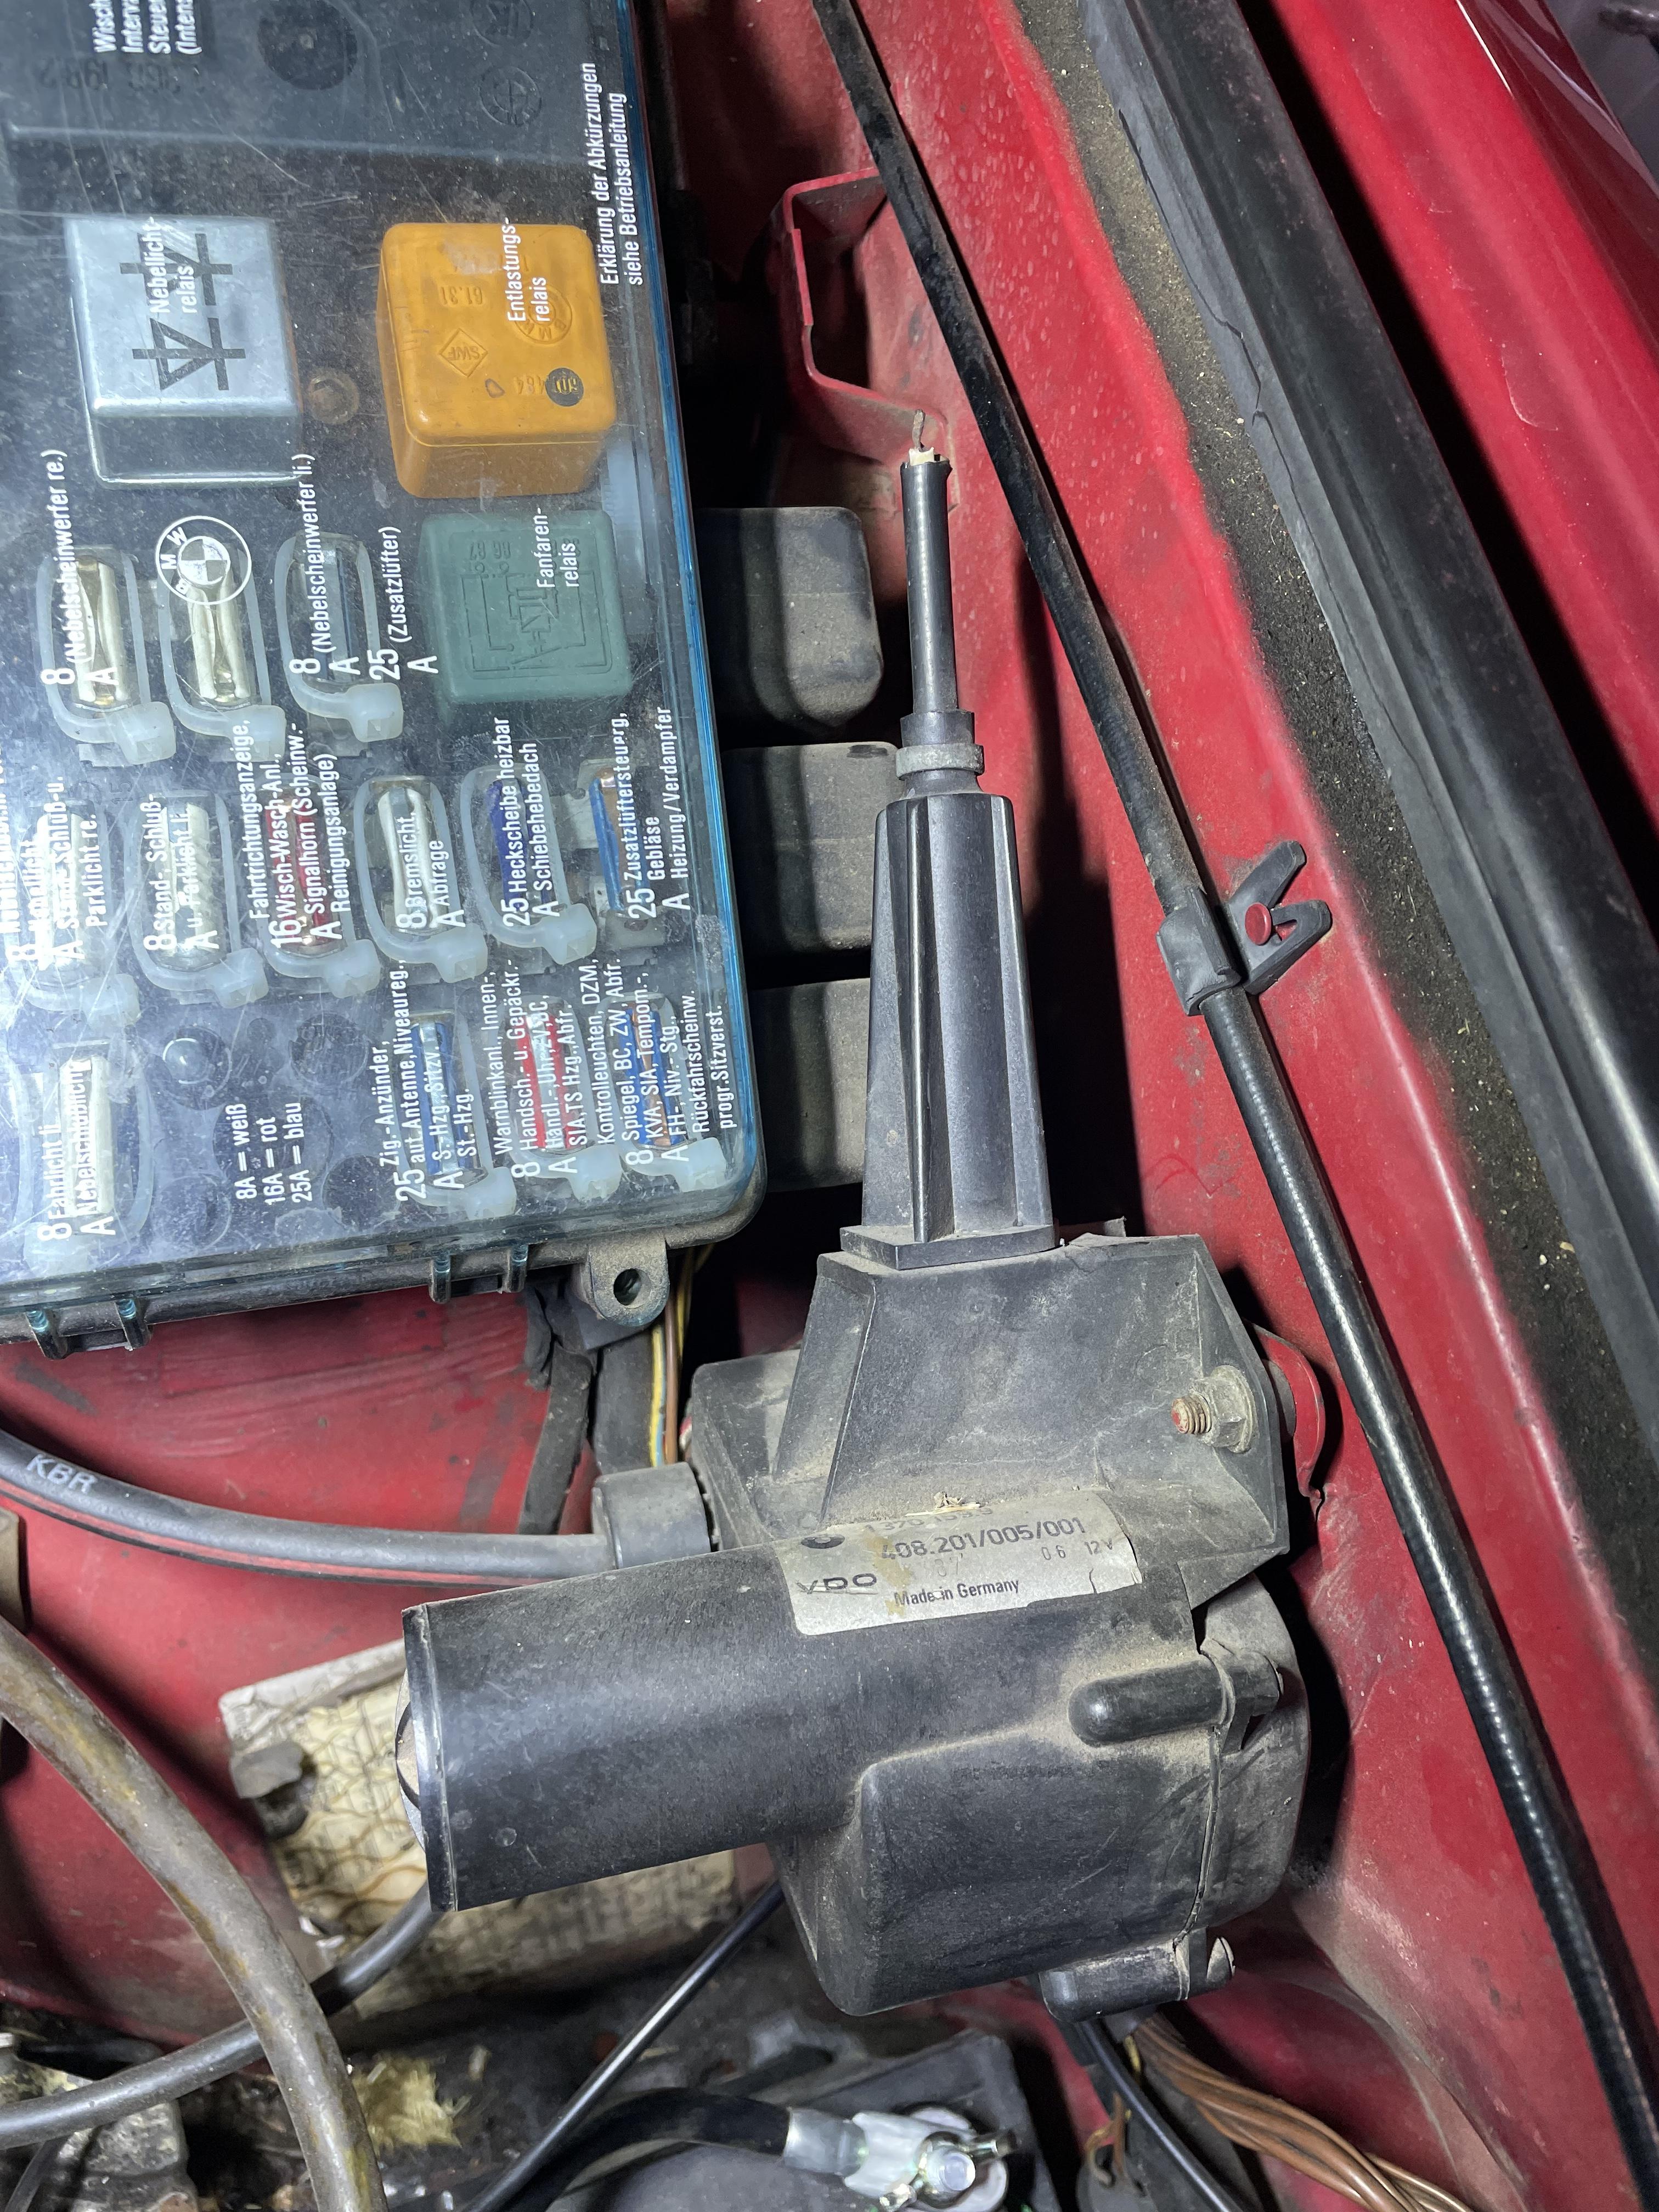
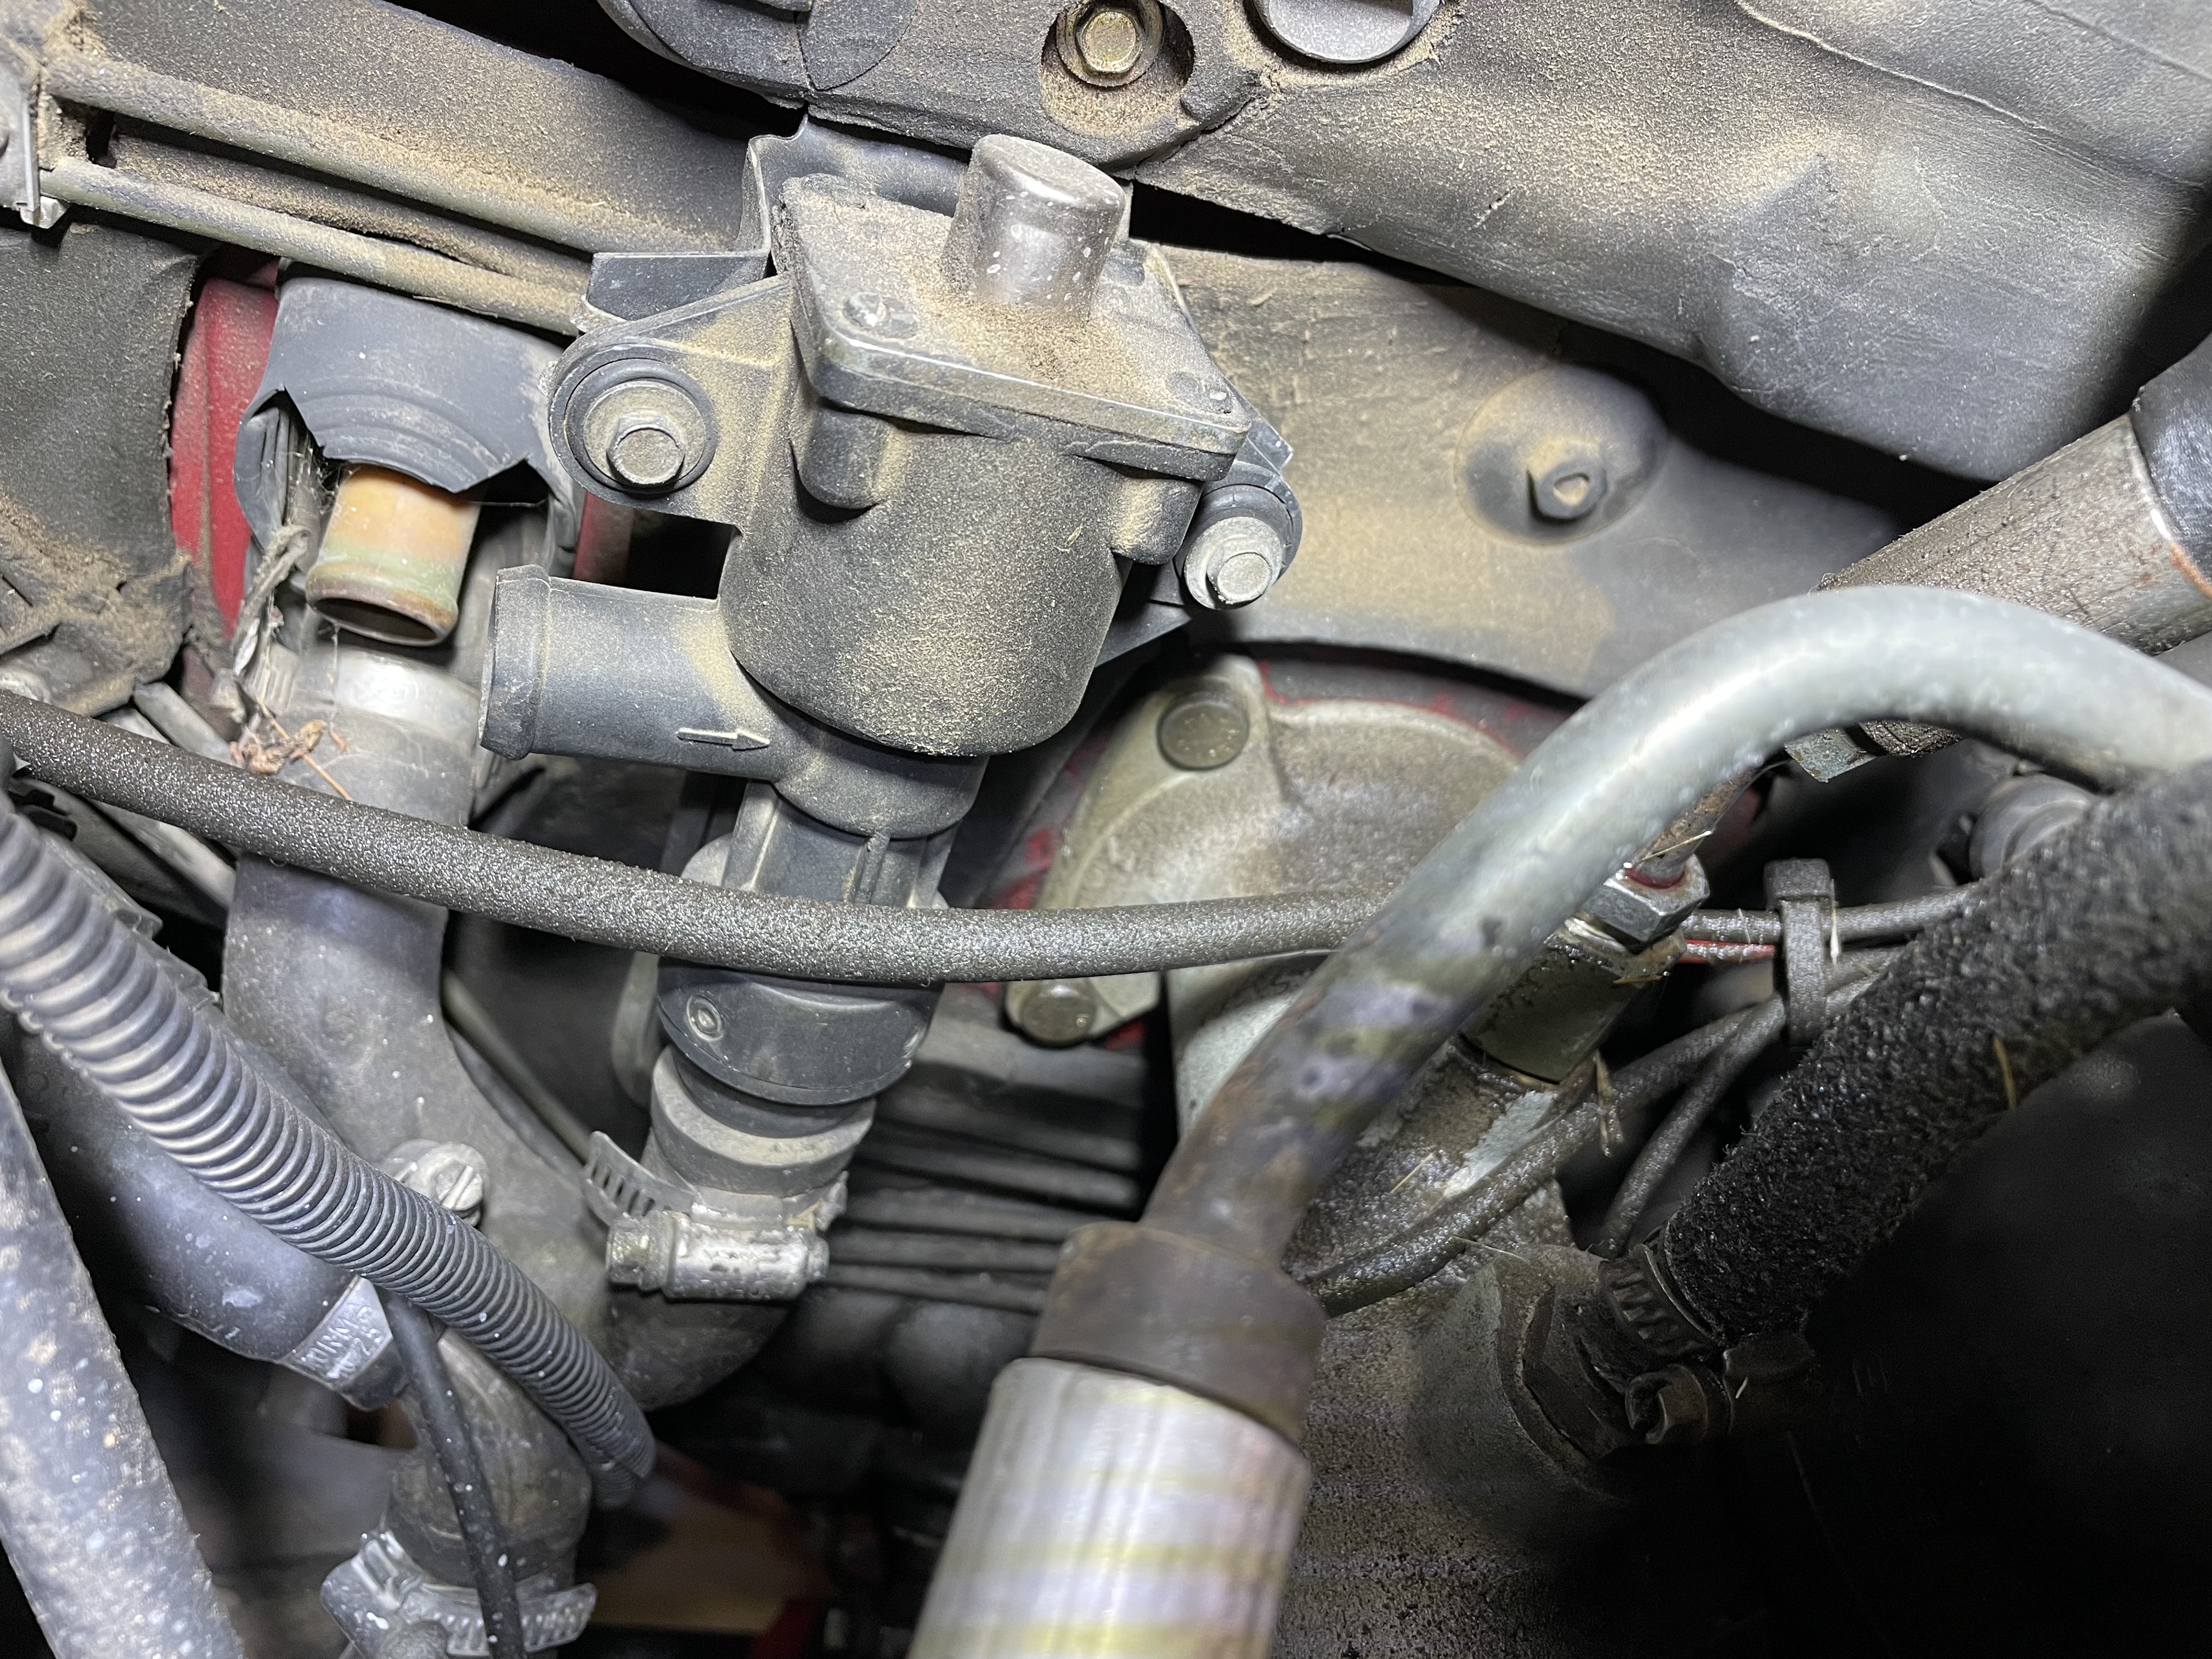
No wonder we froze heading north out of mid Oregon on our way home from Mesa! Not sure if the valve works bit it is accessible later for replacement if necessary, once the correct hoses are attached.
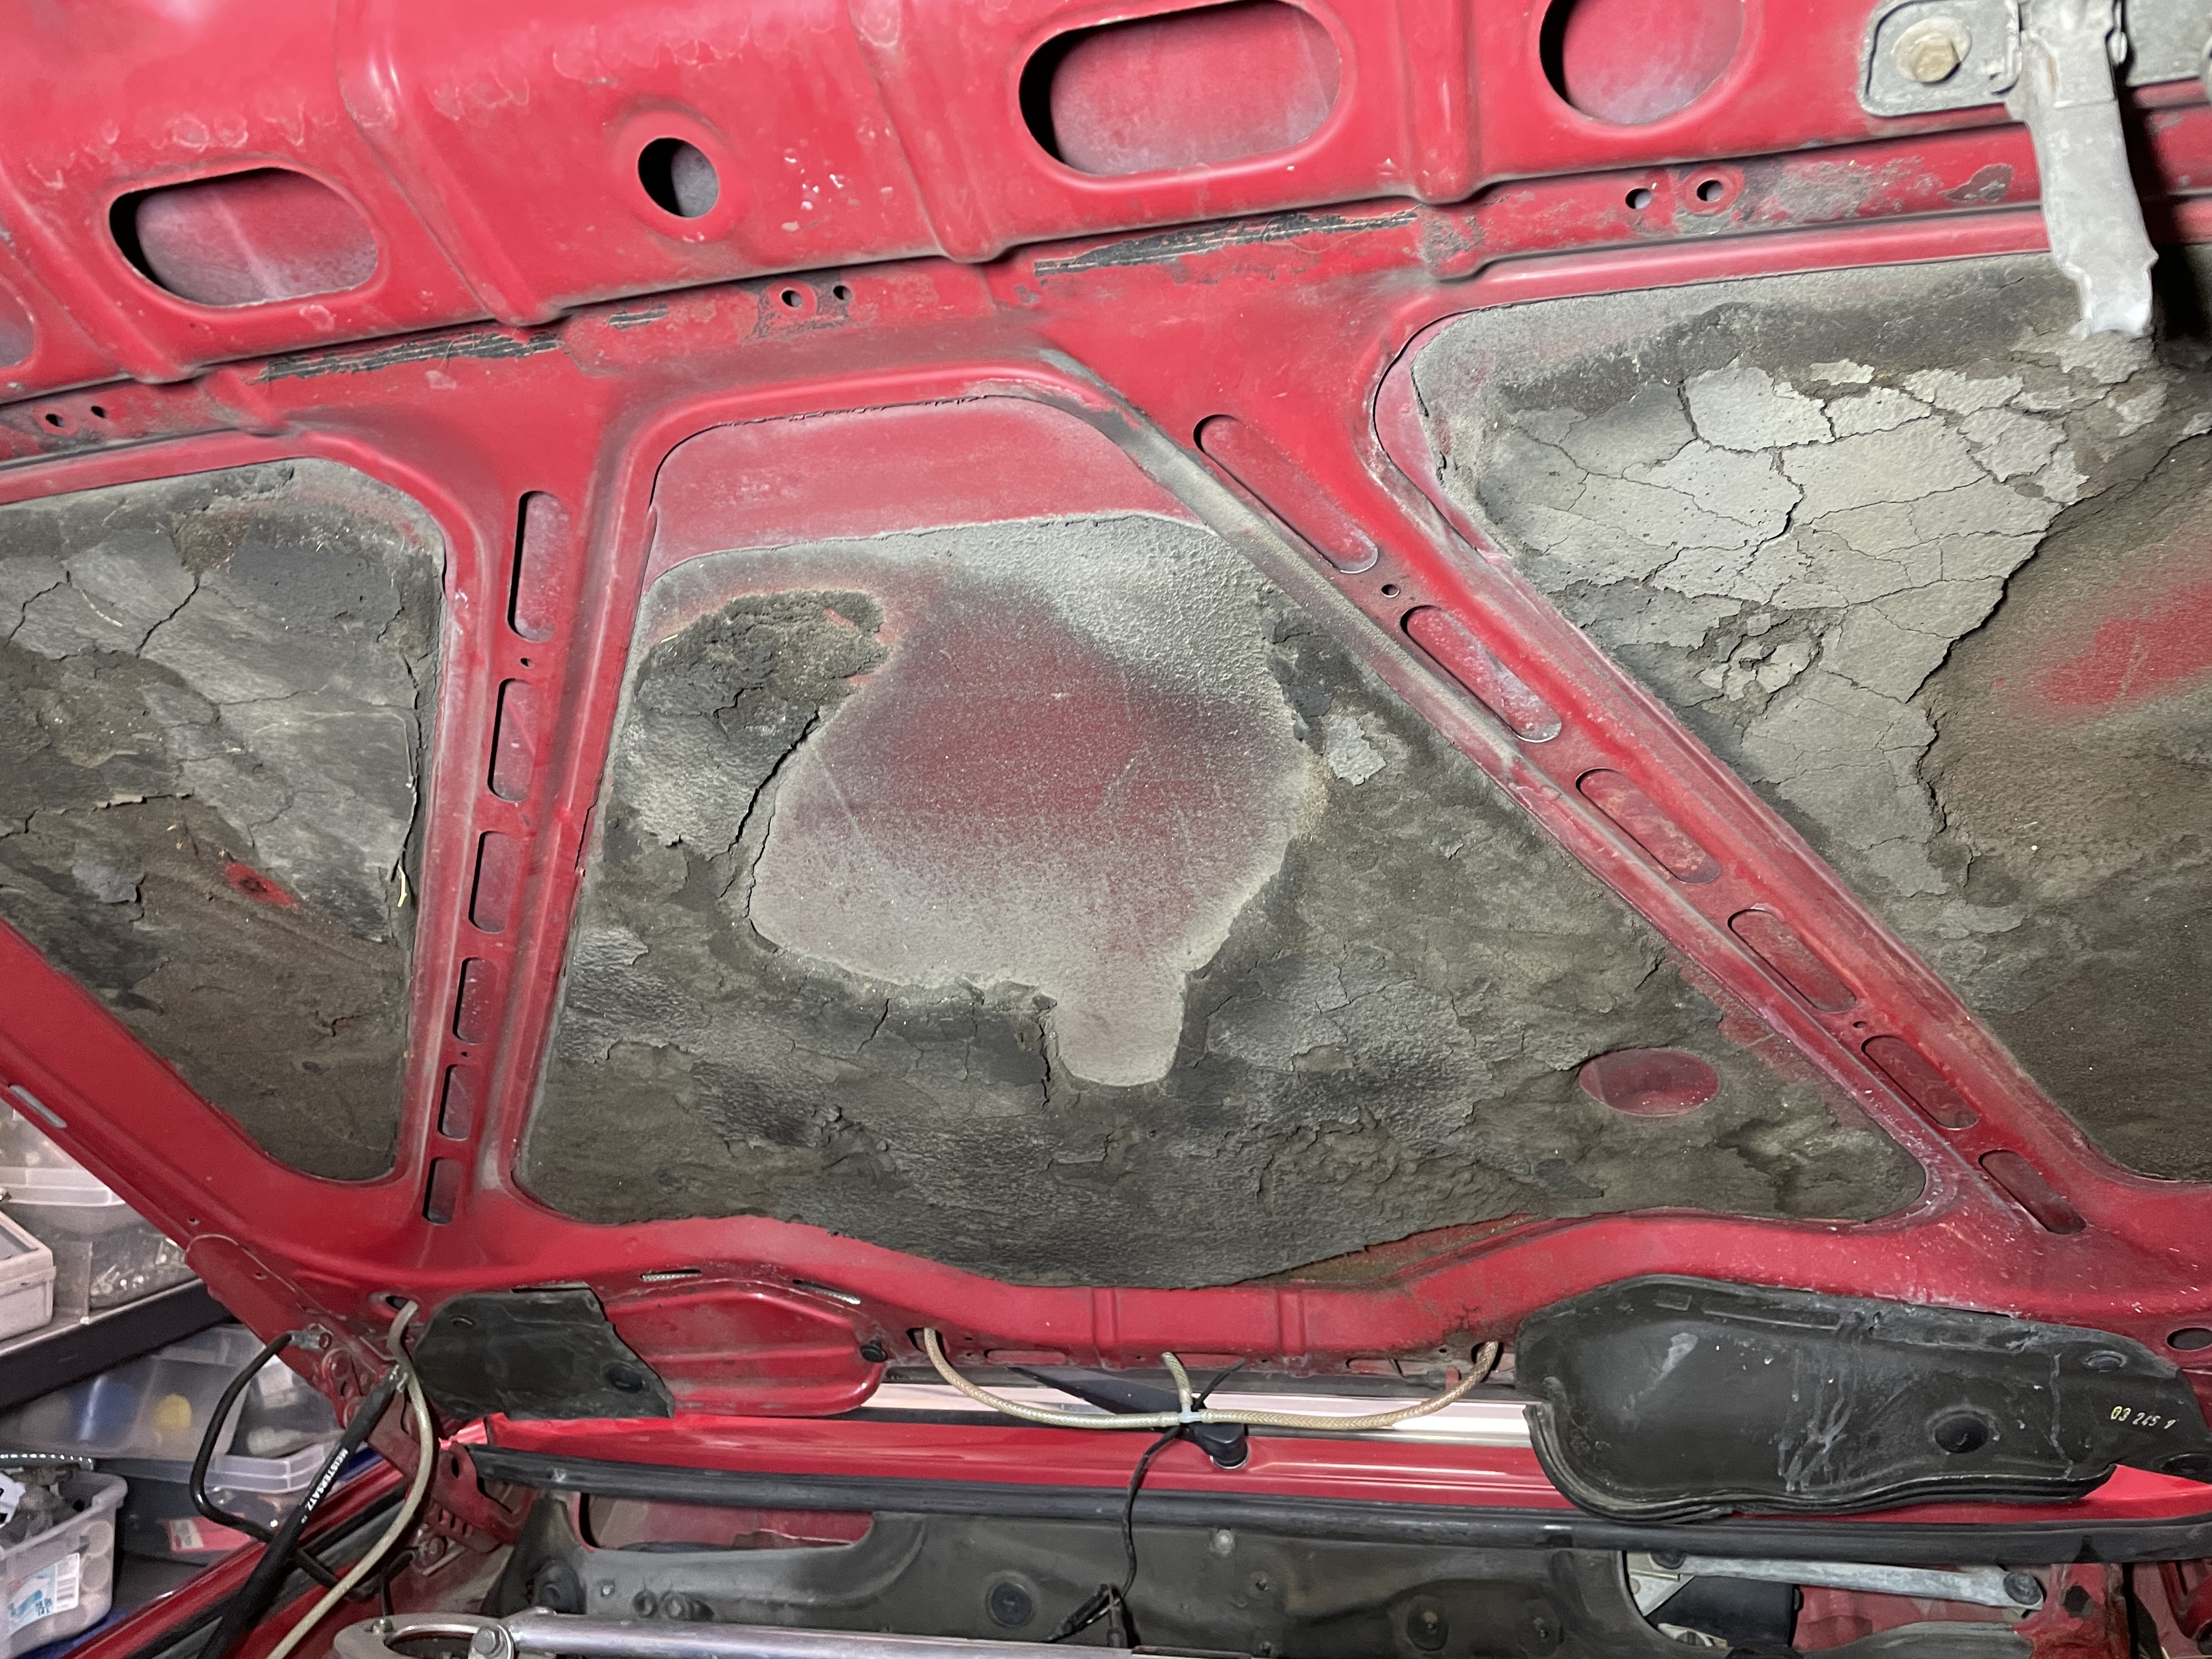
another example of what 30+ years in the AZ heat will do to rubber and foam.
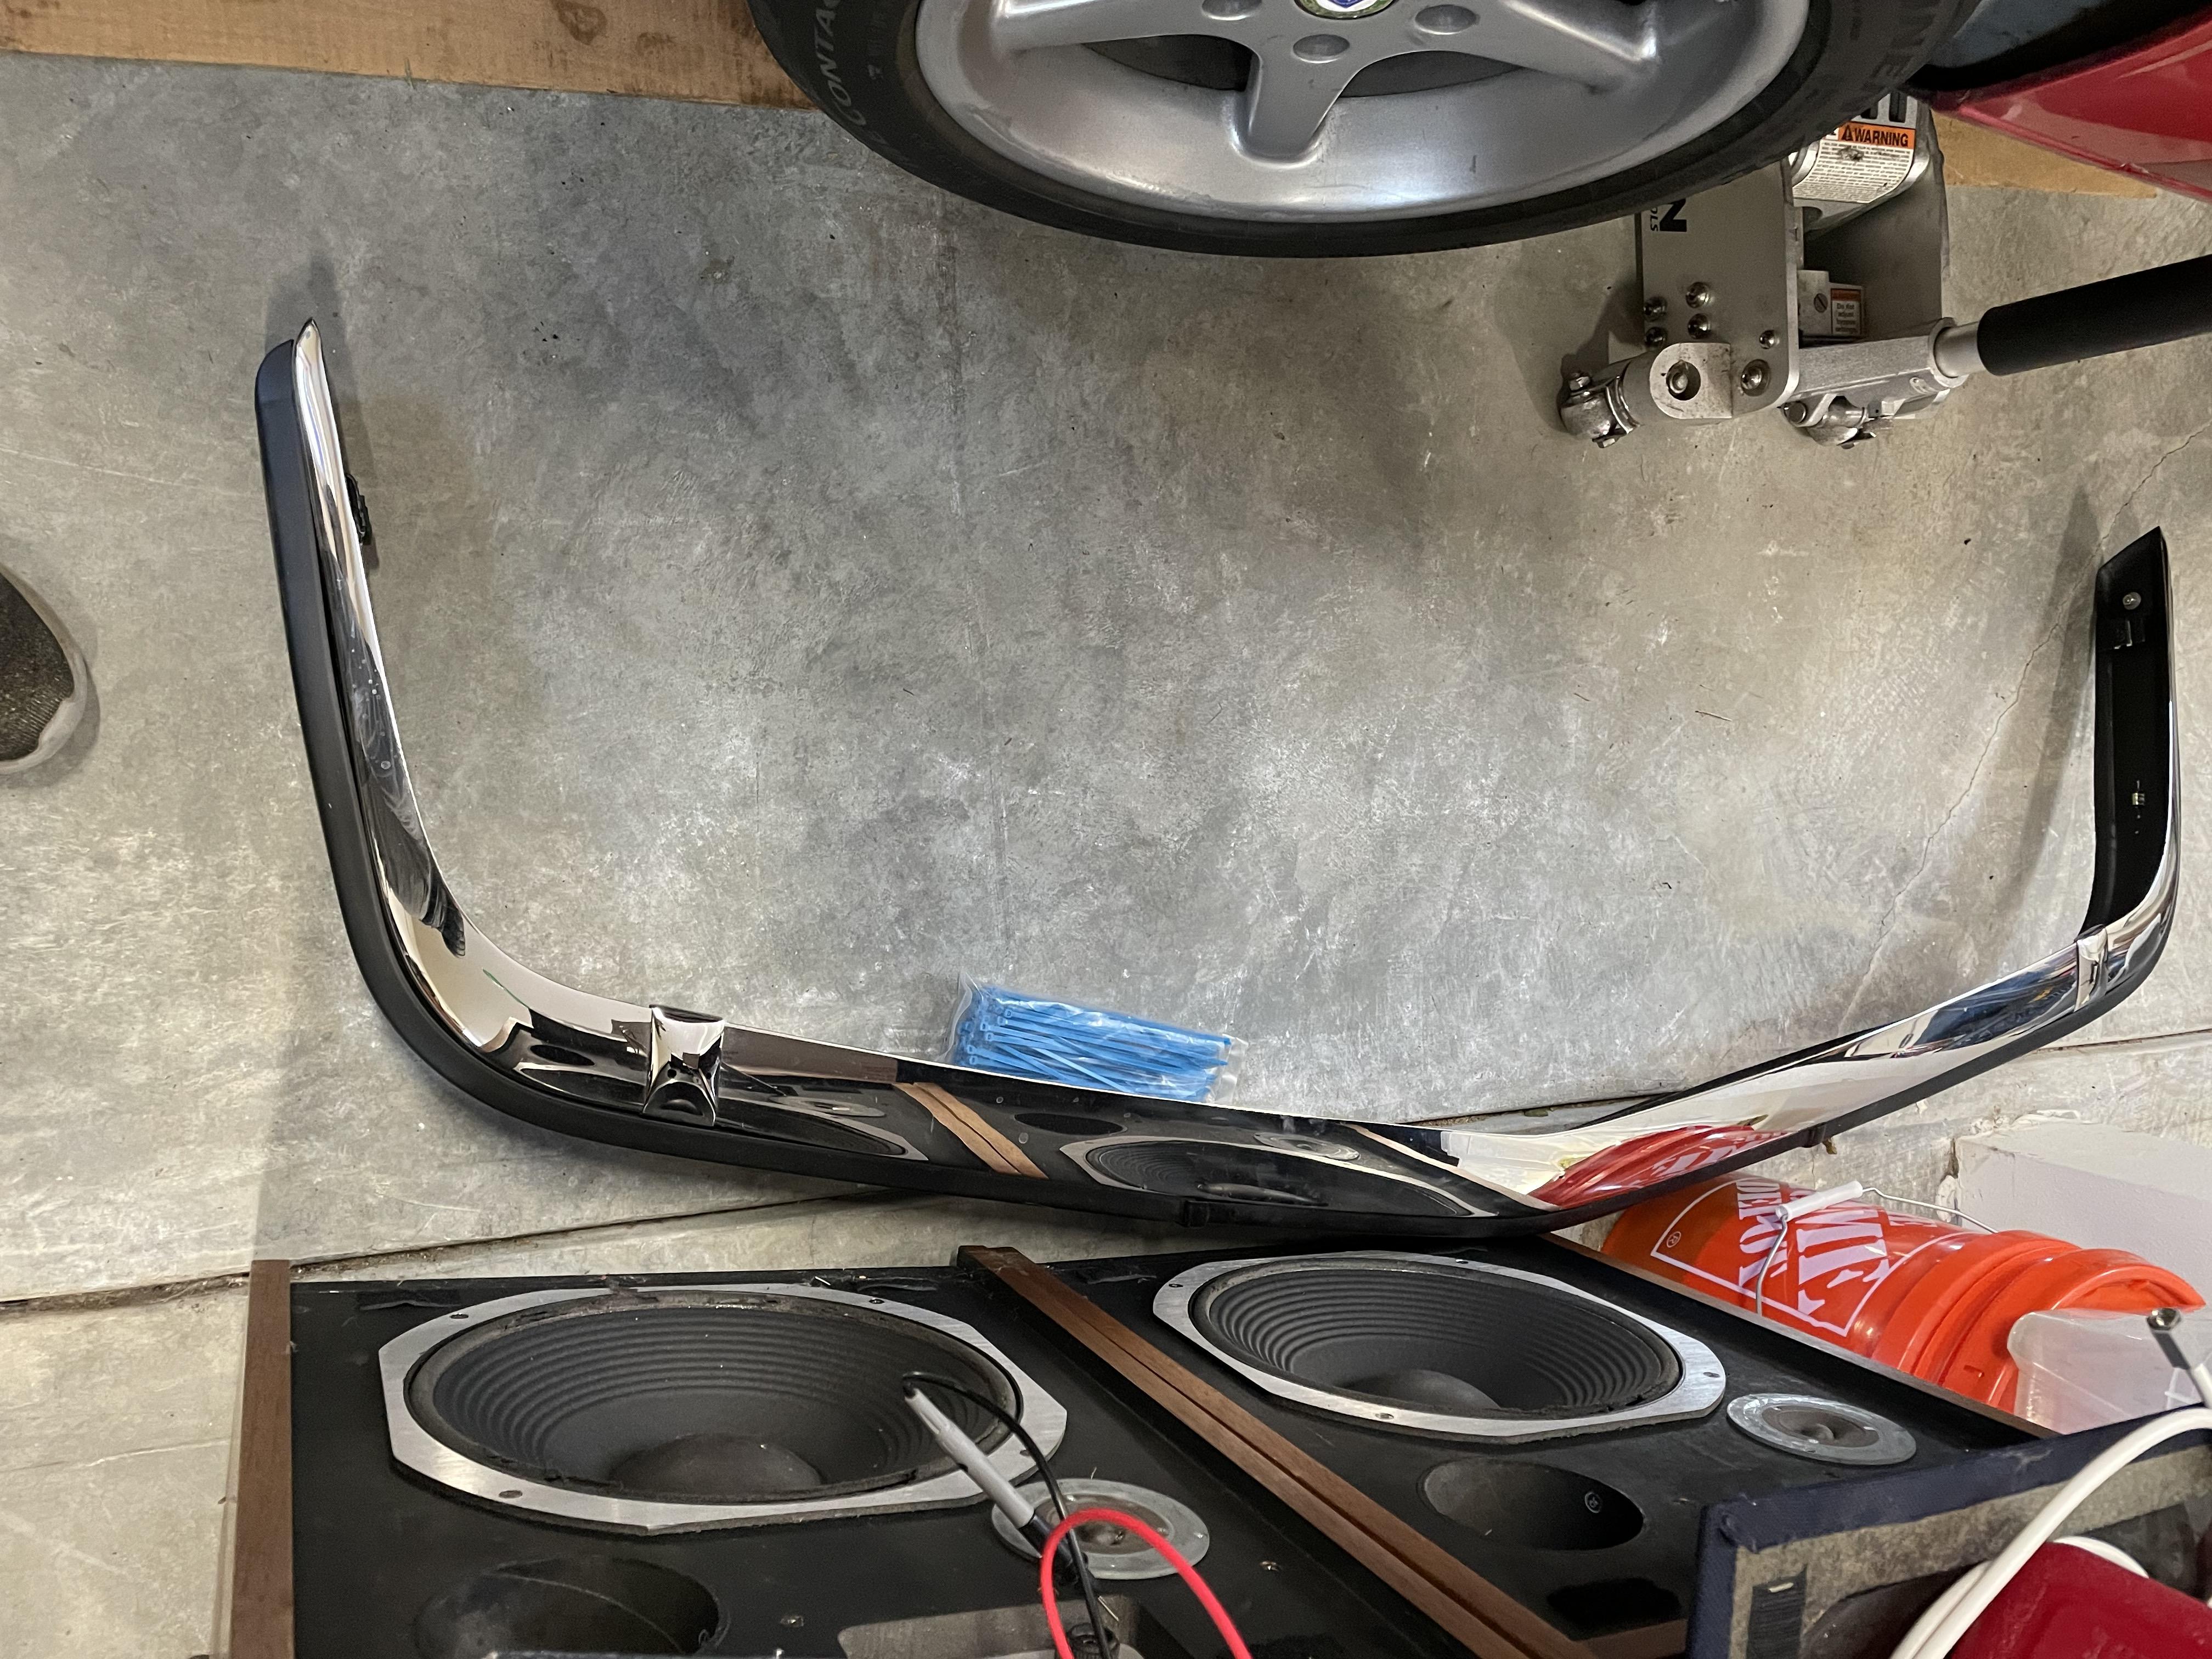
I plan on leaving the chrome bumpers/window trim and other "bling" on the car, at least for now. Good news is the front bumper is straight and shiny and the rubber bumper strip appears to be in good shape. (those are JBL L55 floor standing speakers I bought in the summer of 1971 after a summer of shoveling wet fiberglass out of a20x20x15 foot pit at Owens Corning. They need restoring as well)
Not sure why someone would just cut the bowden cable for the cruise control?

No wonder we froze heading north out of mid Oregon on our way home from Mesa! Not sure if the valve works bit it is accessible later for replacement if necessary, once the correct hoses are attached.

another example of what 30+ years in the AZ heat will do to rubber and foam.

I plan on leaving the chrome bumpers/window trim and other "bling" on the car, at least for now. Good news is the front bumper is straight and shiny and the rubber bumper strip appears to be in good shape. (those are JBL L55 floor standing speakers I bought in the summer of 1971 after a summer of shoveling wet fiberglass out of a20x20x15 foot pit at Owens Corning. They need restoring as well)

Re: And so it starts
The bright trim looks much better than shadowline in my opinion. If your stuff is in nice shape, I'd keep it that way. I am biased though despite buying everything I needed to shadowline my 528i. The more I look at shadowlined cars and then at my car, the more I like not having it.
The heater valve was bypassed, but not because of an issue with the valve. It's the core. That's a pretty sizeable job.
The hood foam looks like that on virtually all of these these days. You will be excited to see what the sound insulation under the dashboard looks like. Usually is pretty nice on "northern" cars.
Re: And so it starts
My next job is removing the front windshield to get at the dash. The dash will be removed and mailed to Just Dashes in Van Nuys for restoration. Expensive as can be but I'll get back essentially a brand new dash. And this is going to be my every day car so I want it to look right when I get in the car.
After mailing the dash away, the next job is to restore the heater box. I looked at a post on the restoration steps and I can tell you its a lot more work than my 2002tii heater box was. Oh well, it's one of those things you want to take care of when every thing has been taken apart. I plan on replacing the core with a new one as I don't want to be forced to do the job twice.
After mailing the dash away, the next job is to restore the heater box. I looked at a post on the restoration steps and I can tell you its a lot more work than my 2002tii heater box was. Oh well, it's one of those things you want to take care of when every thing has been taken apart. I plan on replacing the core with a new one as I don't want to be forced to do the job twice.
Re: And so it starts
I'll have to think this through a bit before plunking down hard earned $ for a new valance. Most of what you can see in the photos will be hidden with the bumpers being installed and a new air dam being mounted. I'll just have to POR the areas that were cut to prevent rust from rearing its ugly head.wkohler wrote: Dec 27, 2021 4:26 PM The valance is an OE part as I don’t think they’ve been selling aftermarket copies of that. I prefer the other style of course. You can cut the openings out of the one you have as well but I’d recommend replacing it. There are lots of aftermarket ones floating around and they don’t fit well (some even here advertise them as though they’re real), so avoid those. They don’t fit the fender properly and have a crappy paint on them instead of a true e-coat like factory parts. Honestly that bracket design is the simplest thing you’re going to get compared to actually getting the front of the frame rails from a Euro car. Perhaps that Russian kid would do that for you but it is a lot of work to get to them. If you replace the valance you will have to make the same modification to use the brackets you already have, just do it more cleanly. Unless someone really looks at it, they’ll never know.
Last edited by gwb72tii on Dec 27, 2021 5:39 PM, edited 1 time in total.
Re: And so it starts
You don't have to remove the glass to remove the dash. It does make that part slightly easier but if it's part of doing the whole job combined with painting the car, then that's no big deal. I'm personally not a Just Dashes fan after my experience with them but it will probably last a long time for you and with the prices that crack-free dashes command these days, it might make sense. While you have it all apart replace the AC blower, expansion valve and all of the o-rings in the AC box.
Re: And so it starts
I like the zipties holding the fuses in. Good job so far!
Re: And so it starts
All the glass is coming out prior to painting as one common area for rust is under the windshield gasket, at least on my tii it was.
And yes to the A/C recommendation.
It's pretty amazing that all the bright work on the car, the window trim etc is all in good shape. My tii's trim was scratched and a lot of it needed replacing when I restored it. And BMW doesn't give anything away.
Any other companies restoring dashes?
And yes to the A/C recommendation.
It's pretty amazing that all the bright work on the car, the window trim etc is all in good shape. My tii's trim was scratched and a lot of it needed replacing when I restored it. And BMW doesn't give anything away.
Any other companies restoring dashes?
Last edited by gwb72tii on Dec 27, 2021 5:49 PM, edited 3 times in total.
Re: And so it starts
What do you think of the 16a and 25a fuses on fuses 5 and 6?
Re: And so it starts
Sometimes its better to not look too closely when driving a new to me car up the coast!
I think If I had noticed everything I'm coming to see I might have had it shipped north. But then that's no fun.
Re: And so it starts
That ain't right - good catch. Going to 16A is unlikely to cause an issue by itself but 25A is too much. Both are evidence of covering for some other problem.

