535is Homebrew Turbo (ex 633 Callaway) - 2024 Update

Discussion pertaining to positive pressure E28s.
tschultz
Posts: 4102
Joined: Mar 01, 2009 7:58 PM
Location: Denver, Colorado
Contact:

Re: Callaway 633CSi

Post by tschultz »

Spent some time taking apart the center console. Found the temp control knob seized. The temperature knob spun, but the linkage between the two was damaged. A new one is coming to my house.

Today, i spent the afternoon mounting up the rear euro bumper. Pretty happy with the fitment considering I eyeballed it after a test fit. After I drilled the holes, I thought I could have mounted the chrome above the extended tail panel. It wasn't meant to be and so it is tucked underneath. Very tight clearance under the euro rear valance, so it will likely stay where it is at...

I'm trying to determine if I'm going to stick with the euro side trim covering or try to modify the US panel. Either way, some photos:

Image

Image

Image

Image

Image

Image

Getting the US trim panels removed was a bonus when I did it originally, so i'm probably going to stick with the Euros...
tschultz
Posts: 4102
Joined: Mar 01, 2009 7:58 PM
Location: Denver, Colorado
Contact:

Re: Callaway 633CSi

Post by tschultz »

I had to head out of town for work for about a week, so I didn't get as much done as I wanted.

However I have another update for the time being. I mounted my rear Zender spoiler. I used the two studs to bolt it to the trunk, along with 3M double sided tape. unfortunately the edges are still lifting slightly, so I may have to try it again or use an adhesive instead. Onto some overdue photos:

Image

Image

I also spent some time cleaning up my bumper and airdam to be painted. This was definitely a DIY job as I don't need it to be perfect, but I think it came out pretty good. I just need to get the bumper aligned nicely on the passenger side. I just used a spray can enamel and a clear coat to get some sheen. Good enough for a track car, I am liking how it is coming along.

Image

The front will be going down once I replace the shocks/springs, but that won't happen until I install a new TCD turbo and get my exhaust/ downpipe cleaned up.

Image

I know it's dirty
Image

City lights all hooked up. You can see the alignment issue that I need to fix.
Image
tschultz
Posts: 4102
Joined: Mar 01, 2009 7:58 PM
Location: Denver, Colorado
Contact:

Re: Callaway 633CSi

Post by tschultz »

Bad news:
I had been hearing a creaking/clunking noise which sounded like it was coming from my drivers side rear window. I removed the seat and after not finding anything for a while, I noticed something shifting which i got in and out of the car.
The rear subframe bushing mount seems to have separated from the underbody. See pictures below:

Image

Image

Image

Image

Image


Can I have this welded and repaired? Any suggestions/advice greatly appreciated.

At some point I was going to install a cage, but that was quite a ways off in my mind. Maybe I need to do some structural reinforcement sooner than later...
marc79euro645
Posts: 513
Joined: Dec 08, 2008 11:33 PM

Re: Callaway 633CSi

Post by marc79euro645 »

A small sandblaster rig is real good at cleaning up areas like that. Then just mig in some more metal.
tschultz
Posts: 4102
Joined: Mar 01, 2009 7:58 PM
Location: Denver, Colorado
Contact:

Re: Callaway 633CSi

Post by tschultz »

marc79euro645 wrote:A small sandblaster rig is real good at cleaning up areas like that. Then just mig in some more metal.
Good suggestion, thanks! I found a welder guy locally who seems experienced enough to be able to handle this job.

I'll double check and see if he has a portable blaster to clean it up.

Since I am hesitant to drive the car, i was hoping to swap injectors. Well it was raining so I took a quick walk around. More slow progress to come later...

https://youtu.be/6PEVT0WAabU
tschultz
Posts: 4102
Joined: Mar 01, 2009 7:58 PM
Location: Denver, Colorado
Contact:

Re: Callaway 633CSi

Post by tschultz »

After it finished raining, I decided last night to install the 24lb injectors. The old ones were quite dirty and probably came out of a junkyard car or something. I started it up and put the FQS switch at setting#3 (-6% fuel) to get close to stoichiometric. It was running slightly rich, so I attached the o2 sensor and now idle right at 14.7-15.0!

I drove around the block and the engine revs smoother than before and seems just a bit more happy. I'm glad I didn't need to adjust the AFM spring (I'd rather keep that stock if possible) to make this all work.

Stays right around 11AFR with WOT which may be slightly rich, but then creeps to ~13 when the additional air moves through the engine. Right now I'm running ~8psi and will be installing the RRFPR (BEGI 2025) as soon as the fittings come in -- I want to be able to add fuel as more air is forced in.

I ran some calculations and think these injectors might be just up to the task. I'll explain my logic below, please correct me if I am making an assumption that isn't valid, I just want to get it recorded in my notes on the web.

Code: Select all

For Stock M30B34, target boost pressures are: 6psi, 8psi and 10psi (we'll do all three just for comparison purposes)
Elevation: ~5000ft    Air Pressure: ~12.2psia

Pr 6psi = 1.49, Pr 8psi = 1.65, Pr 10psi = 1.82

According to Corky Bell's intro book, we multiply the Pr by the NA engine airflow capacity. The very definition of Pr is a ratio of the amount of airflow in the intake charge as compared to the original airflow value. So at 10psi (Pr=1.82), we are moving roughly 82% more air than stock. If this is the case, I argue that we can increase our fuel by approximately 82% to match and keep stoichiometric combustion and roughly the same running characteristics throughout the fuel map.

I found specs for the stock M30B34 injectors to be 17.6lb/hr @ 3bar (43.5psi) fuel pressure.
My replacement Ford injectors are 24lb/hr @ 39psi, or 25.3lb/hr @ the same 43.5/3bar as above.

If I extrapolate to 10psi boost, I use the following equation
(fuel pressure * fuel injector rating required)/ fuel injector size = fuel pressure required
[43.5psi * (17.6lb/hr * 1.82)] / 25.3lb/hr = ~55psi fuel pressure required via the FMU to run 10psi boost with these injectors and fuel pressure
Right now I get nice running characteristics with the settings mentioned above, smooth running, right on 14.7 AFR. The only problem is fuel when the turbo starts to move more air. Now since I believe my calculations are correct, I believe my injectors can handle the above usage and with the proper fuel pressure should be able to provide the required fuel. FYI this engine is fully stock otherwise, so 10psi is my maximum limit, I will likely be running 8psi only.

If I keep normal operation at 3bar fuel pressure, and tune my BEGI to run 55psi fuel pressure at 10psi boost, I should be able to increase my fuel proportionally the same amount as the air I am moving and use these injectors.

The above are theoretical approximations, but I will assume this is a maximum value of air flow due to intake restrictions, air density losses due to heat and other misc items. Assuming we are moving less volumes of air due to restriction and efficiency issues, and less fuel due to other restrictions, I think this sounds about right.

Basically, keeping 55psi as my upper limit of fuel pressure with the RRFPR, These injectors are good for a maximum 10psi. Thoughts?
Last edited by tschultz on Jul 15, 2015 11:36 PM, edited 2 times in total.
mitch5
Posts: 432
Joined: Feb 12, 2014 1:36 AM
Location: phoenix

Re: Callaway 633CSi

Post by mitch5 »

Wire wheels from harbor freight will strip it to bare metal fast. They are the heavy duty ones that go on a grinder. For 20 bucks you can get the grinder and a wheel.

I have been following this thread for awhile and honestly I would say go buy a used Lincoln mig welder with c02. It looks like you have quiet a few cars with projects.
tschultz
Posts: 4102
Joined: Mar 01, 2009 7:58 PM
Location: Denver, Colorado
Contact:

Re: Callaway 633CSi

Post by tschultz »

Still waiting for fittings to come in to install my Begi. Also waiting on my welder contact will come to fix my rear subframe mount issue (he won't come until next weekend).

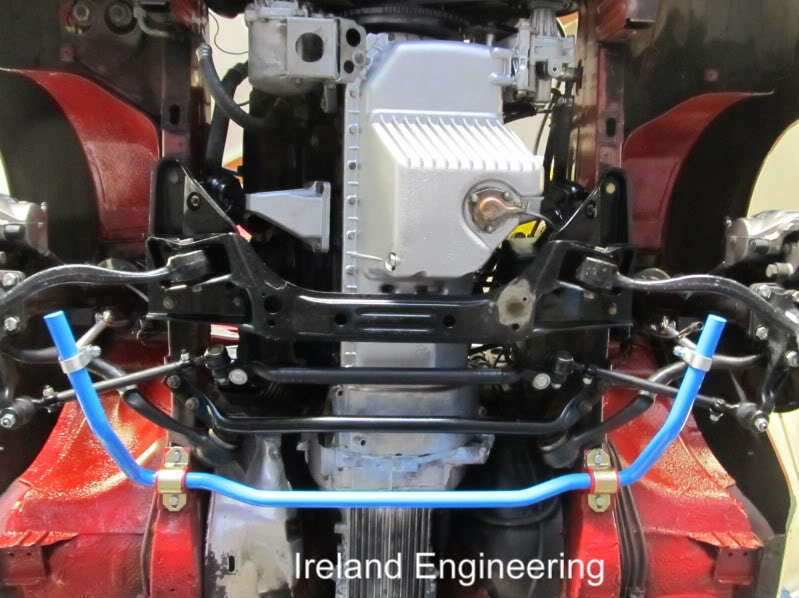
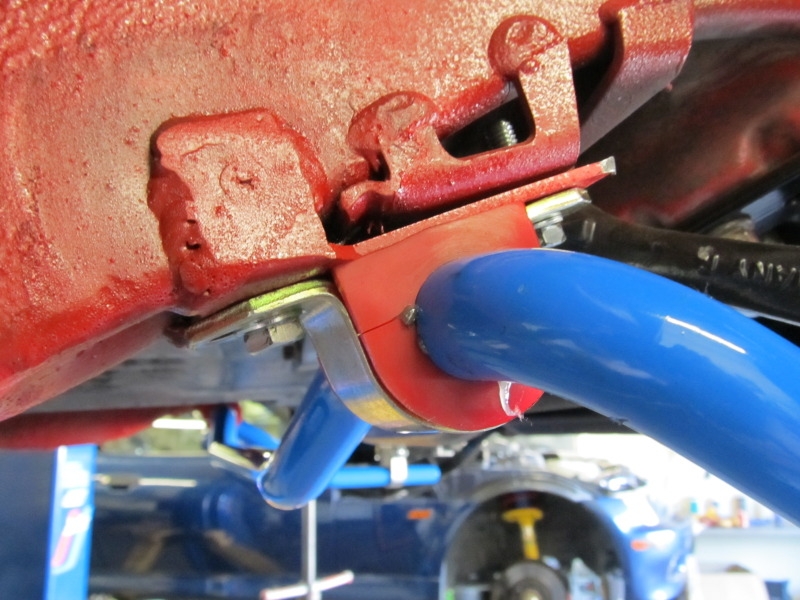
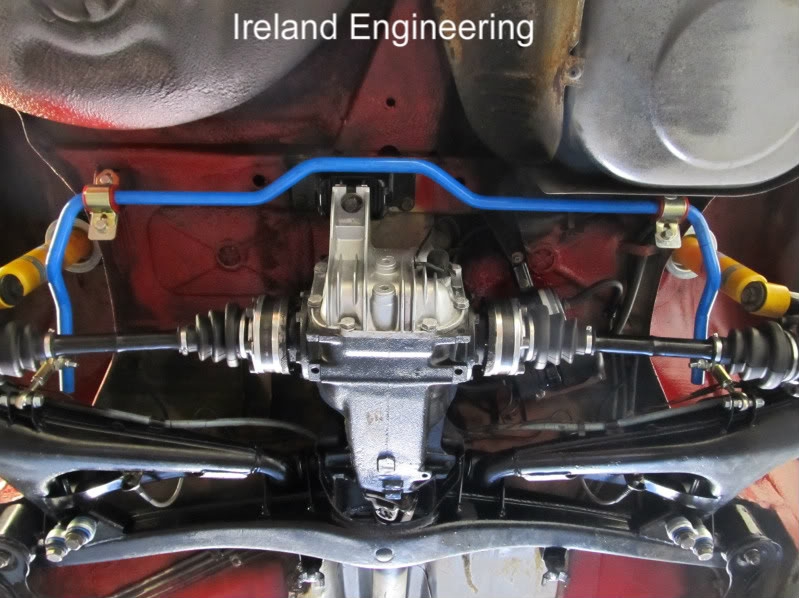
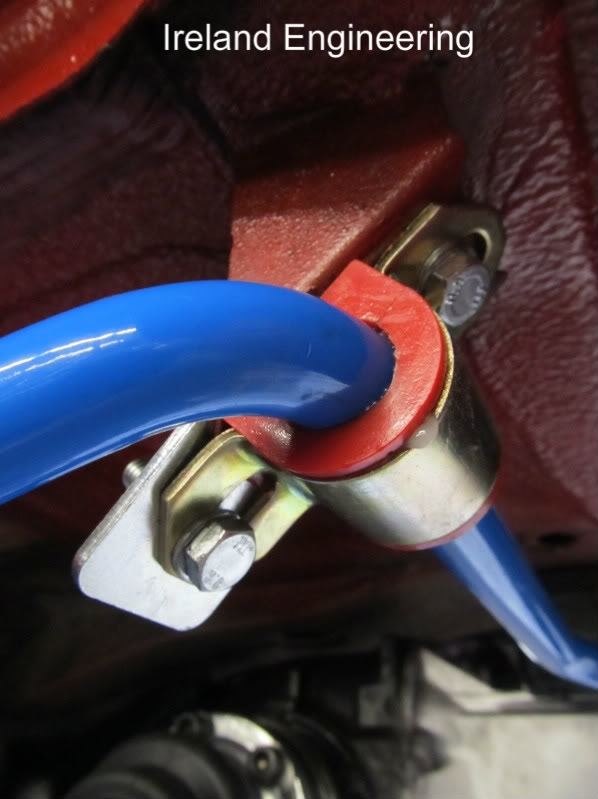
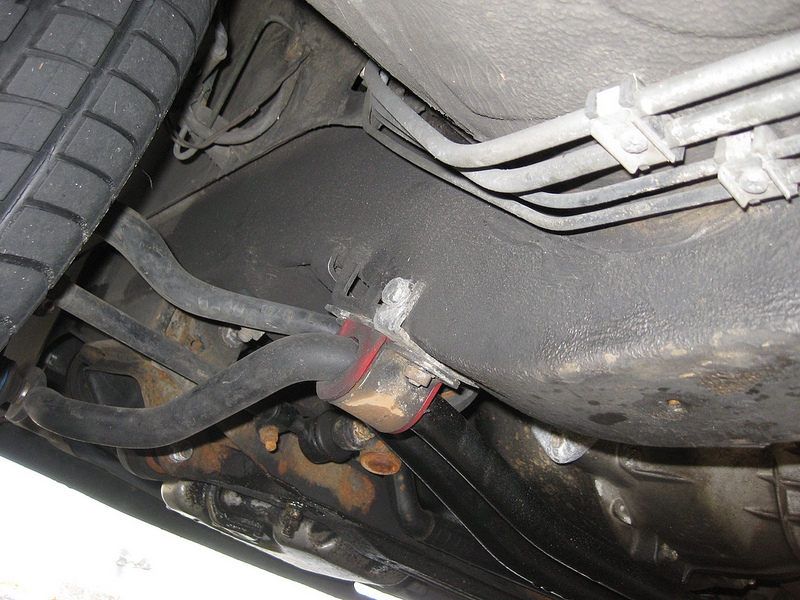
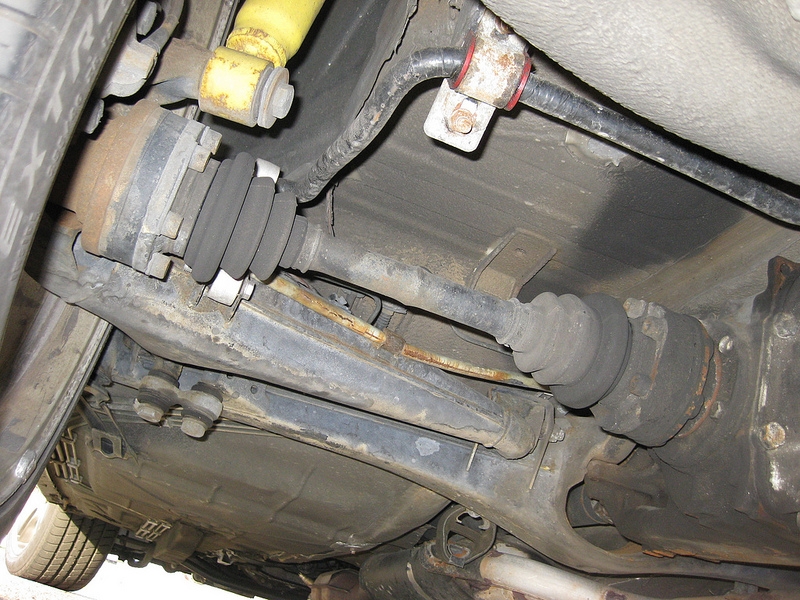
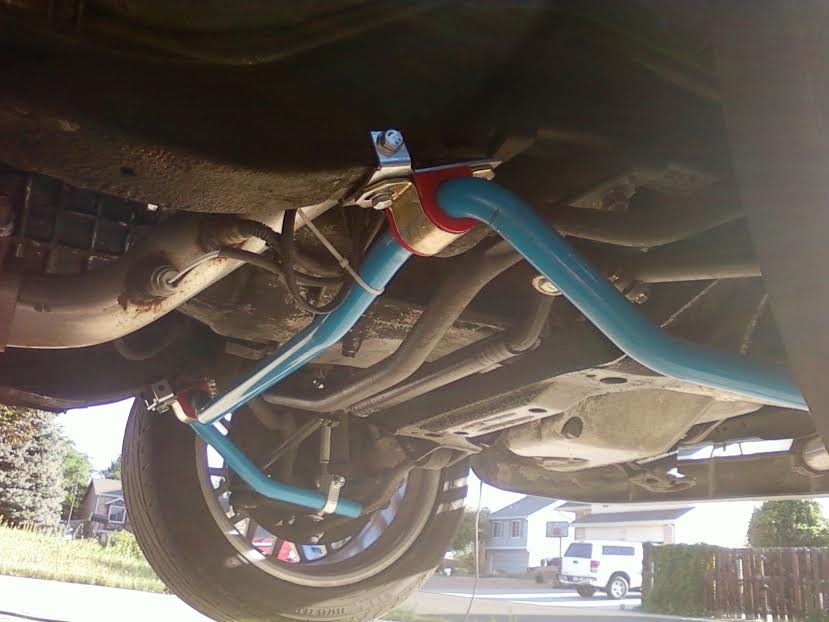
In the mean time, I mounted the IE rear sway bar. I was able to fit it to the early 533/633 style mounting ear even. I haven't driven the car yet, but I'd like to have the welder reinforce this as well when he comes out to my place.

The front, I need to continue modifying the frame rail so the new bracket can be mounted flush. Once flush, I can drill through and mount the bolt. Anyway, waiting to get these issues fixed before trying it out and driving the car. I'd like to keep everything reversible until I'm sold that I want to go forward with these bars...

Some great photos of these bars for later reference (not my cars). These are from Jeff at IE. Notice how the frame rail has to be pounded in to fir, sort of a silly design...

I am not the most happy with this design, especially since it contacts the control arm when trying to get to full lock (Kohler has mentioned this before).
Image

Image

Image

From another poster here:

Image

I don't want to weld unless I know I want to keep the 25mm bar... (IE or E28 M5)
Image

Image

Image

And another customer who bolted them

Image

Image


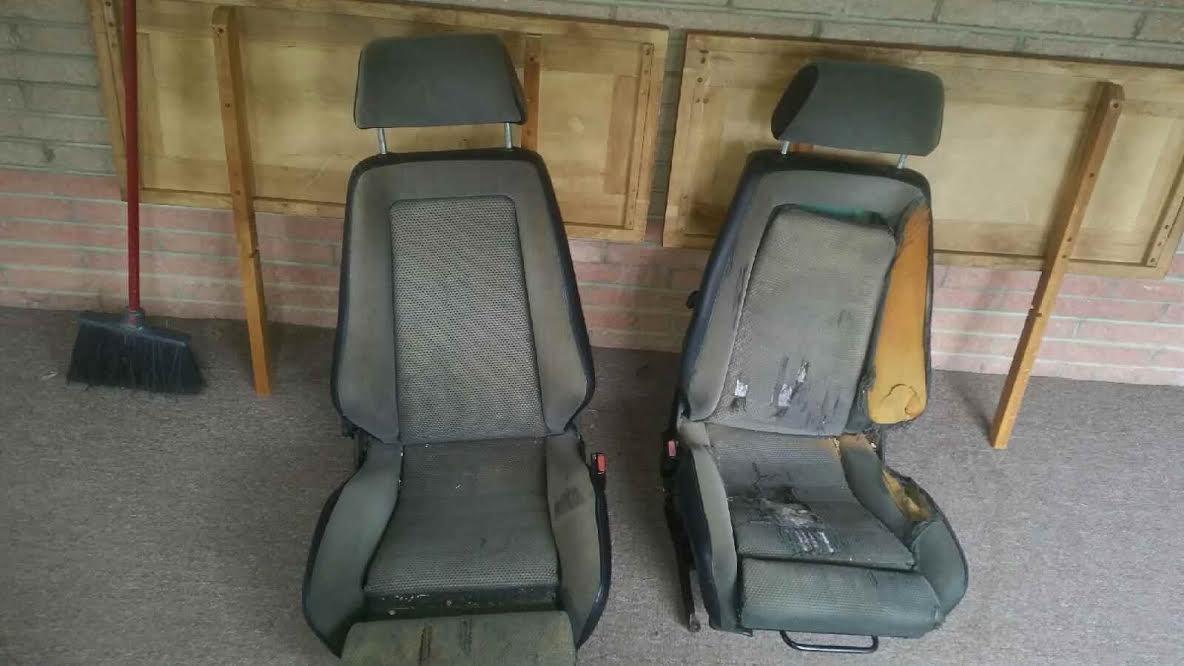
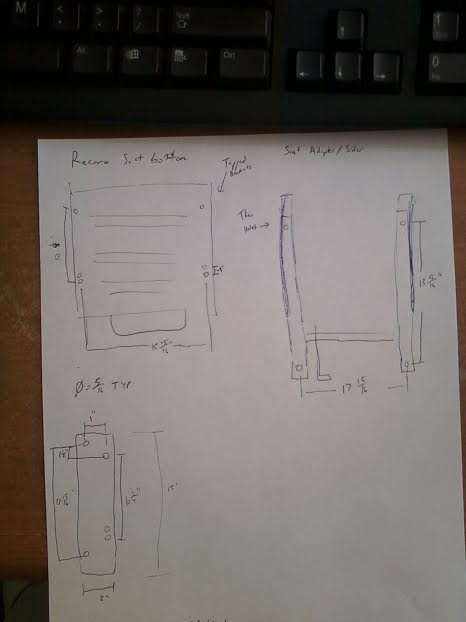
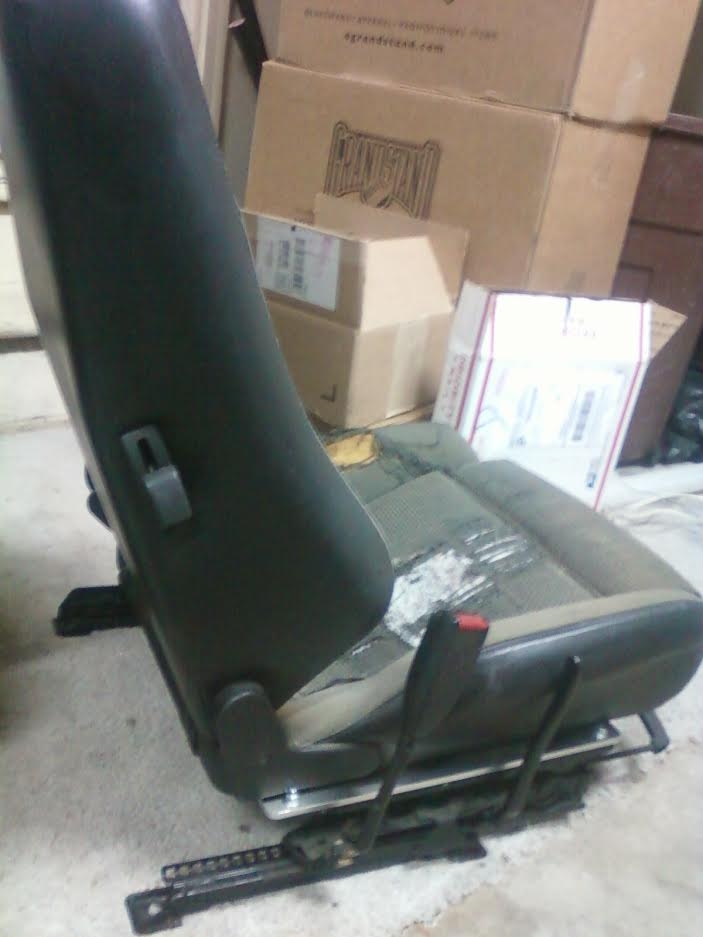
In the mean time I picked up some E21 Recaros from a friend. These seats are awesome (I have them in my Euro 635)! Not sure if/when I would have them recovered but my friend says he will get me some replacement foam for what I paid him. I couldn't wait to try them out in my car this morning.

Image

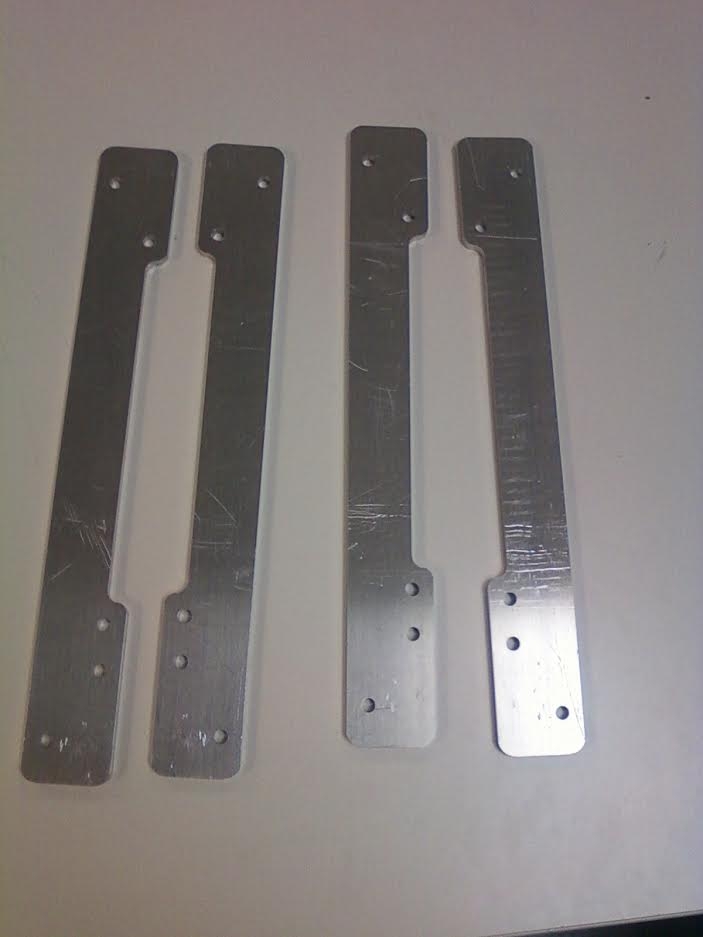
I was thinking that the comfort bases/sliders would work with these seats, but they are too wide so I need adapters. I took some measurements and plan to make my own.

Image
tschultz
Posts: 4102
Joined: Mar 01, 2009 7:58 PM
Location: Denver, Colorado
Contact:

Re: Callaway 633CSi

Post by tschultz »

Part way finished with the IE sway bar in the front. Putting the other bolt through tonight. You can see the low hanging downpipe (which is getting closer and closer to becoming priority #1).

Image

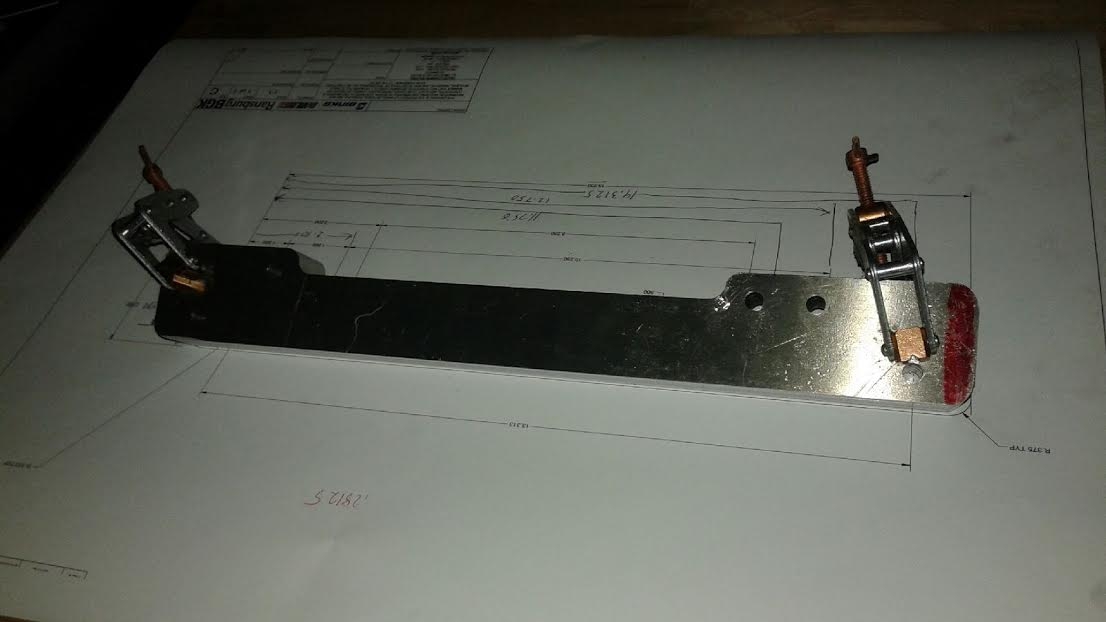
Also, my co-worker helped me make these after I put together my measurements. Going to try to install one or both seats tonight also.

Image

More updates to follow later tonight.
tschultz
Posts: 4102
Joined: Mar 01, 2009 7:58 PM
Location: Denver, Colorado
Contact:

Re: Callaway 633CSi

Post by tschultz »

My welder is supposed to come this weekend to fit my cracked rear subframe mount. I'm also going to have him weld my rear sway mounts and get them reinforced as much as possible.

In the mean time got my sway bars both mounted, the front I finished up last night and got it tight to the frame rail.

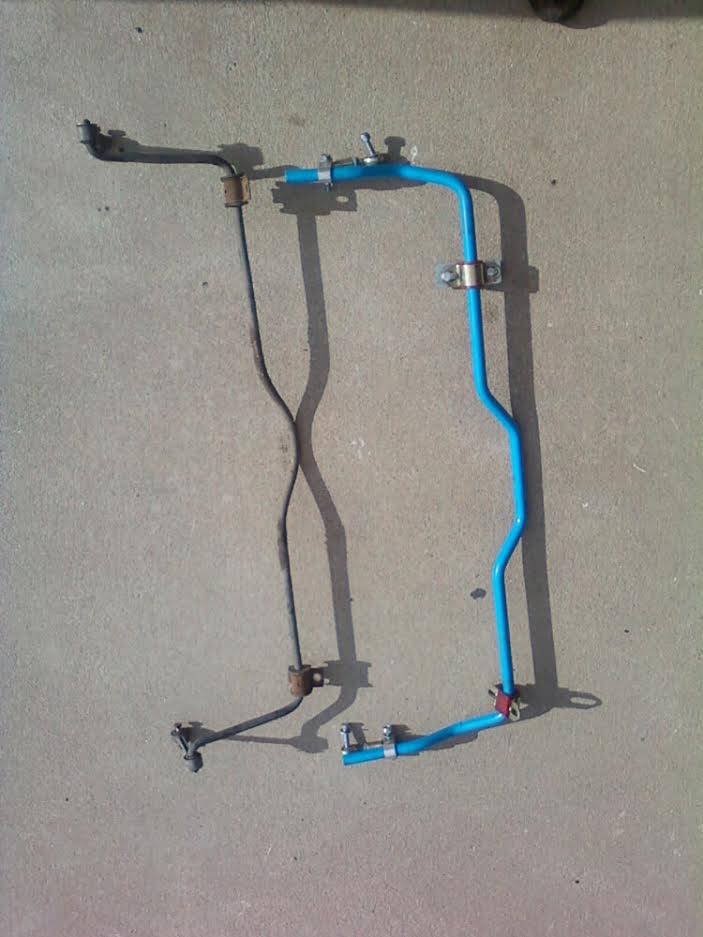
The rear is also on, but here's a comparison of the 19mm vs the stock 14.5mm unit.

Image

It's so tiny, I now understand why the car felt like a big whale when matched with the PO's random cut rear springs and blown shocks. I haven't yet driven the car with the new bars, but will once the repair is complete.

Also a glamour shot of the Recaro seat brackets. My coworker made them real nice, .250" AL.

Image

They fit perfectly also

Image

Putting a radio in the car and awaiting fittings so I can finally install the BEGi. They sent me the wrong fittings (i want 5/16" ID barb x 1/8" mNPT, I got 1/8" ID) last week, so I'm sitting around waiting. But not I think I have a bonus couple of fittings to use as spare boost ports if I get a tee somewhere.
tschultz
Posts: 4102
Joined: Mar 01, 2009 7:58 PM
Location: Denver, Colorado
Contact:

Re: Callaway 633CSi

Post by tschultz »

I know I have been bad about laoding pictures, so I took some today after installing my (old) radio and putting the glovebox and knee panel in place. I have previously fitted the Recaro seats, even though the Driver's needs to be redone. The main pieces missing from the interior are the ebrake surround and the rear seat for access during the repair when the welder comes tomorrow.

Some pictures of the 24# injectors that my brother gave me. They are from Ford crown vic's
Image

The front sway bar after mounting the other night.

Image

The rear sway bar/mount.

Image

The front window all fixed and door panel all back together. I found almost all the pieces in the mess from when I bought the car. Nice to have the window working properly again.

Image

The seats installed. You can see the custom brackets. The good news is that seating position is great.

Image

Cockpit and laughable gauge pod. I wired this up in this position and at least it is functional! At some point I will probably upgrade to something that isn't damaged and looks better, but it works for now.

the trunk cleaned up pretty well, including the toolkit, tire lug wrench and spare which is such a far cry from when I bought it.

Image

Image

Passenger side. This seat I was going to put on the drivers side, but it only has a tilt lever on the outside bolster.

Image

Image

Image

And of course, an engine bay shot

Image

I drove it around the block because I couldn't resist with the new bars. It is sooo much better. Even with clapped out shocks and the stock springs, the front of the car feels so much more agile than before. It is much more accepting to change directions and feels much more similar to the M5's handling characteristics.

Additional video once i get the subframe mount fixed.

Adding a signal line onto the BOV helped to open and hold close the valve during normal operation. At the moment, it will run up to 8/9psi with my current settings. Fueling is good (11-12.5) up until the higher revs where it starts to go lean (13-13.5). I obviously haven't driven it hard up top because of this.
My biggest concern is intermediate throttle between WOT and below. Up until the threshold throttle position, I see 14-15 AFR's even if accelerating slightly. I am hoping the RRFPR will help aid this in boost related settings, but that leaves the transition when boost in less than 0psi (but more than -15psi).
Or maybe the RRFPR will operate at a manifold conidition in he range and not just +psig??


I am just wondering in the scenario where I am on boost and I left off briefly and then continue with part throttle where theres still engine load/accelerating may 2/3's). This scenario is where I see the lean condition and it worries me.
Should I take the plunge and adjust my AFM to richen over the entire rev range??

Any thoughts?
tschultz
Posts: 4102
Joined: Mar 01, 2009 7:58 PM
Location: Denver, Colorado
Contact:

Re: Callaway 633CSi

Post by tschultz »

A couple photos of Frank the welder doing his job. The issue must have been there a while as there were a few locations he couldn't weld due to the lack of thickness in the metal. But in all he got a good 3-4" of weld in there. He used carbon/stick welding and it took about an hour

Cleaned up, you can see about 3/4" of the way around the welds had been damaged/cracked.

Image

Image

Here's a short video on my way into work.
I really only got on the gas in second gear. Running 8psi and O2 sensor disconnected. It idles right about 14.7 in 70/80 temperatures, but it was about 50 this morning.
The camera placement allows you to see the gauges. On transition throttle and -10-0psi, you can see AFR's in the ~13-14 range. I am hoping to remedy this with the RRFPR. Under WOT the larger injectors give about 10-11:1 AFR until the turbo starts moving air. As I understand this is rich, but maybe still acceptable. Once reaching 5+psi AFR's go lean, and this is where the RRFPR will really help.

https://youtu.be/9aw1Uw0aPNE

You can see oil pressure flickers at 7/8 psi at hot idle. Is this something to be concerned with? I'm running 20W50 conventional...
Once in the revs at this temperature, I see anywhere from 10-40psi oil pressure.

Curious to hear you guys' thoughts on this and overall drivability. Going to try the RRFPR but I now have MS in the back of my mind as a future upgrade.
LeiseyJr
Posts: 1527
Joined: Dec 22, 2013 10:11 PM
Location: Houston,Tx

Re: Callaway 633CSi

Post by LeiseyJr »

When the motor was out did you check the timing chain guides?
tschultz
Posts: 4102
Joined: Mar 01, 2009 7:58 PM
Location: Denver, Colorado
Contact:

Re: Callaway 633CSi

Post by tschultz »

No, total unknown engine.

I know they wear, but there really haven't been many M30 failures of this type that I know of...
LeiseyJr
Posts: 1527
Joined: Dec 22, 2013 10:11 PM
Location: Houston,Tx

Re: Callaway 633CSi

Post by LeiseyJr »

tschultz wrote:No, total unknown engine.

I know they wear, but there really haven't been many M30 failures of this type that I know of...
They don't just wear they disengrate and fall apart. My motor was a known running motor but the tensioners were gone. What can happen is the pieces that do crumble end up in the oil pump pick up screen and clog. Reducing flow and casuing the low oil pressure at idle and under a certain RPM. Did you see any bits in the oil pan?
tschultz
Posts: 4102
Joined: Mar 01, 2009 7:58 PM
Location: Denver, Colorado
Contact:

Re: Callaway 633CSi

Post by tschultz »

Good Point^^

No major chunks in the oil or oil pan. We didn't do an extensive look at the pump, but nothing looked out of the ordinary...


In other news, last night I installed the BEGI 2025. I mounted it just under the coolant reservoir, pretty much where the return line runs.

First thoughts: Throttle delivery felt smoother, especially in the midrange and getting off idle. Really with this old-tech turbo @8psi on a stock engine, it gets going much faster than I could have anticipated!

I ran down the street and back, fine tuning the part throttle AFR's and adjusting the gain and main pressure of the begi. Cruising is just about 14.7, which will decline depending on the vacuum/intake pressure. I feel I have a nice stock pressure setting at about 40psi, and it barely creeps up when at atmospheric. I haven't run my gauge through to the windshield yet, but I imagine I'm at no more than 55psi max at 10psi (see calculations in an earlier post). I'll double check this when I get some time.

Now I have it in a nice place where slight acceleration/load brings the AFR's from 14.7 towards 13-13.5 near atmospheric. I think 12.5 is a good target here, so I might increase the gain slightly.

When it reaches boost, the number continues to creep down towards my target of 11.5:1. I am happy with the feel of all of this. The car will really get going at 3/4's throttle once the turbo spins up; before it just wasn't as smooth.

There is one caveat to all of this. WOT signal from the TPS throws everything out of whack and way rich. My gauge shows 10:1 at anything less than atmospheric into the intake.
As I understand, this is too rich, and is a result of the 24# injectors and stock WOT fuel map dumping more fuel than it thinks.
What I'd really like to do is disconnect the WOT Pin of the TPS and see how it all responds. Of course this means I'd rely on the BEGI for all fuelling needs in boost, but I practically am right now anyway.
All the switch does is activate Idle circuit or WOT circuit-- nothing in between. You can disconnect it and the car will still run, but returning to idle may be tough for the car.

So basically I'd keep it to activate the Idle circle only, just like the automatic cars do. I don't think I want to tune the RRFPR to have less gain as there will still be a segment of the fuel curve that is too lean for the condition, and a segment too rich (WOT).

Thoughts always appreciated...
LeiseyJr
Posts: 1527
Joined: Dec 22, 2013 10:11 PM
Location: Houston,Tx

Re: Callaway 633CSi

Post by LeiseyJr »

tschultz
Posts: 4102
Joined: Mar 01, 2009 7:58 PM
Location: Denver, Colorado
Contact:

Re: Callaway 633CSi

Post by tschultz »

So time for another update. D4C has come and gone, so I have a bit more time to continue with small progress (hey I warned that it would be slow!).

I started driving this car to work and have put approximately 1000 miles on it. To start with, I was mainly tuning the mixtures and experimenting with the FQS switch.

Where I have it now seems to be reliable and I haven't touched it for over a week. First, I jumpered the TPS to the harness, only connecting the GRD (middle pin) and Idle pin. For the moment, WOT is not used because I was getting super rich conditions while under vacuum and full throttle.

Image
**Slightly adjusting it seemed to help, along with cleaning the ICV and Throttle body with carb cleaner-- highly recommended**

The FQS switch is set to Position 0 or 2, which is either standard or -3% fuel. I think this just adjusts the duty cycle of the injectors slightly and holds them closed. This gives me idle AFR's of 14.7-15.3 depending on ambient temperatures.

The RRFPR is set with the gain needle all the way out, and the center screw maybe 2/3's of the way out. However, I found out that I don't have the restrictor required for this device, so I may need to continue tweaking when I install the new turbo.

Last night, I installed a Walbro GSL392 inline pump in replacement of the stock external pump. I like reversible modifications, so if I ever wanted this could be reverted back to a standard Bosch pump, or it could be repaired on the side of the highway if ever needed.
I found a great write up on the subject, which I will save and share below for somebody else's future reference.
Follow the pictures how to swap from your old 130lph vane type inline pump to a modern 255lph gerotor design from Walbro that flows more at the same pressure. The gerotor squeezes fuel from in between to gears up to your rail versus being pushed with the old vane style. This allows the pump to be small, light, quiet, etc. Everything you want to ease your mind while zipping down the road.

First step it to verify you have all the tools and knowledge to do such a repair. This entails safety glasses, wheel chocks, hoses, drivers, clamps, etc.

Here is what you need:

1 - Walbro 255lph inline fuel pump (I used Walbro GSL392)
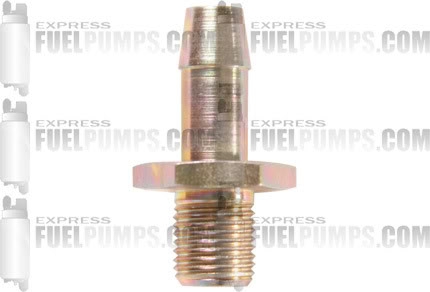
1 - 8mm barb - 10mm x 1.0mm male (Walbro P/N 128-3024)
1 - 12mm barb - 10mm x 1.0mm male (Walbro P/N 128-3025)
1 - Few meters of 8mm x 13mm fuel house (BMW P/N 13311722262), 5/16" works fine.
1 - Meter of 12mm x 18mm fuel hose (BMW P/N 16121176440)
1/2" will work IF you can locate high pressure EFI line.
1 - New hose clamps, ABA or style that does not cut into hose


1. First, secure car on ramps or jack stands and chock wheels. Disconnect fuel pump relay when vehicle is running (if you have it) or let pressure bleed off after a few hours. Then identify the fuel pump beside the filter.
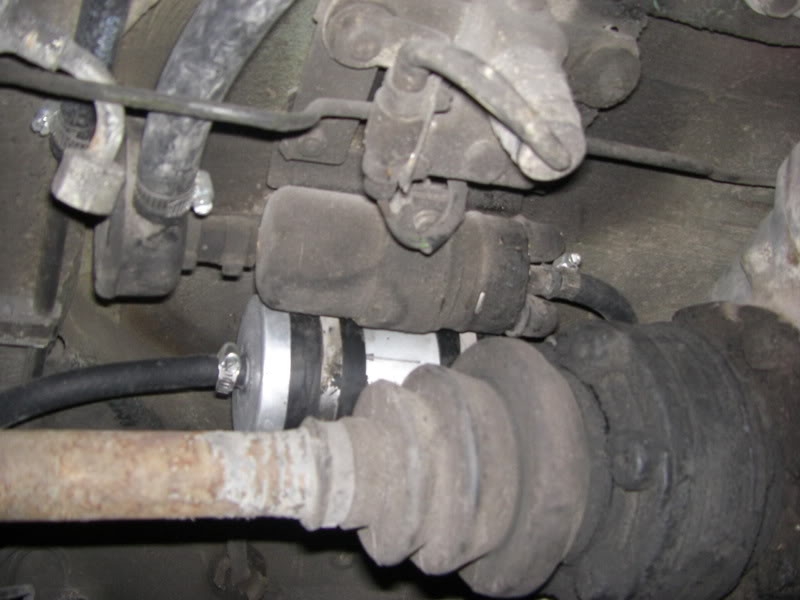
Image

2. Here is your new high volume at high pressure Walbro with fittings installed. 12mm on side to lift pump, 8mm on side to filter.
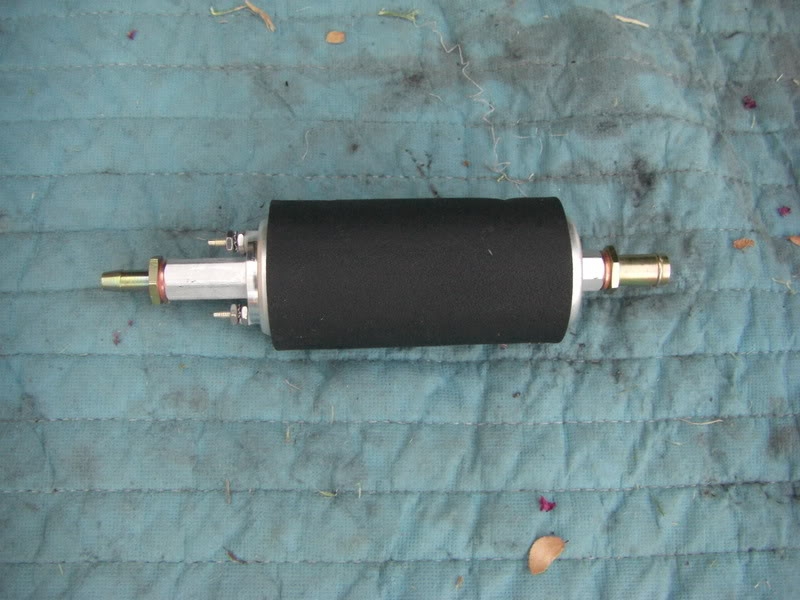
Image

Image
Image

3. Next, go ahead and disconnect the old fuel lines. You will spill fuel, so put that stogie out and locate a suitable container to catch this fuel.
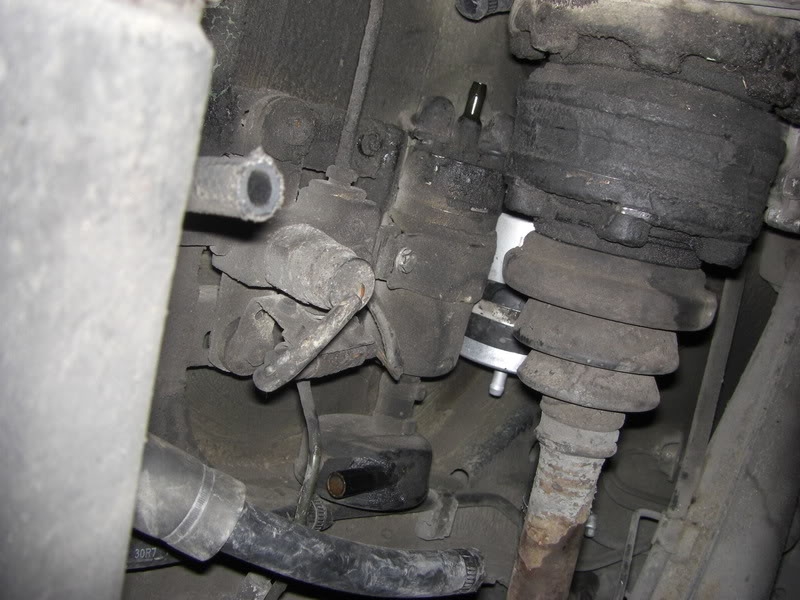
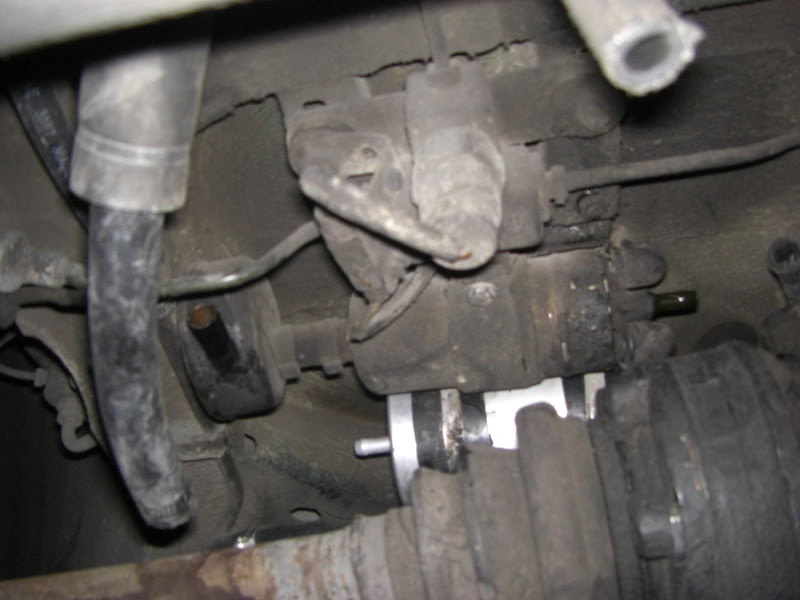
Image
Image

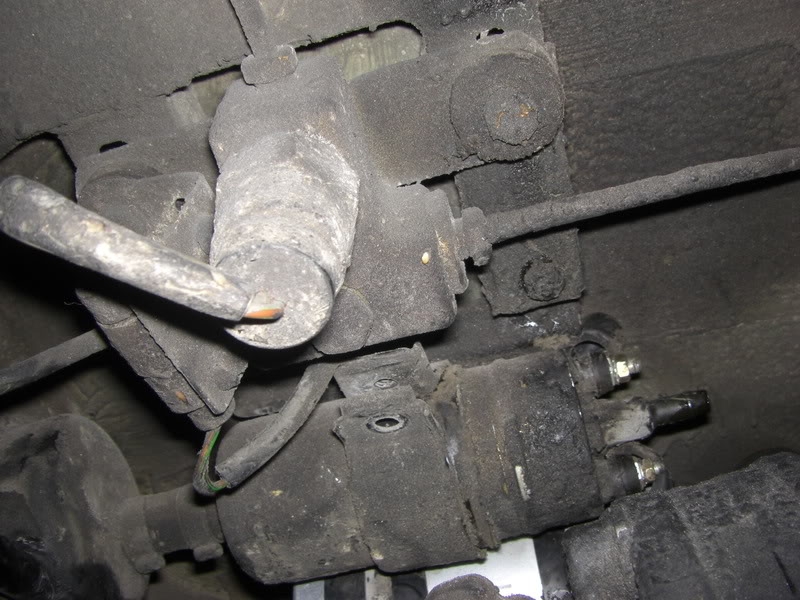
4. Remove 10mm bolt from bracket and nuts that secure power wires. Should be 7mm and 8mm.
Image

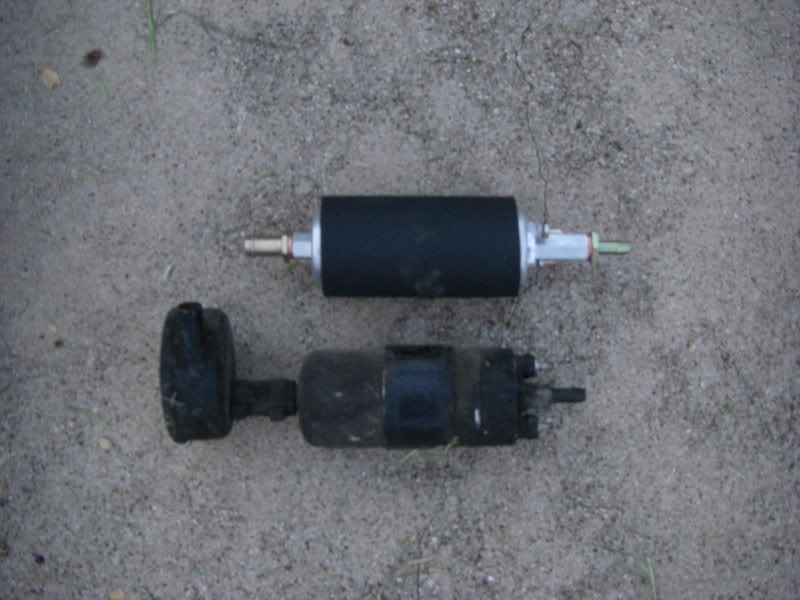
5. Compare new pump to old. You will notice that the dampening unit needs to be swapped over. You need simply a short length of 12mm x 18mm line, around 2".
Image

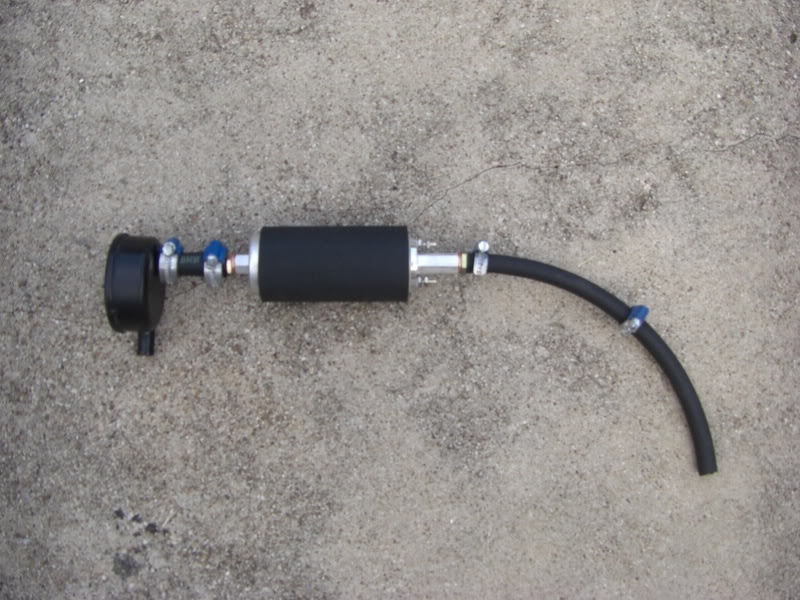
6. Loosely tighten clamps on dampening unit and new hose. This device can be removed, is so, just replace with an elbow fitting, or run the large fuel hose straight to the pump.
Image

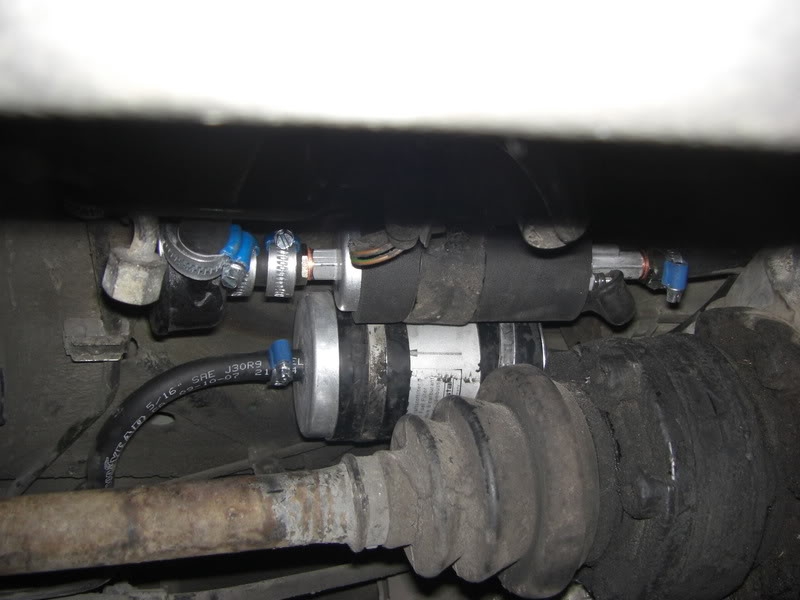
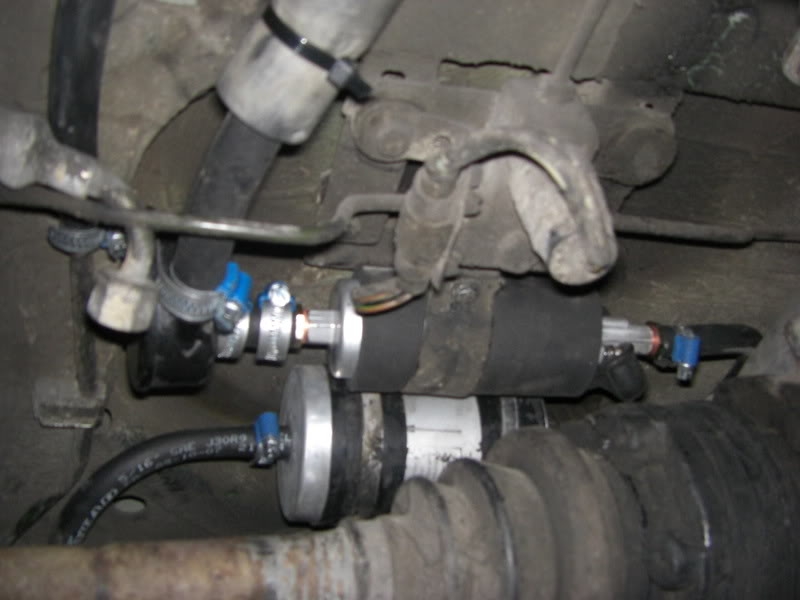
7. Slide new pump into position. Attach lift pump hose to dampening unit and pump supply to fuel filter. Attach pump wires, brown is ground and green is 12V.
Image
Image

8.. New lines at lift pump. I cannot show with pictures what to do, but simply slide the new lines down the top of the tank and they will come out the opposing side. Cut to length.
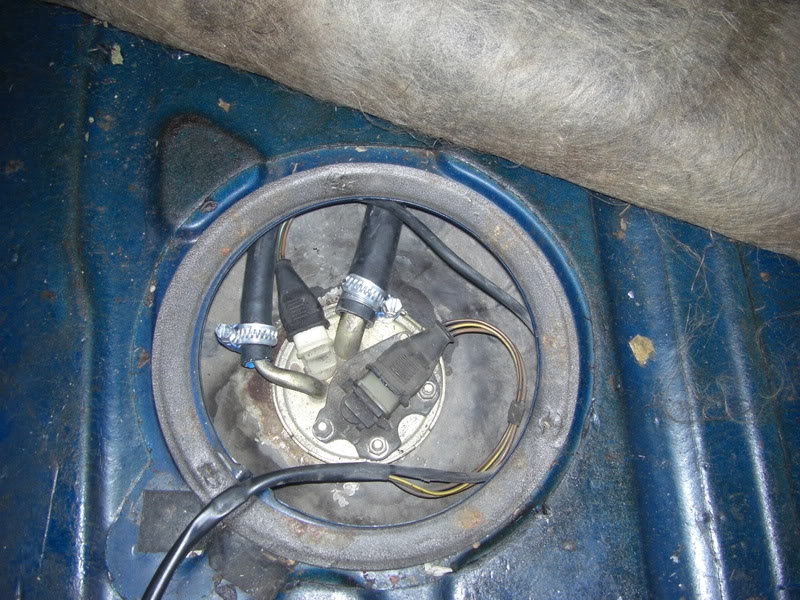
Image

Jump fuel relay and verify no leaks. If none found, go ahead and start the vehicle on up with extinguisher handy. Let idle for a few moments and go over all connections as vehicle idles.

If all checks out okay, lower car from ramps or stands and wash up. Congratulate yourself as you now have sufficient fuel supply to make massive power and one less headache to worry about.
The old pump had been having issues at 5+psi boost of going slightly lean. It was strong otherwise, and will remain a backup for my other two NA cars. I think it was not able to keep up with the higher pressures at the required flow rate as asked by the RRFPR. Static, it was good to 80, but in the required condition, it seemed to be limited to about 60psi. Somehow, the bracket had been missing some hardware, allowing both the pump and filter to wiggle freely, held in place only by the fuel line. I was able to round up the required hardware and mount both properly and secure it all.

I need to continue some tuning as now the AFR's are a bit too rich (10-11) when approaching atmospheric and 1-2psi. I realized I needed to install the restrictor to delay this rise in the BEGI 2025. Since mine didn't come with one (Bell references P/N: F2815-301), I will use a smaller I.D. vacuum line and see if that helps.
I only drove it around the block, but initial trials suggest AFR's of 12.5 in 3rd gear under boost. Excellent. Before, this was the point where the numbers would go lean and the stock Bosch pump couldn't keep up.

Next up will be to continue 'shakedown' progress of the car. In the near future, however, I will plan to upgrade to the TCD 60-1 turbo--I was waiting partially for the fuel pump, but also pending results of daily use.
Sort of reserving the use of the WOT signal, in case the RRFPR can't keep up with the flow capability of the new turbo. Will explore more at that time, but the idea would be to use a 1psi pressure switch with 8psi check valve that opens when the RRFPR can't keep up. Then the WOT signal means the ECU opens the duty cycle of the injectors to get 20% more fuel when at 8psi+.

I have a small leak on the valve cover, by the ICV. It seems like coolant/oil, but is always gone by the time I look at it in the morning. I think the Valve Cover Gasket is leaking coolant, so I may do a valve adjustment and valve cover gasket first, before changing the turbo.
Last edited by tschultz on Aug 27, 2015 5:27 PM, edited 1 time in total.
9mil
Posts: 268
Joined: Sep 27, 2010 8:43 PM
Location: Atlanta, Ga

Re: Callaway 633CSi

Post by 9mil »

Coolant from the valve cover? maybe the duck gasket in the back of the head... but there shouldn't be any coolant under the valve cover.

I am at this stage currently trying to adjust the AFM spring and the FMU to get acceptable fueling. I have wicked rick tip-in dropping into the 9's and 10's - I suspect the TPS (which was new) so I am having them replace it again. interesting note on that, I ohmed it out and it appears there is no WOT circuit in the one I had. I can see the idle circuit and when swapped to the WOT pin, nothing- no change at WOT.... I hope this played into my problem, in that it was seeing WOT all the time off idle. Ill test the new one before install.

I have the Walbro and 30lb injectors and I am thinking about dropping to a set of 24's I have just to see if that will help with fueling (after the new TPS is tested of course)

Good job keeping up with the thread and keep the posts coming!
tschultz
Posts: 4102
Joined: Mar 01, 2009 7:58 PM
Location: Denver, Colorado
Contact:

Re: Callaway 633CSi

Post by tschultz »

It a mystery for sure, so I think it would be a smart idea to take a look around and maybe replace banjo bolts and do a valve adjustment while I'm in there.

9mil,
As I understand, the AT cars came with a TPS that didn't have the WOT signal-- it was controlled by the TCU (Transmission Control Unit). Maybe this is what you had on your car? I have a spare or two around, maybe I'll check mine out to see if they are good still, if you need one.

I haven't touched my AFM spring, instead allowing my unopened AFM's to not mask other running problems. Using the ECU FQS switch allowed me to dial back fuel throughout the range up to -6% (too lean for my liking). It might be worth a try for you, as I mentioned, I like the reversibility.

Sounds like the WOT signal is what's causing your way rich condition in combination with those 30#'s. I'm curious to hear how you fix it. Weren't you originally planning to do MS2?

I'll have to share some pictures soon as I also took off the autozone red stripes!
9mil
Posts: 268
Joined: Sep 27, 2010 8:43 PM
Location: Atlanta, Ga

Re: Callaway 633CSi

Post by 9mil »

Yes- I went MS2 but have since taken 2 steps back and tried to take some variables out of the mix. I didn't have the time to digest the steep learning curve of MS and got frustrated and things weren't working- it was always some sensor or wiring that made something else happen that set me back yet again... I am trying to keep it simple now ;-) yea right!

my car is a 5spd so I only have the 3 pin TPS - I have 3 of the auto ones should someone need.. my new one just got here and it tested correctly. resistance on the idle switch, nothing then resistance at WOT.

I am a little embarrassed to say that I dont know much about the FQS, but I have done a little researching and cross referencing with the 944 today and it sounds like it might be worth a go. I have a TCD chip in retarding the timing, so I want to make sure I don't undo that- some seemed to say it was affected by adjustment- some didn't.

There is no way mine would run without tighting the spring up. I am hoping to get out and do some tuning on the FMU tonight or tomorrow. I hit 12.6 on boost... so I like that, but I know I cant have my cake and eat it too! Ill have to compromise to get this thing out of the 10's and 11;s- it just shouldn't be there.

I clamped off my cold start valve too- just incase. and will be putting in fresh plugs, new CTS, I have 2 AFM I have been playing with to keep them honest, ICV is in there, just not sure what else it can be.

Whats your intercooler strategy going to be?


Found this: http://www.motronic.ws/fqs.htm
Looks like I might want to try position 3 and 4 .... Just that easy, right! ;-)
tschultz
Posts: 4102
Joined: Mar 01, 2009 7:58 PM
Location: Denver, Colorado
Contact:

Re: Callaway 633CSi

Post by tschultz »

Indeed, I have a photo of it on Pg 3 part way down the page. It's obvious with the ECU cover off. I have kept the cover off for now until I am done messing with the switch. Makes it easy to change if required (I always do it with the car off).

Your 30# injectors are almost double the stock size. So the FQ switch may actually give you -6% or -12% fuel if only the duty cycle changes. I'm not sure if this adjusts the entire map, or just portions of it. From my experience, I think it just reduces the duty cycle by a fraction across the entire map.

Establish a baseline:
I'd suggest trying a test run at 2/3 throttle (ignoring WOT signal), you should be able to get to a few psi and see how the AFR's look.
Then repeat with a WOT short run and see if the numbers go rich or if they are pretty close to the first trial.

For me, I had been getting super rich when still under vacuum WOT(not safe) and then under boost, the AFR's were close to the target with the additional air. As I have done, try the RRFPR with the gain needle all the way out so that you get the least amount of gain possible. Adjust the center nut so that atmospheric AFR's are close to 13 (I used this number from looking at various dyno plots). Once that is set, you continue with the gain for additional fuel under boost conditions.
9mil
Posts: 268
Joined: Sep 27, 2010 8:43 PM
Location: Atlanta, Ga

Re: Callaway 633CSi

Post by 9mil »

Its another adjustment to add the mix!
When you say atmospheric - you are saying as you pass into boost from vacuum, correct? Or are you meaning just pulling the vacuum line at idle and adjusting to 13.0?
tschultz
Posts: 4102
Joined: Mar 01, 2009 7:58 PM
Location: Denver, Colorado
Contact:

Re: Callaway 633CSi

Post by tschultz »

9mil wrote:Its another adjustment to add the mix!
When you say atmospheric - you are saying as you pass into boost from vacuum, correct? Or are you meaning just pulling the vacuum line at idle and adjusting to 13.0?
Correct, while passing through into boost.

You may be somewhat limited by your large injectors and may actually want to reduce your FPR from a 3bar(43psi) unit to a 2.5bar(36psi) as found on the earlier cars. This would be another work around to help with idling conditions only.


Will be curious to hear how you get yours running to your liking. I noticed that based on temperatures, the Motronic 1.0 likes to run slightly more rich than it needs in the colder weather. 50degree mornings give me idling AFR's of about 14, where warmer weather puts me near 15.5.
stoney
Posts: 119
Joined: Aug 22, 2015 9:16 PM
Location: Coffs Harbour, NSW, Aus

Re: Callaway 633CSi

Post by stoney »

You certainly saved this car! great job so far.

I'd be looking into the oil pressure thing a bit more too, and start with a correctly sized restrictor rather than the one you have just fitted.

The best way to find out what size restrictor you require is to remove the turbo drain line, and measure how much oil comes out in a minute (capture it in a bucket) and compare it to manufacturers specs. Too much oil can damage the turbo seals and cause drag on the bearings, and if you do have to fit a smaller restrictor then that should also help with increasing your engines oil pressure.

It's a quick task to measure the oil drain through the turbo to know if you are getting enough flow with the restrictor in place.

Granted ball bearing turbos need less oil than the journal equivalents, and my GTX3582R runs a 1mm feed line fitting. What size was yours again?

Do you know your turbos construction - ball bearing or journal bearing?
Post Reply