|
|||
|
Wood Heat |
|||
|
 |
|
Heating with wood in our old house
This page last revised November 14, 2012
(click this link to go to the update location)
May 2009 - I've created this web page because of many Email questions
about how we heat with wood and how successful has it been in our old house. I hope this web page answers your questions.
Just remember we've 'tightened up' our house considerably, as addressed on the other web pages, making wood heating very efficient
in this house.
As noted on the Paine House web page, the house was rewired with 200 amp service, which included
the installation of individual wall thremostat controlled electric base board heat in every room. This is used during
periods when we are not in the house during the winter for several days, to keep a daily wood fire going in the wood stove.
So, what was originally installed as the primary heating system, is now the backup system for the wood stove.
 As I've mentioned on this web page about the house, we widened and lengthed the drive way, to support the delivery of wood to the back yard, involving a 10
ton, or larger capacity dump truck, which can dump its wood load as shown above. It will be stacked on the wood stack to
the left of this picture, which runs 21 feet into the back yard. Take a close look at the wood... it is 6x6 oak cut length
and split, that has been rejected for use as power pole cross ties, which our woodman purchases (10,000 of them last year)
works them up and sells to his longtime customers, like us. Beautiful burning and very clean, to say nothing about ease of
stacking.
 Our wood stack measures 5 x 5 x 21 feet which is 525 cubic
feet, or just a bit over 4 cords of wood. We have been burning wood since the day we moved in, late October 1983. I've been
working cord wood and burning it since 1973, so I have been heating with cord wood for the past 38 years. I've been very
fortunate to have an uncle who lives in central NH, share a lot of wisdom about heating with cord wood, over the years
we've spent visiting.
The previous owner of our house, who built this stove, also burned
wood for the several years they lived here. Over the past 28 years, we've averaged one cord of wood per year, using as little
as 3/4 of a cord, to 1.5 cords depending on the type of winter we get. We like to keep a minimum of 3 cords, so that we have
properly seasoned wood come winter.
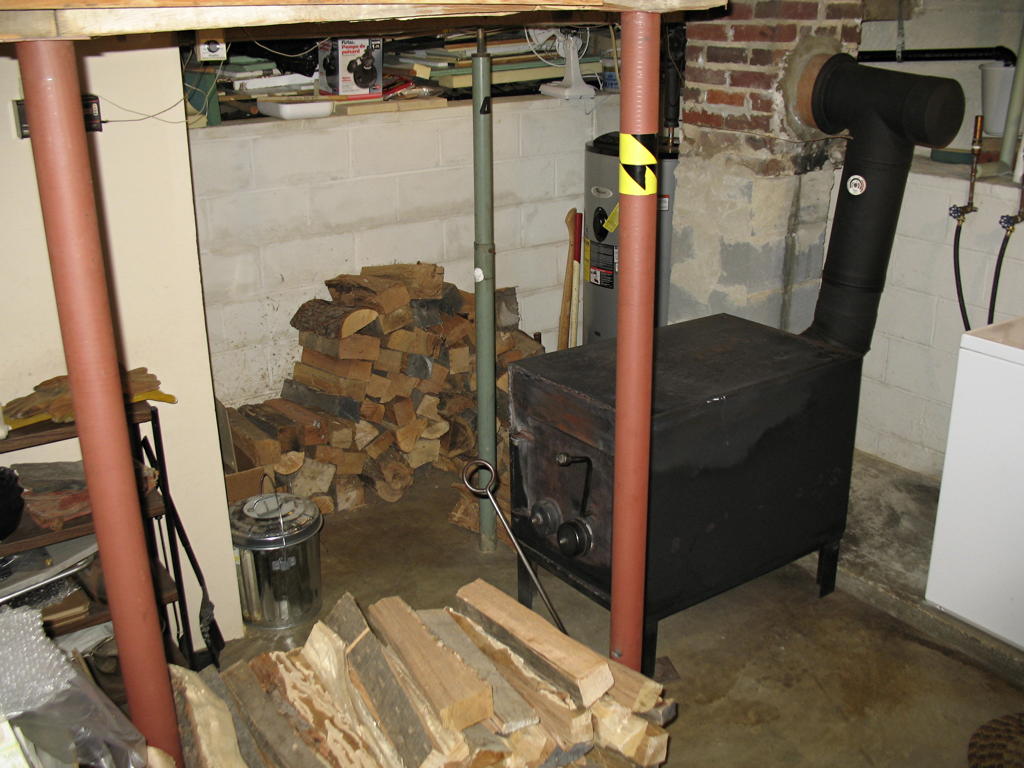
 The stove firebox measures 2'h x 2'w x 3'd (12 cu. ft.) with
2" x 4" x 8" fire brick lining. It's connected to a 17" x 17" brick chimney, lined with a 8" clay pipe topped with a
screen cap. The chimney sits inside the house, 4 feet from the interior of the north wall. This is a very efficient
design, because as the chimney heats up, it gives off heat into the rooms it passes through... the kitchen, dining room, guest
bedroom and the bathroom. A design no longer used in newer homes, unfortunately. They use a zero clearance type of chimney
using stainless steel pipes placed on the outside of the building. Too expensive to build a brick interior chimney and surrounding
framing. That's the excuse they typically use.
The large amount of masonary and cement in the basement also stores
the heat generated by the stove, giving it back into the environment long after the wood fire has gone out. The chimney
is professionally cleaned, inspected and certified every spring. Some preventive maintenance repointing will be done on the
bricks above the roof line, in 2011.
 In the above picture, you can see that our basement was actually
'dug out' (1950's) as it was originally only a crawl space, as shown by the addition of the solid concrete blocks to the base
of the brick chimney and the heavy footings and concrete block walls. The house was originally heated by a large oil fired
floor heater, in the crawl space, with its floor grate between the dining and living room. The Concrete floor was installed
in the basement by the previous owner in 1981.
The stove easily takes 8-10 inch diameter 24-28 inch length wood.
We don't know what amount of btu's the stove is capable of, but we do know that it is oversize for the house, as
you can elevate the interior temperature pretty quickly and we don't need to keep the fire going for very long. Typically
3 hours in the morning and 3 hours in the evening will keep the first floor of the house in the 68-70 degree F range, second
floor at 56-60F with outside temps at 21-25F, during a cloudy day. Of course the basement is a toasty 90-98 degrees F
at the stove and about 80 degrees F at the other end of the basement, where my wife has her computer and office.
Update November 14, 2012
I've received a few Emails about the air temperature that the stove
is producing at the floor grate and the concern about the air being too hot. On the contrary, it is actually much cooler than
a gas or oil fired hot air furnace is typically producing at the air outlets which range from 110F to 140F, given the furnace
is operating properly. Comments about this can be found here and also here, FYI.
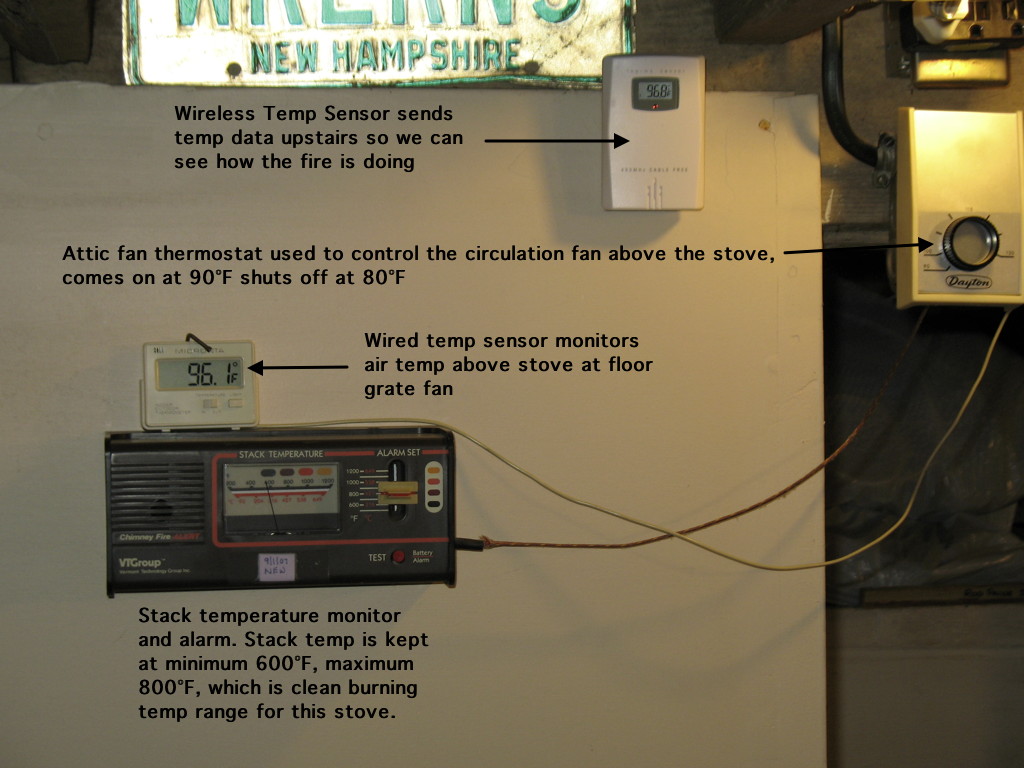
 In front of and to the left of the stove, we have monitoring devices.
A combination of wired and wireless temperature monitoring units and a circulation fan control which is explained in
the above picture. It's very important to have these things, to insure safe and efficient wood heating. Not shown is the circuit
components that shut off the fan in the event of a fire. I'll get that picture posted eventually. Thanks to the reader who
questioned if I had such a device. A fellow cord wood heat user.
 The previous owner was using a small, noisy fan, not capable of
moving an appropriate amount of air to distribute the heat this large stove produces. The older Panasonic built Sears floor
fans had large motors (seen above, blue fan blade spinning) and very quiet fans, so they are ideal for such service and not
killed by the heat. Unfortunately, no such fans exist anymore, but are simple single pole motors that don't last very long.
 The floor grate vents (added by the previous owner who built the
wood stove) are situated perfectly to support ideal air flow. One grate is located at the foot of the stairway on the south
wall, (in living room) where cold air falls down the stairs, assisted by the suction of the fan on the other grate which is
located over the wood stove. It draws the air down into the stairway grate, across the basement to the stove and
up through the dining room vent next to the chimney near the north wall, as shown above. You can feel the cold air going down
the stairs and the warm air coming up the stairwell ceiling, into the second floor rooms. Really great!
 Update July 10, 2011
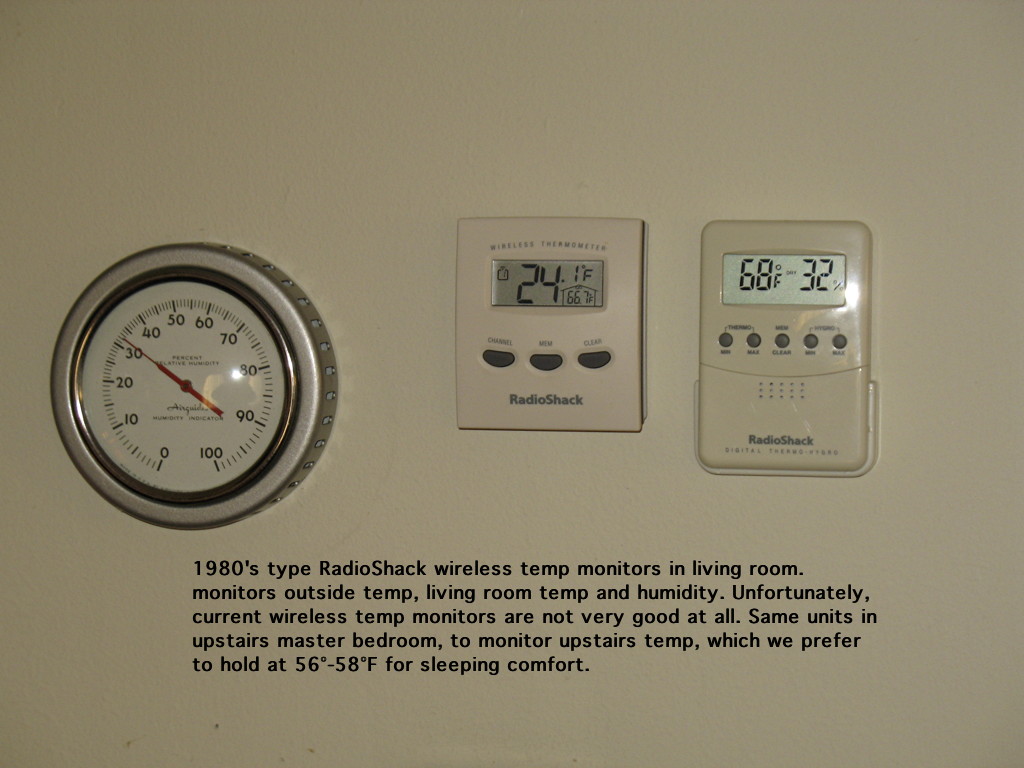
These temperature meters are also no longer available and current
products are troublesome, as I discovered attempting to use current products in other places (like monitoring garage and office
temps) and also from friends and neighbors who have reported problems to me. Good luck with finding devices that will
work reliably.
I am currently testing a remote sensing thermometer, originally
marketed by Honeywell and now marketed by Meade, as shown here. It is available directly from Meade at this link (revised 2/12/13). The Honeywell version available from Amazon is much more expensive,
although it does appear to be the exact same unit. I have purchased both brands (from Amazon and Meade) and am testing
them... I will post my findings after my tests. I already have one transmitter that is placing a 30ma current drain on its
'AA' size batteries and drains them in five days! The normal drain that I measured on a properly functioning transmitter
is 2ma on an intermittent basis, when it transmits its data, about every 45 seconds.
Back to the Home Page
Copyright 2010 - 2013 by Rod Paine. ALL RIGHTS RESERVED
|
|
|
 |