

 |
|||||
|
|||||
|
This page updated/revised April 2, 2013 Rebuilding and Restoring 100+ Year Old Wooden Windows
(improving their efficiency and installing interior thermal windows)
Photo documentation and comments on my experience with the old windows
in our 1927 Sears, Roebuck type* house. Go here for additional info about this house.
(*Our house is not a "kit" house, but is based on Sears floor plans, the
"Carlin" and the "Lebanon" models and stick built by local craftsmen)
|
||||||||||||||||||||||||||||||
|
Background...
May 2001
The original first floor windows in our house (7 of them) are 6-over-6 pane 36x72 inch double-hung windows, originally removed from a Pennsylvania schoolhouse dismantled in 1925 and installed in our house, built in the spring of 1927 by the Case brothers of Purcellville (source: Evelyn Case, 1984). According to National Historic Trust restoration people, located at Oatlands Plantation, Leesburg, who I spoke with in 1995, this window design was not manufactured after 1910, as the design changed. The Oatlands Plantation Carriage House (1904) and Chauffeurs House (1903) use the exact same windows and exterior trim as our house, as shown below in two of the many pictures of the Chauffeurs House I took, in late December 2009, when I had purchased a professional digital camera and could better document the Oatlands windows, since my earlier visit in 1995. Special thanks to Katherine Farley, Dir. of Site Use and Events, who let me take many pictures, that brisk December day in 2009 to help better document my own windows.
The muntins and glazing, although behind the storm window glass, were in
pretty bad shape, as shown below, with years of neglect, many layers of old paint and who knows what kind of glass glazing
material was used over the decades (some was silicone caulk, some plaster, etc.), to say nothing about windows that couldn't
be opened at all! Thankfully, all the old original wavy glass was still intact.
The pictures above is typical of all 20 windows in the house, including the 8 smaller windows in the four shed
dormers. The glass window panes in some of the sashes has already been removed in these pictures, as explained below.
 With the window sash partially stripped, removal of the glass is now necessary to continue the rebuilding process. You
can see the failed condition of the glass glazing, with much of it coming off simply by carefully and lightly picking at it
with the sharp edge of a putty knife. Unfortunately, it isn't really that simple for the whole window or the other windows.
While we all appreciate the glazing coming off easily, remember that those pieces and sections that do, were no longer
water tight, nor air tight, which contributes greatly to air infiltration and poor sealing, as well as water damage to the
wood, caused by the condensation of water vapor in the air on cold window panes, lying on the wood and often running down
between the glass and the muntins.
 The trick, of course, is to take your time removing the glass panes, working carefully to insure you don't crack or break
the glass as you work to remove it. As you can see above, one pane has been removed, its frame has been cleaned and gently
sanded, while the lower pane is now in the process of being removed.  I've found that the best way to remove the old window glazing, is to use a single-edge razor blade (a bunch of them)
and carefully cut the glazing until you've reached the edges of the muntins. You have to be very careful and work slowly,
as the glazing may be extremely hard and applying too much pressure will crack or break the glass. Believe me, I know. If
you're good with a large high wattage (150 watts) soldering iron, you can use it to heat the old glazing to help soften it
for removal, unless somebody has used plaster/joint compound to make a patch or two to replace failed/missing glazing, as
they did on several of my windows. This stuff could only be removed by grinding it out with a Dremel tool and a cutting disk!
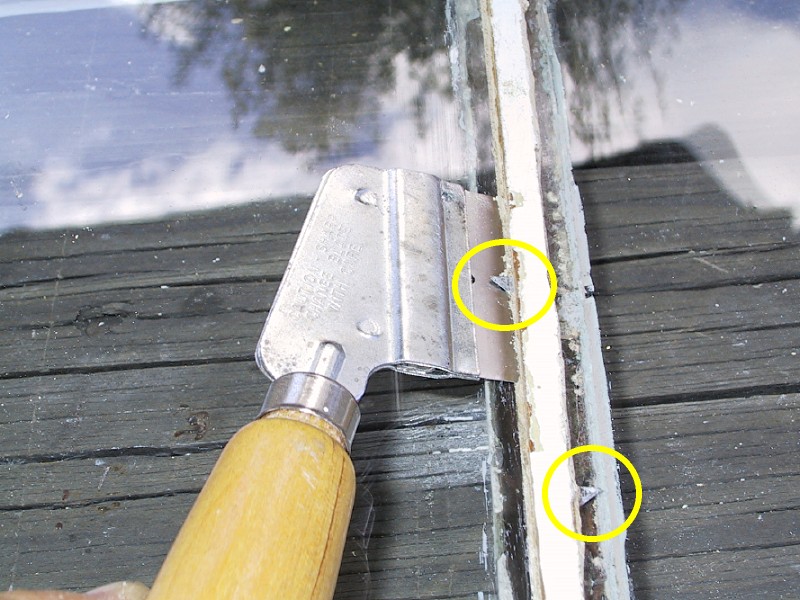 Watch out for very small window glass retainer points, which were used in old windows (shown circled above). Prying on
them with the razor blade, slowly and gently, will allow you to bend them up, so you can get at them with needle nose plyers
and remove them. Watch out for them when your cutting the old glazing and make a note as to where they are (a magic marker
helps) so you can back-off your cutting pressure when you draw the razor blade over them. Otherwise, you risk cracking or
breaking the glass. 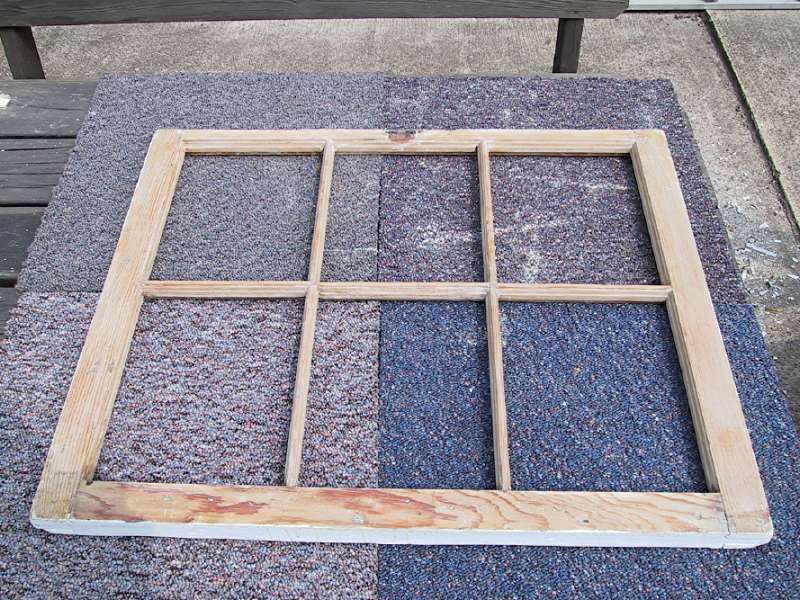 With the window glass removed, strip the window completely of all its old paint. Then make all necessary repairs, including
filling holes, rotted areas and prying damage, reglue joints, etc. Set it aside to dry/cure until ready for sanding and primer. 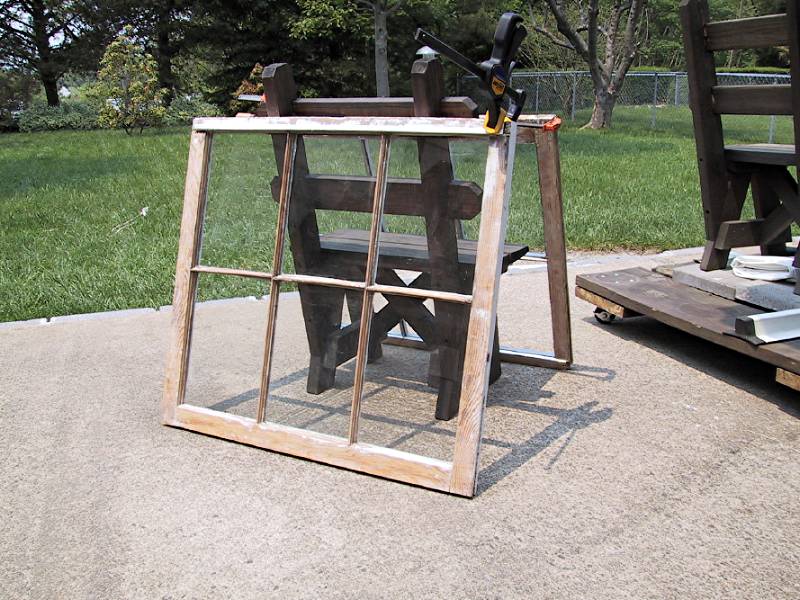
You can see epoxy repairs to the window frame surfaces, they are the light colored areas, curing in the sunshine. The clamps
hold reglued parts.  In 2001, I used Benjamin Moore oil based premium primer, shown above with its first coat application. Two primer coats
are recommended, which was the Benjamin Moore recomendation to me (I spoke to an "Applications Specialist" at the factory
by phone), for the hard southern yellow pine windows, 5-7 days for curing of each of the primer applications. Then, paint
them with two coats of premium Benjamin Moore acrylic paint, giving them a day between coats. I did exactly as Benjamin Moore
advised, consuming about three weeks per window restoration, allowing for proper drying/curing times and they still failed
on the south exposure, by peeling of the primer, in less than three years! They also failed on the east side, with cracking,
after the same amount of time!
This year (2009), I am using a 100% Acrylic primer, two coats after removing all existing primer and paint (AGAIN!) and following up with two coats of premium acrylic paint. Same process as last time, but not using the oil based primer. Discussions with area painters (30-40 years experience), disclosed that oil based primer (the current products) do not last long on this very hard yellow pine, especially in the direct summer sun, as is the case on the south facing material. They also suspect the ongoing removal of various chemicals as dictated by the EPA has reduced the life span of the applied products... a very common observation made by many other old house owners who have experienced poor paint performance, compared to prior years experience, with the same products. I would also add that during our old house tours and inspections in March 2009, in Savannah, we talked with a number
of house painters, who also had the same opinion about the greatly reduced longevity of current paint products, which they
felt were due to major product reformulations. Not a very good situation for some one with a very large Savannah home, spending
well over $20,000 to have it properly preped and repainted every 3 to 4 years, which the painters said was the typical length
of the paint's life, given proper prep and not simply power washing and repainting!
UPDATE Jan. 9, 2009 (added pictures of primer and paint failure) Here is the lower sash (below) of the south facing window, showing the primer and paint failure on the bottom rail and spots on the bottom side of the bottom rail. I have lightly scraped the failed areas, to clearly show how much of the primed and painted surface has failed. The Sun's radiant heat is very strong in the summer and is the principal reason we want to have new window shutters built to replace those that were removed and discarded, when the aluminum triple-track storm windows were installed. The new shutters will be dark green, or black on their open side, but will be white on the closed side, to better reflect the sun and limit heat damage to themselves. They will provide greatly increased protection for the refinished (again) windows, of course.
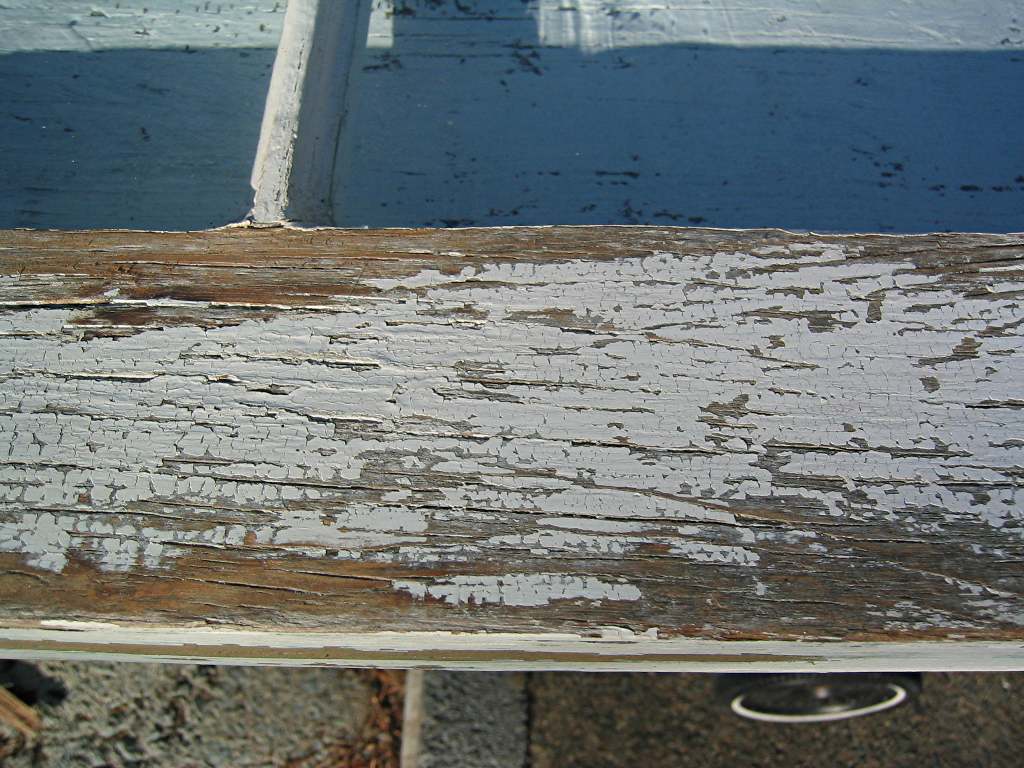 In the above extreme close-up, you can see that the paint cracked/checked and that both the gray primer and the paint
came off together, leaving little evidence that the surface actually had primer on it. Tiny specs of the primer can be seen,
however, with a magnifying glass. You can also see that the exterior wood filler used to fill the small weather cracks in
the surface has also come off and out of the cracks. It was applied to the first primer coat and protected by the second primer
coat. So much for that process!
It will be interesting to see how well the use of premium acrylic primer and paint will stand-up on these windows, when finished and installed. I am using an epoxy based filler to fill the surface cracks. Unfortunately, the south facing bedroom windows were so badly cooked by the sun, that they had to be replaced. I used premium Anderson 400 series double-glazed tilt-in windows, as the original wooden window sashes and trim were literally crumbling from 80+ years of baking in the sun. 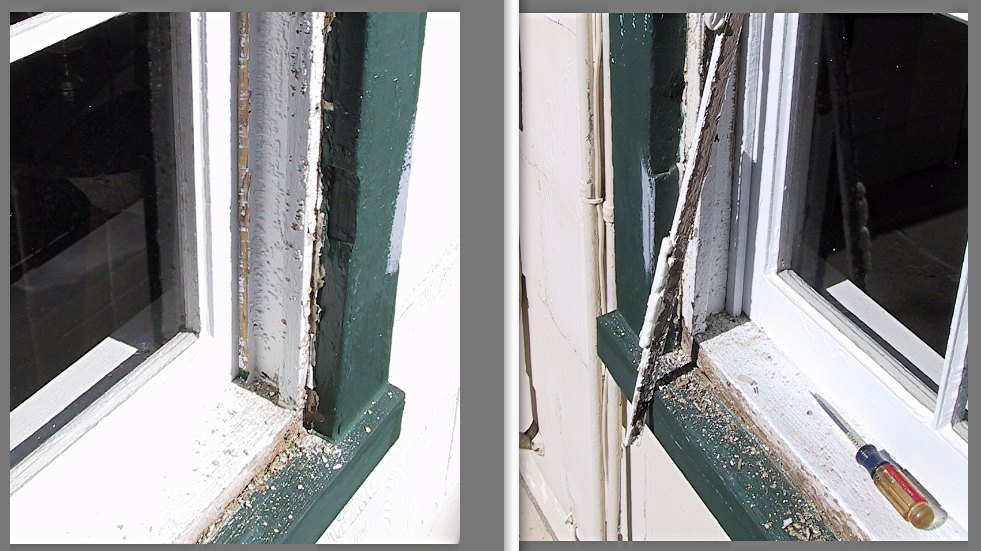
Back to the initial restoration work... While the window sashes were drying/curing, I started on the window frames, which
have a lot of problems as can be seen in the pictures. In addition to the many layers of old paint, most of the damage was
created by the installation of the aluminum triple-track windows and later attempts to make them air or water tight. This
only managed to trap the water and prevent proper drainage, contributing to associated wood damage.  With my test* window sashes positioned,
new exterior stops made from poplar are test fitted. All of the exterior window frames have been stripped to bare wood, showing
their wonderful old growth structure. The wood types are a mixture of longleaf pine and oak. You can see the old exterior
shutter hinge cut outs which most of them have been filled with plaster. This particular cut-out appears to be for a door
type hinge. Others were for Lull & Porter hinges, easily identified because of their unique hinge plate design, which
I discuss further down this page, during the installation of new wooden exterior shutters.
*The test window sashes come from the badly cooked west
facing kitchen window, which had no pocket weights, but used a pin in the side of the sash to hold it open. As such it was
very difficult to open and position as needed. Infact, it was impossible for my wife, as she had to lean across her work table
to attempt to open it, which she couldn't, unless she moved the table first. Hardly a practical soloution.
The old wavy glass was removed and replaced with acrylic plastic and a simple
bead of caulk applied to the acrylic panes to seal them from rain. You can see that the interior muntins are in poor
shape. This sash set was trimed down to fit all of the seven window frames, stripped, primed and painted, now serving as a
temporary window of very light weight, with the acrylic panes and cooked sash wood which was now like balsa
wood.
If you have a number of the same type sashes in your house, with one in very poor, unrestorable
shape, consider it for use as a temporary replacement, while restoring another window of the same type and not drawing attention
to itself, or limiting vision, such as my foil faced insulation panels do, shown in use below.
None of this lumber is readily available today, unless you go to somebody who does old growth lumber recovery and you
take lots of money with you! Recent comments about the benefits of old growth wood, showing examples, can be seen here.
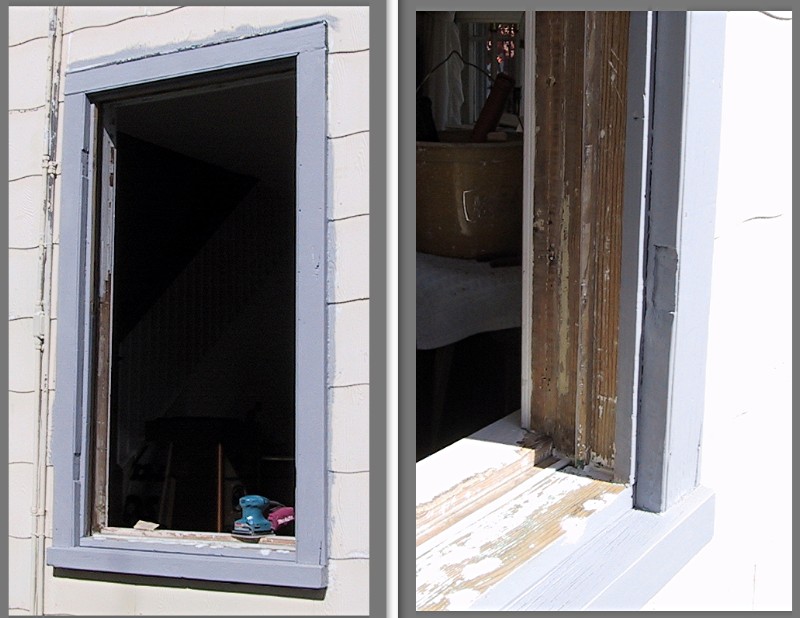 Work in progress in 2001 on the window frames and face trim, when the gray oil based primer was used. The 2008 work used
100% Acrylic primer, which is white. The lighter areas are expoxy type wood filler, used to repair damaged areas. Other type
paste wood fillers had previously failed, after 1-3 years, depending on the brand. These were products specifically labeled
for "Exterior" use!
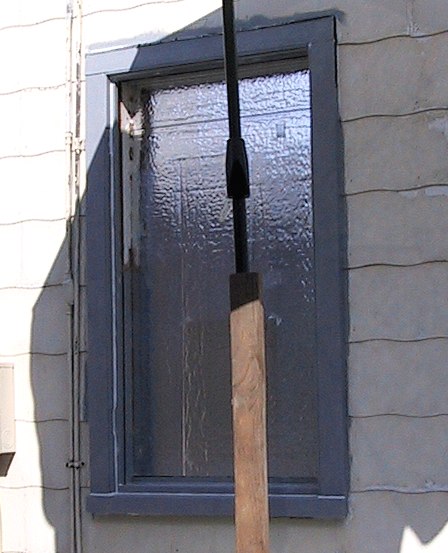 4x8 foot sheets of 2-inch thick rigid double foil faced foam panels were cut to fit the window frames, to keep the heat
and flying things out while I was rebuilding the window sashes. I only had one "Test" set of temporary sashes (as
mentioned above) but did want to work on multiple windows at different stages of restoration, thus the use of the foam
panels for other window openings. The panels were used elsewhere to insulate various areas, such as in the basement,
after the windows were completed. 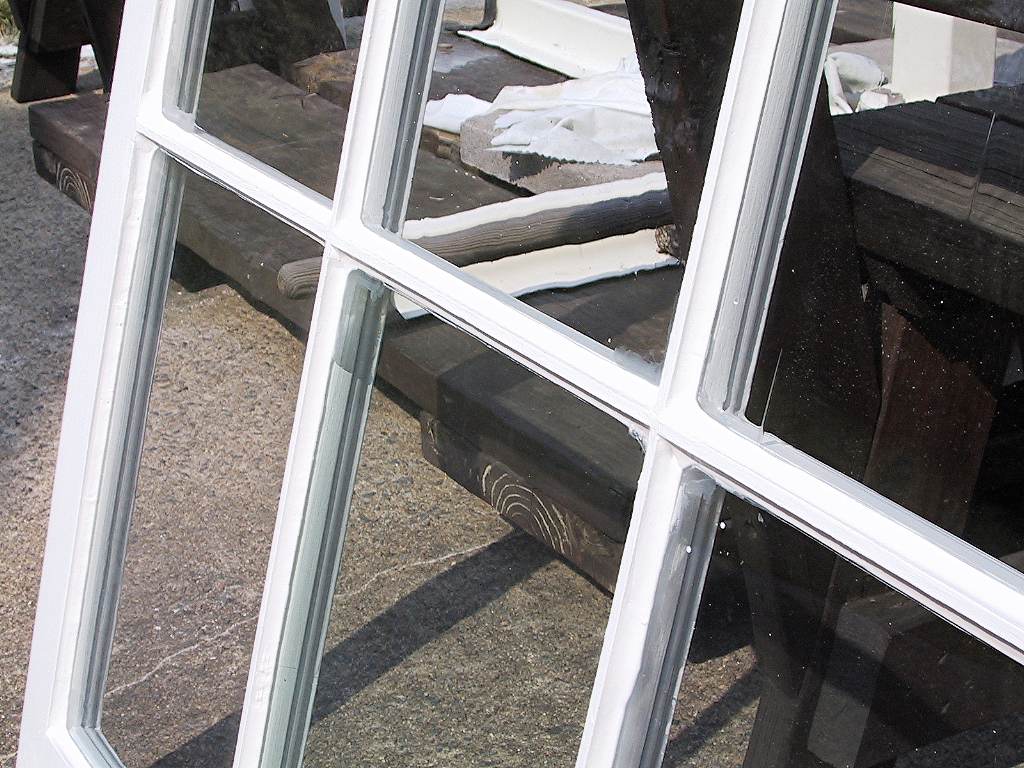 Update June 22, 2010
Shown above, is a completed window sash, with its Trypolymer Sealant Advanced
Acrylic Silicone used to glaze the window glass, which was the White Lightning 50 Year product marketed 4-5 years ago, unfortunately
no longer available and its so called replacement is inferior. I switched to using the T-rex product with very good results, but it was also recently discontinued. While T-rex was actually made by Soudal and is
the "SoudaSeal FC" product, but obtaining SoudaSeal FC has been difficult due to a lack of local retail outlets, for
the home owner.
I am currently looking for another suitable caulking/sealant
product, since there is currently no retail supplier for the SoudaSeal FC product. A real shame, but I and some of you have
wasted enough time trying to obtain this product, from the source I previously recommended, given to me by the Souda USA office.
Back to the window... the glass needs to be cleaned-up with a razor which
I'll do, after the sash is placed back in its frame, which is a nice working height.
UPDATE April 8, 2009
I've added the pictures below, per your Email requests, which are much larger (when you click on them they'll
expand) so that you can see more detail in the completed windows. If you need still larger pictures, send me an Email and
I'll send full camera resoloution size pictures.
Here is a picture taken from the inside, looking through the interior thermal
window at the muntin profile detail, after the restoration was complete. This profile is important in dating the age of the
windows.
Finally done, with the exception of some razor blade clean-up of the glass. A major improvement in looks, operation and
weather proofing. With the internal thermal windows installed the combination of my rebuilt prime windows with their 3M
V-Seal installation and the internal thermal windows provide a more efficient system (thermal and acoustic) then
replacement double glazed windows! Check the facts for yourself. 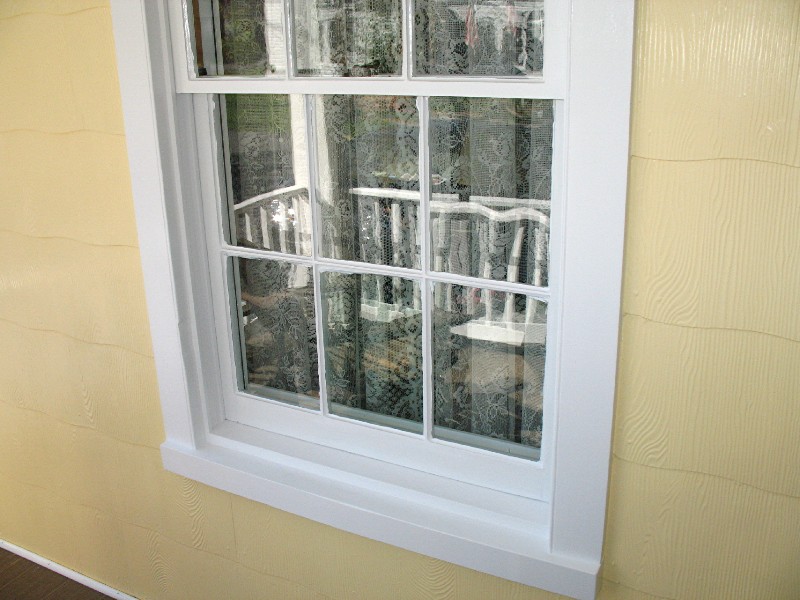 When walking or driving past the house and looking at the windows, their wavy old glass sparkles and winks at you. New,
replacement windows with their single big piece of glass just stare, like dead eyes!
 Update April 2, 2013
Our Climate SEAL interior thermal windows now enter their 11th year of service, having been installed in 2002. The so
called 'experts' who said these plastic windows would have a short life span, would turn yellow from sun exposure, would become
brittle and crack, the surface would craze and become hazy plus a number of other possible failures projected to happen, HAVE
NOT HAPPENED! The products look as they did in 2002, when I originally installed them and they have performed perfectly. Beware
of people making such statements about this product and ask to see examples of such service failures, including the invoice
so that the actual product age can be confirmed. I have seen too many failures of vinyl replacement double-hung widows
in my neighboorhood. Those things do fail with such problems. Here is a link to a discussion about these problems.
Update October 28, 2010
A very important point... I continue to receive Email asking if an internal thermal window system, such as described
here, can be installed without first performing all needed repairs and improved weather stripping on the primary (exterior)
window? Yes, it can be installed, but you must understand that the two windows function as a "system". If the exterior window
is not fully up to performing its job (has major air leakage around its perimeter and failed leaking glass glazing), the internal
thermal window can't compensate for this and the performance of the "system" will be poor. Only when the exterior primary
windows are functioning as they should, can the internal thermal window do its job. Period.
July 2002
With the aluminum triple-track storm windows removed, we looked at the
options available to improve our old window energy efficiency, without detracting from the beauty of our old windows, by installing
something in front of them. We considered 1920's style wooden exterior storm windows, looking at a great many of them, but
we didn't like the fact that they typically used new glass in a one-over-one sash arrangement, which hid the beauty of our
old wavy window glass behind them, as well as the fresh six-over-six restoration work. We then concentrated on looking
at internal window installations, as installed on many of the truly great historic homes, most notable being Thomas Jefferson's
Monticello, in Charlottesville, VA, my favorite and only a few hours drive south of our house. We also looked at interior windows
created by other DIY home owners, such as this very good idea here.
After a lot of research on the Internet, we chose the
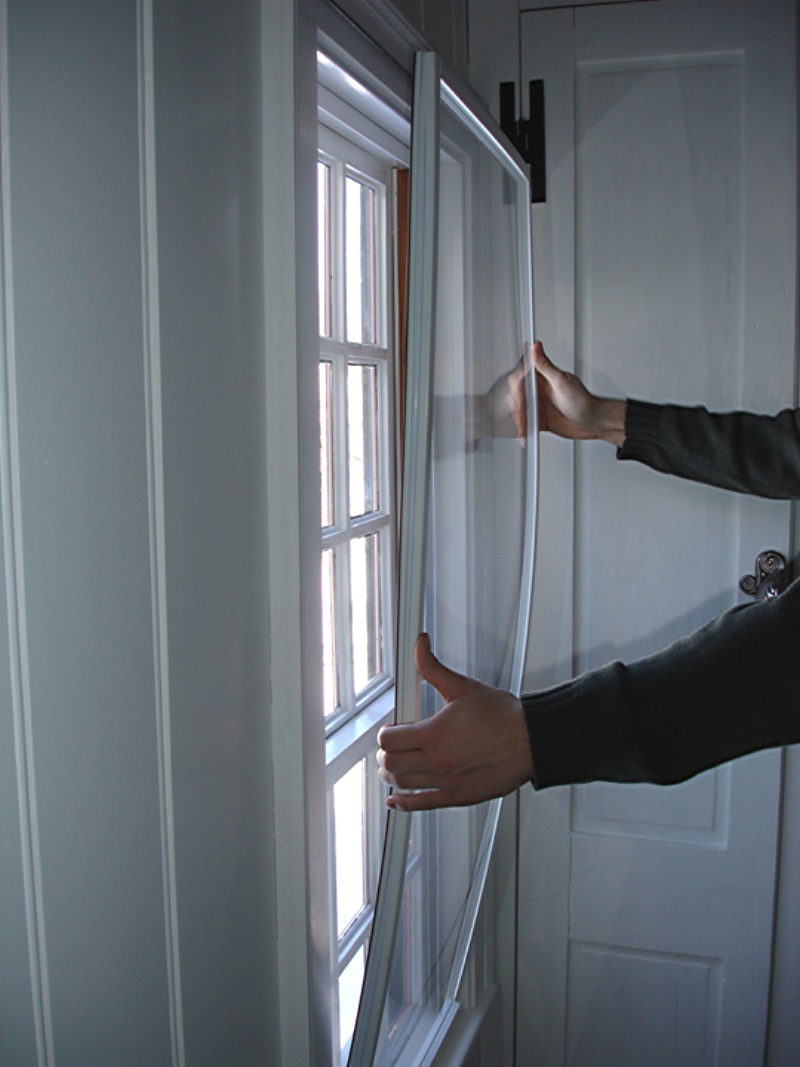
Petit Industries internal thermal window system, now known as the Climate SEAL interior window system, shown above being installed within the inside window frame, magnetically attached to metalic
tape faced interior stops. The perimeter sealing method is very much like what your refrigerator door uses... a magnetic bellows
system that seals against the metal frame, or in our case against metal tape attached to the interior window stops, as shown
below in the pictures of the product and its installation on our large double hung windows.
We chose this manufacturer, after we purchased and examined a small window model sample (cost credited to a purchase),
talked to people who had purchased and were using the product, along with talking to the manufacturer. Further, they also
had a track record of installing their thermal window systems in historic buildings, with very satisfactory results. Our cost
per window (5 of them) was $249.40 each incl. shipping, July 2002.
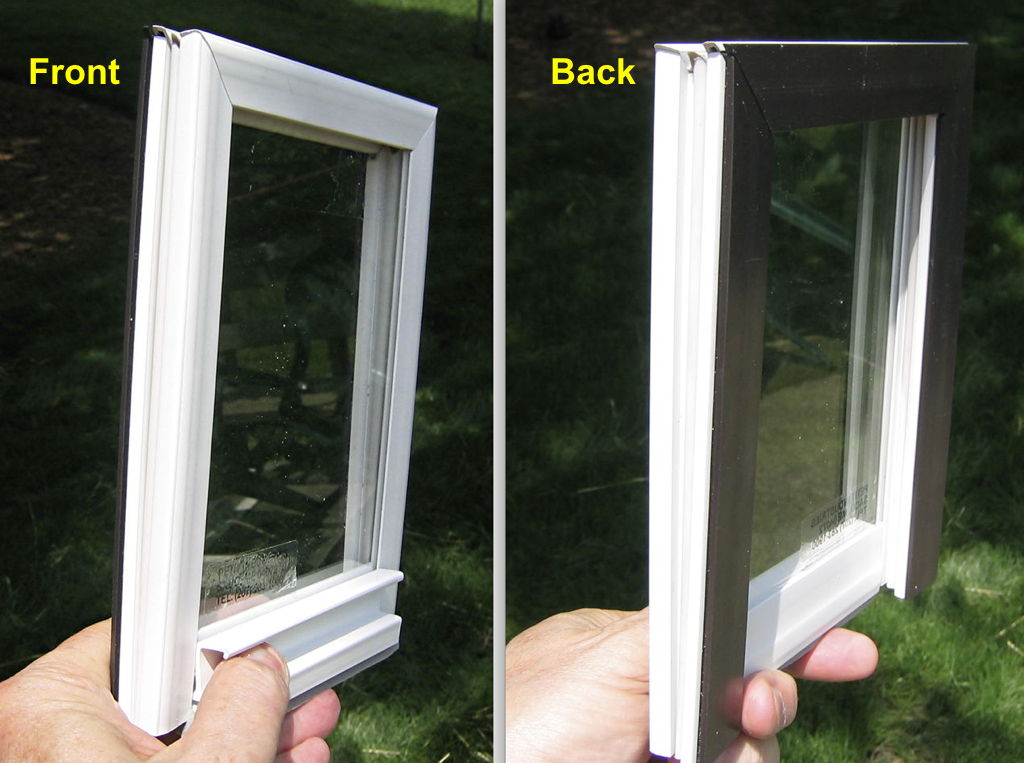 Here is the small 'sample' window we purchased from Petit Industries,
December 1998 for our examination, as well as currently using it to show how the system might work on friends and neighbors
windows, since it is a simple matter to take it to their homes. However, most local people who are interested come to our
house to inspect our installations.
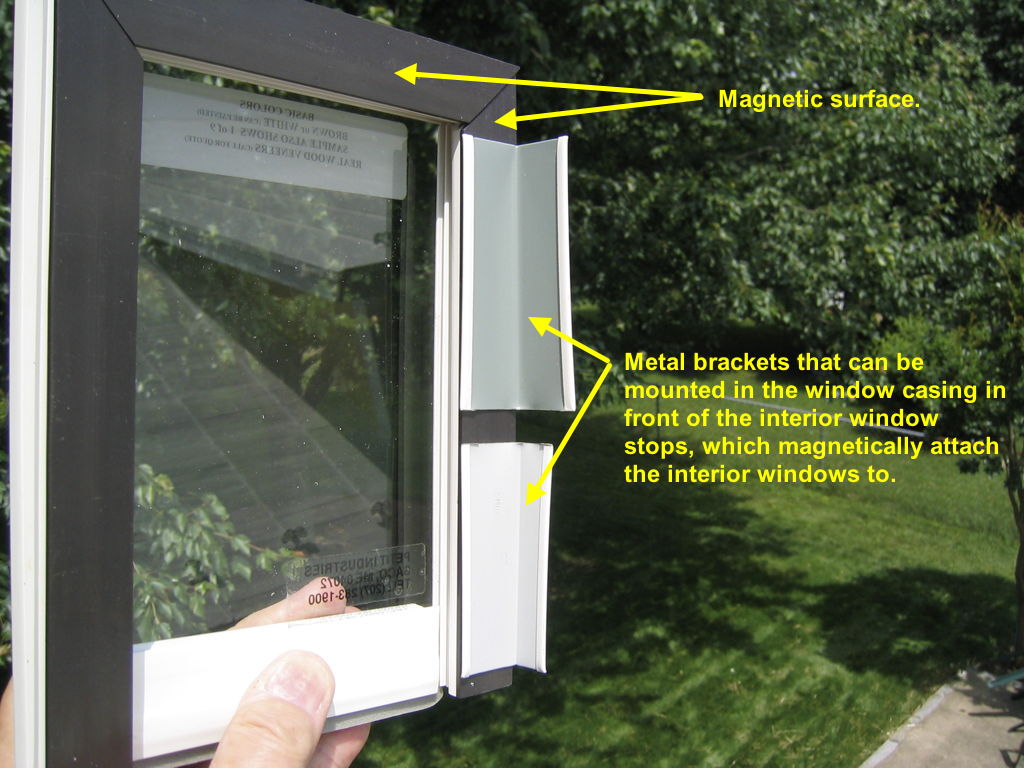 It was available at the time with several different mounting methods, shown
here with painted steel 'L' brackets for mounting to the window casing, with different bracket dimensions.
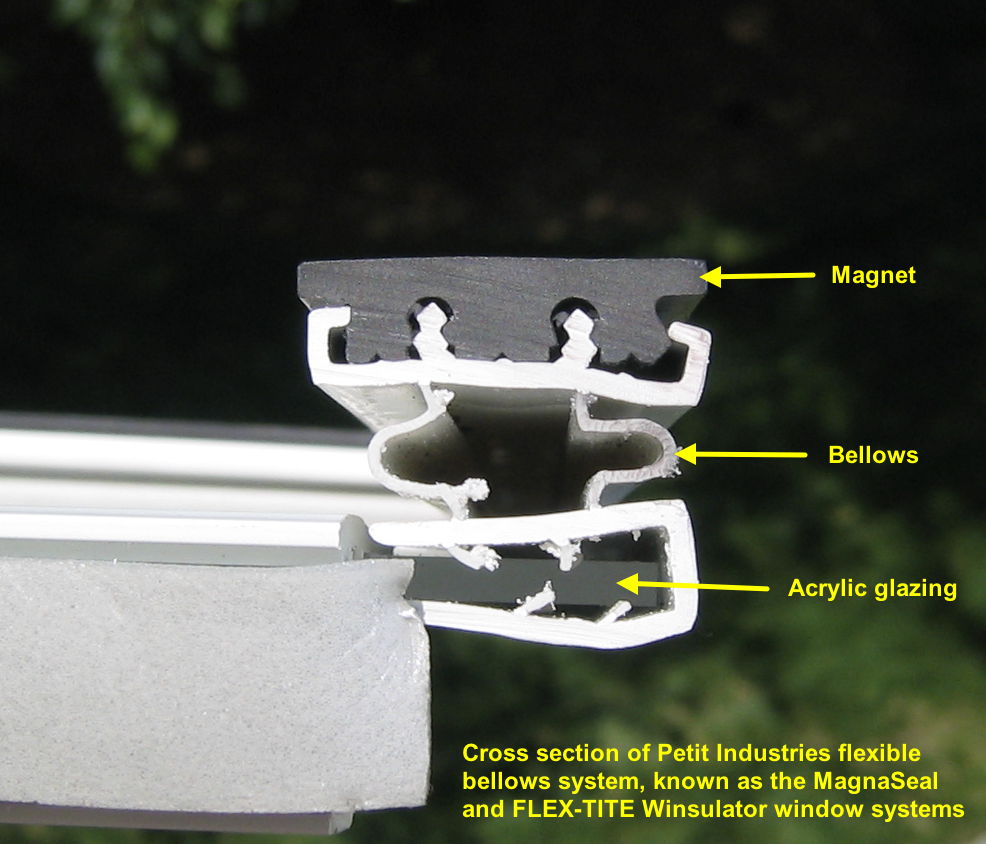 Here is a close-up cross section of our sample, showing how it is constructed
and why we chose this product. First, the sealing concept is very much like you have on your refrigerator door seal. A strong
magnet within a flexable covering to insure a good seal, with the bellows allowing for differences in surface alignment as
well as temperature effects a window will be exposed to. Second, the acrylic sits in a clamping arrangement that allows for
temperature changes, also, and minor adjustments for window width variations.
After experimenting with the sample window and its available mounting brackets, I chose to fabricate new, larger, interior
wooden window stops, since 1.) some of the original stops were in poor condition and their profile was not available in new
wood products. 2.) I didn't want to have metal 'L' brackets showing between the interior window stops and the new
interior thermal window. It simply looked too cluttered, easily visible from inside and outside the primary windows.
 Looking at the lower left inside corner of the interior insulating/thermal window, in our house... I fabricated new
interior window stops made from poplar and sized to position the face of the Climate SEAL window flush with the face of the original window inside casing trim pieces. The stop pieces are faced with an adhisive
backed steel strip on the thermal window side and are finished on the other side with a clear urethane, which has been waxed
to promote very smooth and easy operation of the double-hung window sashes.
A different compression sealing material configuration seals the mating of the interior window to the window sill. While
the bottom seal can be repositioned on the acrylic, to adjust for a window sill that is not level, you want to make sure that
your window sills are not badily out of level from side to side, since the interior window system does not have a large amount
of adjustment. You need to level any sills that have major level differences from one end to the other.
As I noted above, the windows can be provided with 'L' shaped metal mounting brackets, for the thermal window to attach
to, but I did not like the look of a metal bracket, versus making new widow stops and using the adhesive backed steel strip
on the interior face of the stop, for the window to magnetically attach to, which gives the installation a much cleaner, less
cluttered look, compared to seeing the original window stop plus an 'L' shaped bracket, all of which are clearly
visible from the outside. The new window stops are shown below.
 In the picture above, looking in from outside the window at the upper right corner of the window. See the rope and pulley?
These large heavy windows now open with a single finger's worth of effort. Really! This is primarily due to the very slippery
surface that the urethane side of the window stop provides, which has been waxed and is pressed against the exterior window,
which has the slippery 3M V-seal on the outside of the window. The problem today, is that the 3M Company has stopped making
V-seal, except for markets in Canada. This requires that you find a dealer/distributor that still has the product. NO! The
current look-alike products on the market do not last, period!
Where I applied the 3M V-seal is shown below in the following pictures, taken of an upstairs bedroom double-hung window that still has an exterior aluminum triple-track storm window... UPDATE - These exterior triple-track storm windows and original 2-over-2 prime windows have now been replaced, with Anderson Insert windows as shown here. While the 3M V-seal did an excellent job of sealing the window sashes, these original wooden windows, located on the
north wall of the house, were replaced because of the continued heat loss and gain due to the pocket weight cavities
at the sides of the windows, which allowed excessive cold and heat penetration during the seasons. After our 26 years of experience
with this, something had to be done.
The 3M V-Seal product is the best that I've found over many years, (since early 1984) that improves the weather proofing
and greatly reduces air infiltration of old wooden double-hung windows, but also promotes ease of window operation. It is
also a necessity when involving internal thermal window systems, if you expect the internal windows to function as specified.
They can't do their job if your primary external window is allowing excessive air into the building. Our experience with the
Climate SEAL interior thermal windows and properly weather stripped double-hung sash windows, over the past 10 years
(installed in 2002) has been very satisfactory. So much so that I have purchased additional Climate SEAL thermal windows
in 2009 and installed them in my second floor garage office, to deal with its original low efficiency aluminum single glazed
sliding windows.
You should know that the 3M product, as well as several other brands I have tried, will fail quite
rapidly when exposed to strong sun light (UV), such as experienced on windows/doors with a south exposure. The material
becomes brittle at its outer edges where sun light is reaching it and the material starts to fray. The frayed edge is easily
damaged when you raise/lower the window sashes and its condition becomes worse, until it catches and is partially ripped off
the window. I have 3M V-Seal on north exposure windows which have been in place since 1984 (27 years!) with no sign of failure!
I would also note that this 1984 vintage 3M V-Seal is thicker and more robust, then the product I purchased 5 years ago
from a source in Canada.
Unfortunately, 3M discontinued this product and the last of the product that I was able to find (pictured above)
was from the source in Canada about five years ago and I bought about a dozen packages, but now their supply is also gone.
If you find, or know of a good replacement product for the 3M V-Seal product, please let me know. The current v-seal type products still available are inferior to the 3M product, based on my own experience with them. There
are a number of people who have contacted me and want such a product, so that they can improve the efficiency of their wooden
windows.
UPDATE June 4, 2009 -
I've obtained another V-Type sealing product, suggested by a person also involved in old window restoration, called
"Ice-O-Tac" V-seal, made by Niagara, to see how it compares to the 3M V-Seal product. UPDATE The
Ice-O-Tac product has failed, due to UV exposure. I have no other source for this type of weatherstrip, so you'll have to
resort to the bronze strip material.
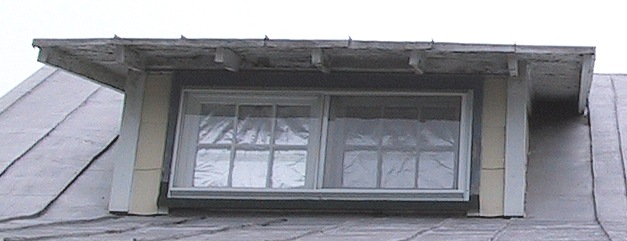 This is a picture of one of the shed dormer windows (1 of 4) when we bought the house. Attempting to get decent ventilation on the second floor was near impossible, given all the shed dormer windows had aluminum triple-track storm windows installed on their side. Ever try to open such a window installation? With years of dirt and junk in the window track now on the bottom? And the left hand window latches hidden behind the wooden divider between the two wooden windows? Good luck! The wooden 6 pane windows tilt in at the top and are actually made from the top and bottom sections of four small old growth wooden double-hung sash windows with wavy glass, and appropriate changes and add-on pieces to make their dimensions identical, such as cutting down the taller bottom window rail and adding to the top thinner window rail. Very clever re-use, indeed, of superior material no longer available. 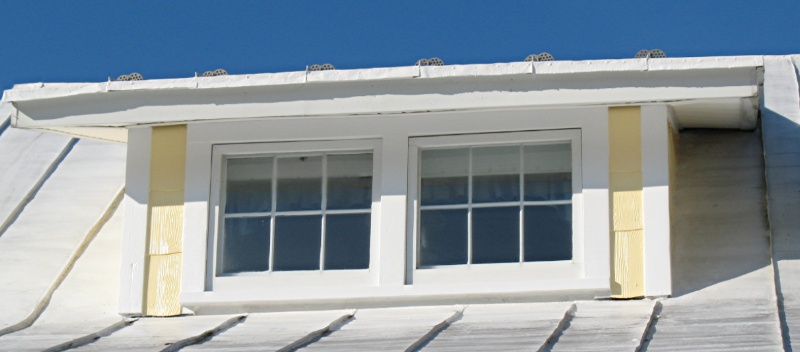 The aluminum triple-track storm windows were removed and repairs were made to the window sills where water had accumulated
behind and under the storm window frames. Thankfully, the old growth oak wood sills didn't allow excessive damage over the
years. The glass was removed from the triple-track frames, cut to new dimensions and placed in new wooden storm window frames
made from Poplar. The inside edges of the wooden storm windows are faced with EPDM rubber gasket material, which effectivly
seals the window to new window stops... also fabricated from Poplar, to permit thicker and wider stops, for better sealing
and a proper reveal with reference to the existing exterior face trim.
 Update June 25, 2009
(additional info added per Email requests)
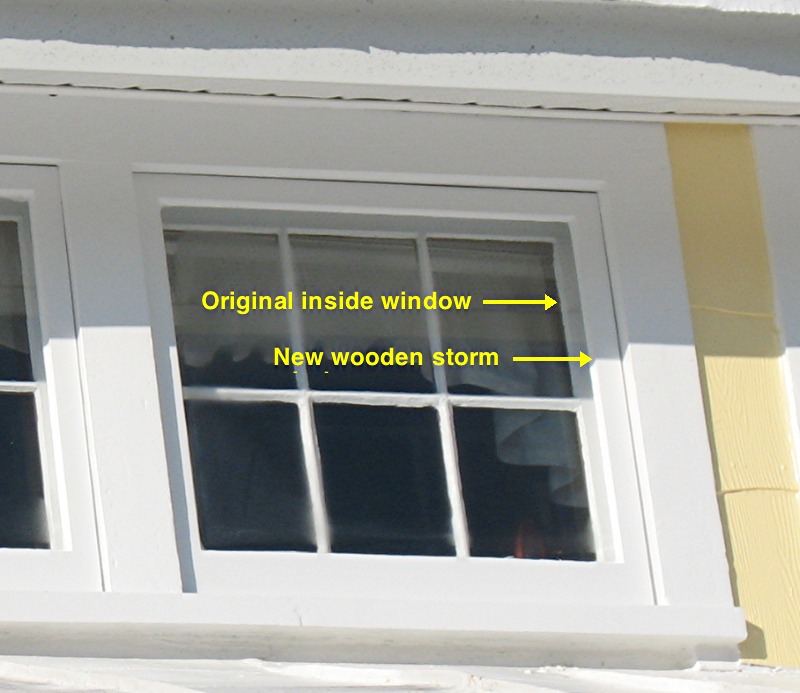
The new storm windows bottom sit on the inner sub-sill, not the main sill, which provides clearance around the total
perimeter of the window to allow proper water drainage, as shown below. I think this is all too common a problem, leading
to water damage, with add-on exterior storm windows... all those that I've been able to inspect had window sill and storm
window bottom rail water damage in a number of installations on many houses I've been to, over the years. This
is why I came up with the idea of positioning the bottom rail differently, to promote water drainage in this area of the window,
which has worked well for the past 5 years with my small dormer storm windows.
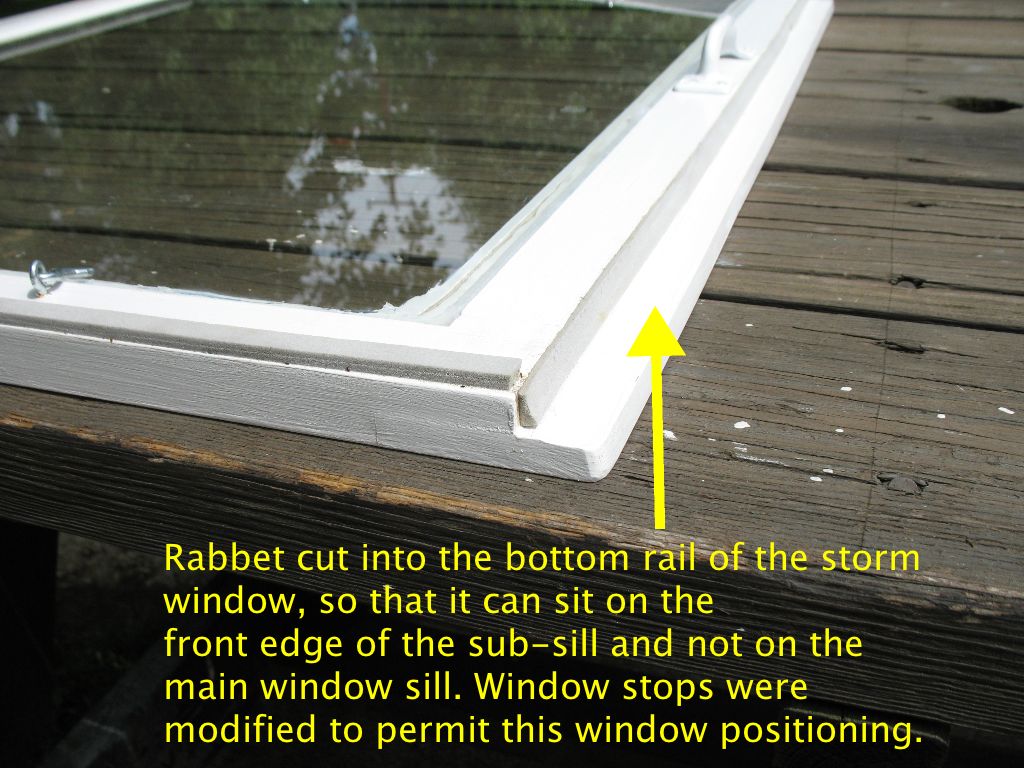 NOTE - The weather strip shown on the base of the storm window above, where
the rabbet has been cut, has since been removed from the windows, after the first winter, where I realized these windows were
fogging up because there was no ventilation to allow the trapped moisture to escape. They were simply too tight, which you
don't want exterior storm windows to be.
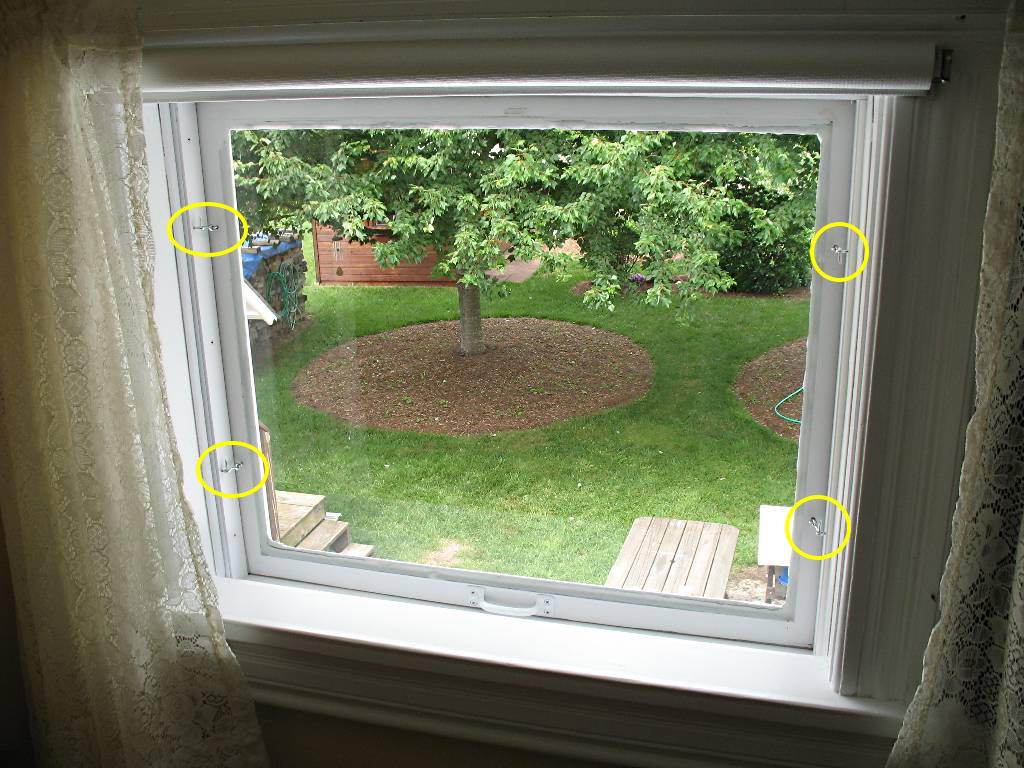 You can see the small hook fasteners in the side rails of the storm window, which attach to the eyes in the window stops.
I had thought about using a sliding latch arrangement, but the simple hook and eye fastener allows for quick and easy adjustment
of the closing pressure between the window seal and the stop that it comes up against. A small handle is attached to the window
bottom rail to assist in holding on to the window during moving it. I also have fabricated several screens the same size as the
storm windows, for use during the cooler months.
Lastly, don't paint the surface that the face of the weatherstrip comes in contact with, to seal the joint.
While 3M V-Seal won't stick to a painted surface that it seals against, most foam and rubber based products will, especially
the foam products which may not release at all and will tear apart! Instead, apply two coats of primer to seal and protect
the wood, as the weatherstrip won't stick to primer when it comes in contact with it. It's okay to paint the surface that
the weatherstrip is attached to, of course, since it improves the weatherstrips ability to stay in the position you want it
to stay. And always put the weatherstrip on the removable surface, when ever possible in terms of making a good seal, such
as the storm window or window stop in the case of a double hung window, since they can be removed to allow easier
replacement of wornout weatherstrip and adhesive residue.
 Interior 6-pane window in place, held in its closed position by the small bolt latch located at
the top of the window. Depending on the type and thickness of the weatherstrip used to seal the window, you can use small
washers underneath the bolt latch body, to adjust how much pressure the window applies to the weatherstrip, if you're dealing
with pre-existing holes for the latch bolt in the window frame, such as I was.
Fortunately, all our old growth wooden sashes have remained stable and perfectly flat over the years, allowing
us to easily seal the perimeter of their surface face without having to resort to trimming or other adjustments to obtain
quality sealing when closed.
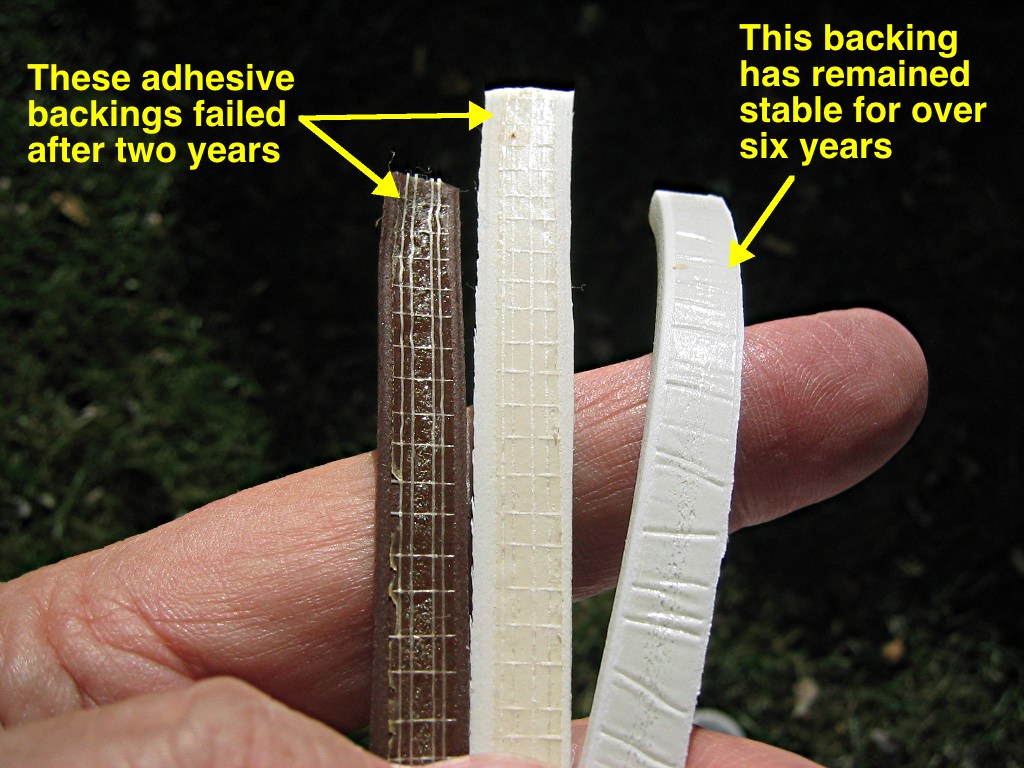
Update October 20, 2009
After a large amount of rain last week (3-inches) and high wind blowing directly upon the East facing wooden
storm windows, they had a small amount of water seeping in behind them. Upon inspection I found that the sticky backing
used on the EPDM rubber weather seal used on two of the windows, had failed completely. When the windows were removed,
the weather seal fell off! Its sticky backing was no longer sticky. Watch out for this stuff, it is not the first
time I've had this kind of problem with this type of sticky backing... I thought the first failure with this weather
strip was simply a "weak" batch, but I see now that it wasn't. This sticky backing is a bad or faulty design,
based on my most recent experience with its additional failures.

The WindsorONE products are available at
their web site located here.  With the repairs completed, work will now continue on the window frame, stripping the face and getting it ready for an
Anderson Insert window system. I am still looking at the installation in terms of installing the new window from the inside,
as I did here with my earlier Anderson Insert windows installation, or install the window from the outside, cutting away the original exterior
window stops. As it turns out, it was necessary to install the window from the outside, as shown here.
Now I can start thinking about celebrating the completion of having rebuilt all of our home's windows. A major feat,
as many of you well know, from your own experience... but don't give up! I started this project in April 2001, while still
busy with a full time consulting job, doing what I could to restore the windows, as time permitted. It has taken just over
9 years, but the end result is fantastic, providing us with beautiful old windows that are very energy efficient. You won't
regret your efforts, if you choose to do the same.
Replacing the exterior wooden window shutters
(original shutters removed and discarded during the early '60's when triple-track storm windows were installed.
Here is a good web page on the subject of shutters.)
The new western red cedar wooden window shutters have arrived from Timberlane and will be fitted to the first floor south and east facing windows, with the assistance of carpenters, Kenneth Wine and
his brother, Earl, as proper fitment takes a level of carpentry skills that I do not have. And I don't want to screw-up
these expensive shutters.
NOTE- If you're looking for comments about installing vinyl window shutters, go here.
Installation details for our wooden shutters are as follows...
 The Timberlane shutters arrived well packaged and housed in a cage like
structure, built around their shipping skid. Don't throw it away just yet... it may come in handy, as I suggest further down
this page.
 If you search the Internet, you won't find much detailed or illustrated
information about installing hinge systems as used on older homes with exterior shutters. There is one good article at This
Old House, using different hardware (surface mount) then I am using, that you may want to look at here. If you find a good article that is well illustrated with good photographs (not business card size tiny
low resolution pictures taken on a cell phone camera!), please let me know, so I can link them here on my web site for others
to have access to.
On our house, I decided to use the old original (or last created)
hinge recess locations, to minimize patching the original window trim, which is otherwise in very good shape and to use
Acme Lull & Porter No. 2 hinges, which were typical of the original construction and have been around since 1854, when
they were patented. These hinges consist of a window frame pin plate and a mating shutter plate pin socket, which allows the
shutter to easily be removed and also holds the open shutter back against the wall, through its pin and socket cam action.
The last hinges used appear to have been plain door hinges, although the outline of Lull & Porter hinges were clearly evident
on some of the window frame hinge recesses, we were working with. The ACME Lull & Porter hinges are cast metal and
known to break if treated roughly, which many were after years of neglect. This may explain the use of door hinges, by
a previous owner(s), who replaced broken Lull & Porter hinges.
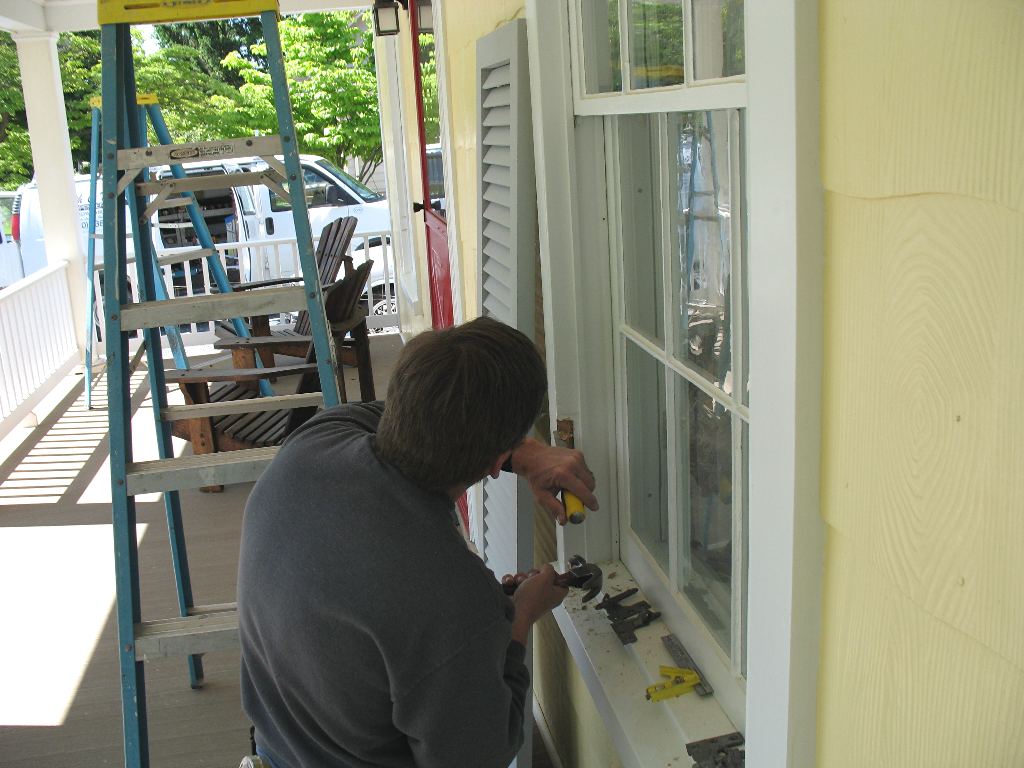
Earl Wine is shown here beginning the window hinge pin plate placement. He had to clean out the old original hinge recesses, as they
had been filled with various types of material over the decades, which made it impossible to get a proper hinge fit and
accurate alignment. On this window, the last shutter hinge used had been a door hinge, as can be seen here, so all of the area had to be cleaned out so that a new Lull & Porter hinge could be positioned correctly,
with the remaining area filled with epoxy.
 With all the new Lull & Porter hinge pin plates installed in the window
frame, the hinge pin socket receptacle plates for the shutters will be installed next. NOTE
- These ACME hinges are labeled "L" and "R" on their backside, but that reference is from the perspective of being in the
house, looking out at the shutters, not standing in front of the shutters on the outside as one might expect! Otherwise, you
might go a bit crazy trying to figure out their proper orientation... It played with my head for a bit, until I figured it
out.
The gap around the new Lull & Porter hinges in the window frames are
filled with an epoxy based filler, as shown below, and will be finished to hide the later door hinge recess.
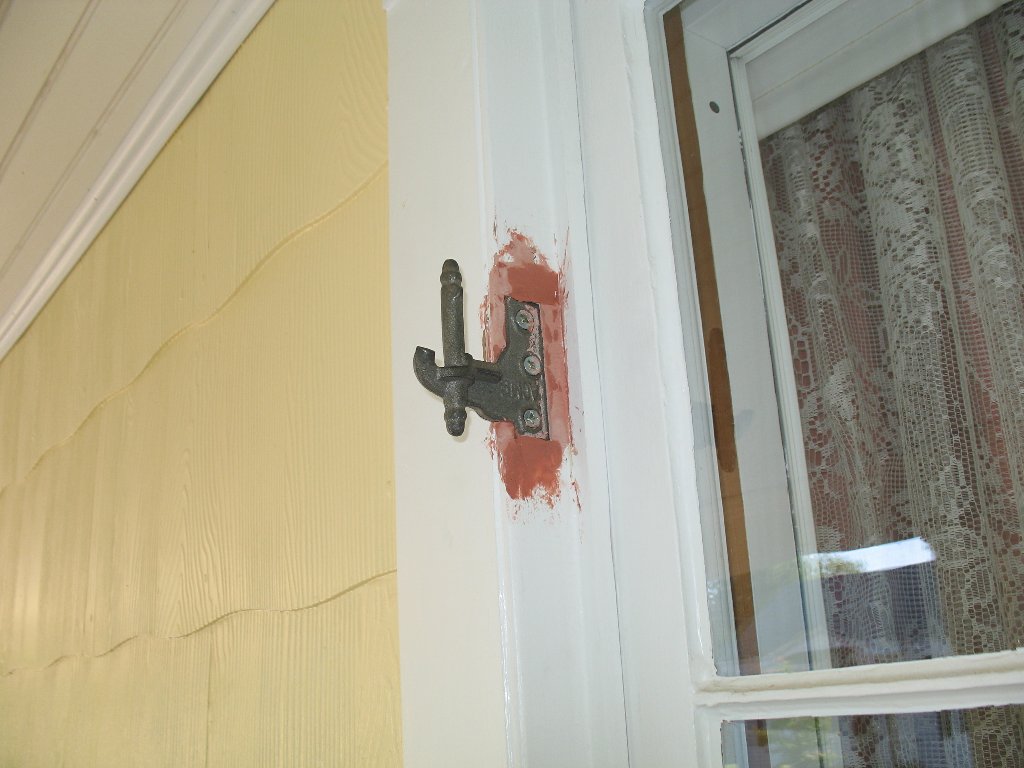  Window frame hinge plate installation and painting complete. I had considered
not painting the hinges, but coating them with a clear coating, or a gloss black coating... a carry over from my automoble projects, where hardware is often not painted, but has been plated, clear coated or simply painted gloss black. However, the
hinge looks best painted with the shutter/window frame colors... which is how the majority of the old shutter hinges
are painted on the many houses I looked at.
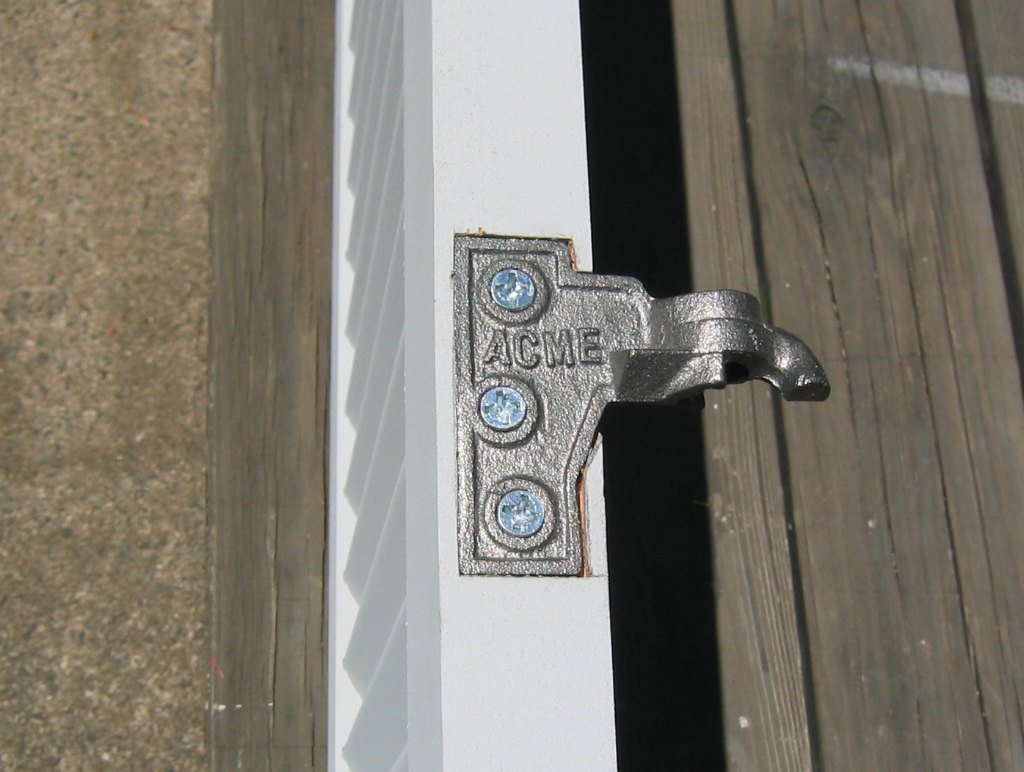 The shutter hinge pin socket plates were carefully installed in the
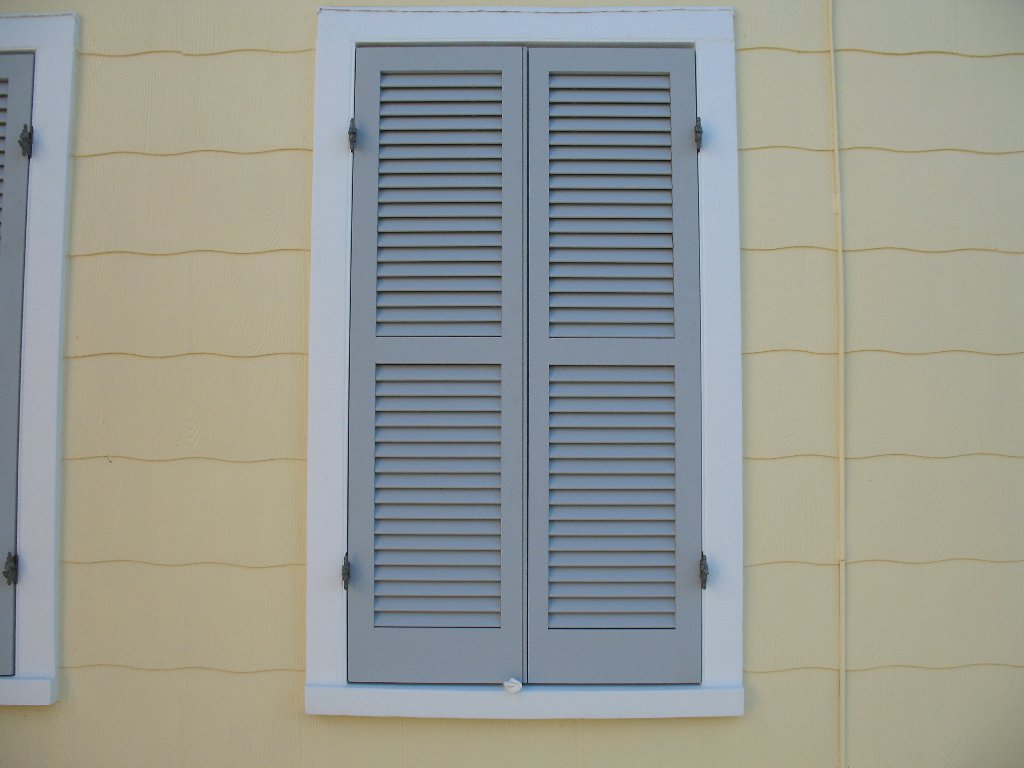
shutters, to match the window frame pin plate locations. After completion of the hinge installations, the shutters were test
fitted, as shown below. The top caps for the shutters have not yet been installed in this picture.
 With a confirmed fit, the hinge pin socket plates were removed from the shutters and primed with two coats of metal primer
(the screws were dipped in the metal primer, coating the threads before they were screwed into the shutters) and the hinge
plate recess in the shutters are primed with two coats of acrylic primer and everything put back together on
the shutters after drying. This step will help prevent potential water damage and hinge loosening, over the shutter service
life.
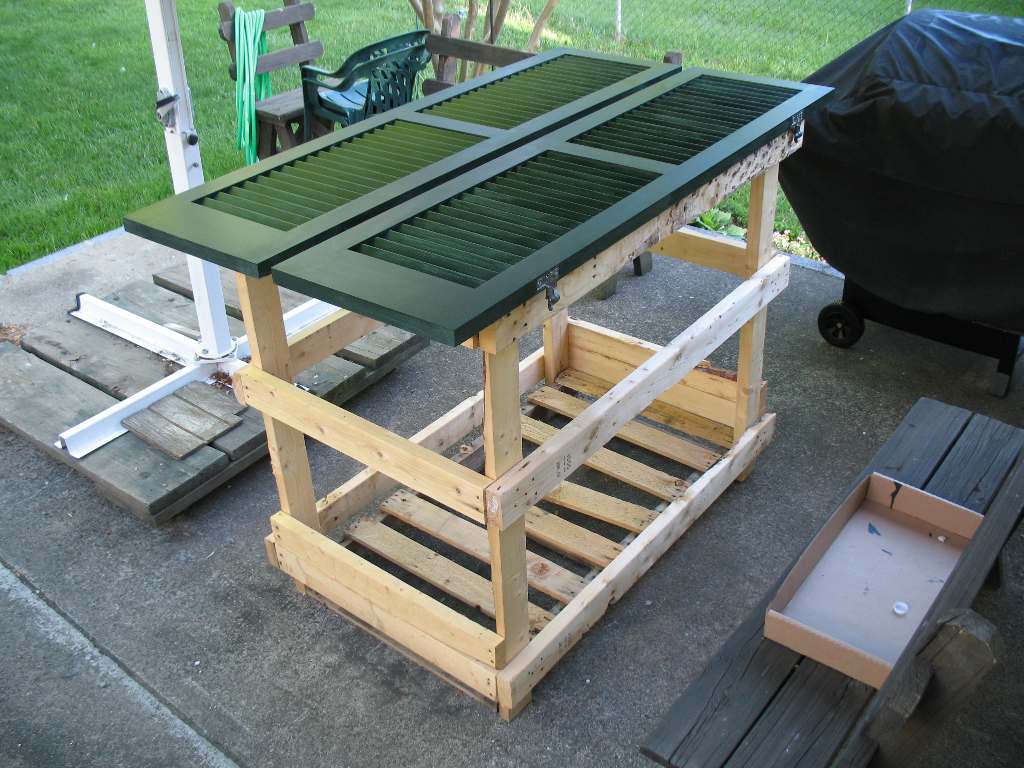 A suggestion... don't throw away the original Timberlane shipping
crate, if you purchase your shutters from them. It makes a great paint stand if you're painting your shutters. And, because
the crate was not made of treated wood and we heat with wood, it provided a final service, it became excellent kindling to
start our wood fires.
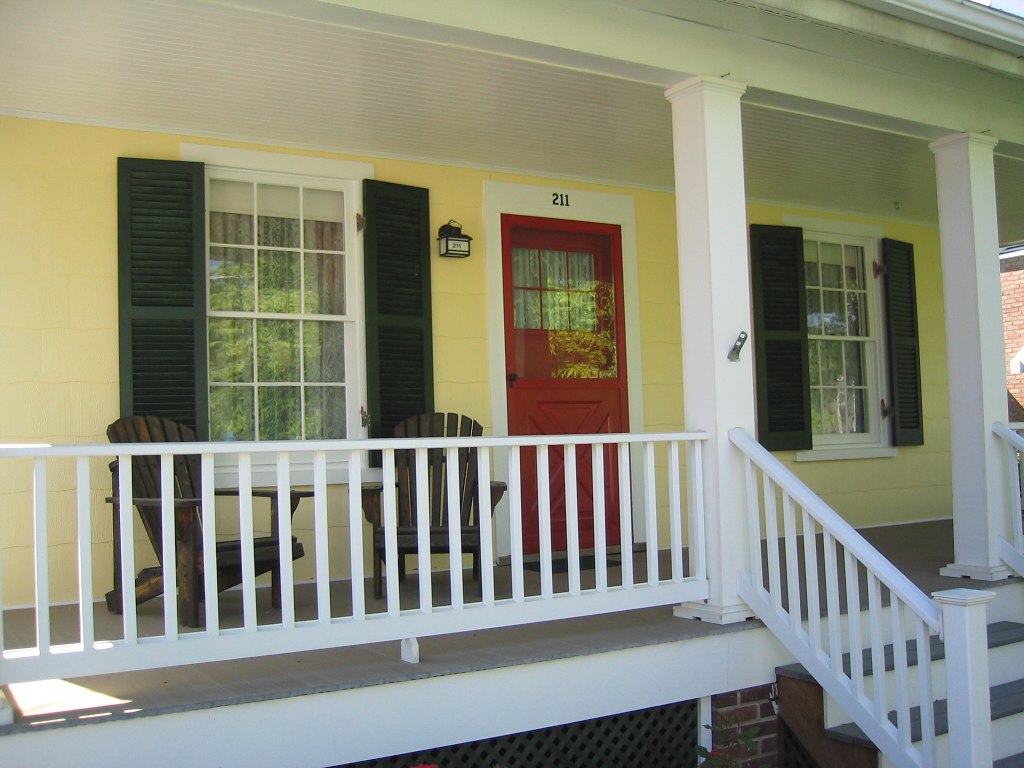 With their first coat of paint, the new shutters are placed on their mating
hinge pins (not yet painted) on the front porch to cure and to see what they look like. All the original shutters were
removed nearly five decades ago, to make room for aluminum triple-track storm windows, installed in the early 1960's. The
new shutters look great! Back to painting when the weather permits.
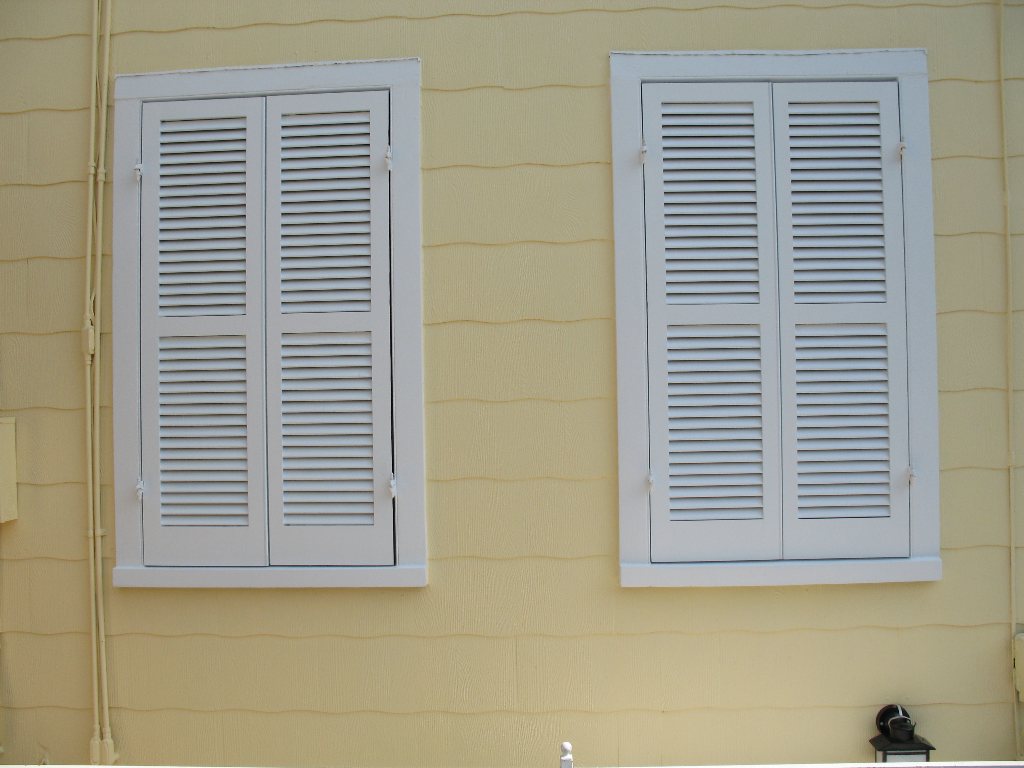 The pictures, above, are of the south side of the house early in the morning. The south facing shutters are painted white
on the closed side, so that radiant heat is reflected and isn't cooking the shutters, as it would, if it was painted dark
green. Of course, the shutters will be open all winter to help warm the house, so we're hoping this reduction in
the amount of time the shutters dark green sides are exposed to direct sun light, will help extend their paint life. They
certainly reduce heat gain and UV damage to the windows sashes, during the summer, to say nothing about the effect of the
"shuttered" light in the livingroom, which is very nice. It looks like a Savannah home inside. Total completed cost per window,
including shutters, hardware, paint and carpenter labor totaled $680 per window, not including my painting labor... which
is always free, of course.
Finally, a clear day and strong sun and my chance to replicate what I see in terms of the filtered sun light coming
through the shutters, as shown below. The picture on the left (below) shows the strong afternoon sun on the closed shutters.
The picture on the right (below) shows the inside view of the shuttered windows. The strong light from the left in this
picture is the porch window facing east, which is in the shade. Very difficult to show the actual resultant shuttered light
effect, (lots of tinkering with exposure settings) but my resultant photo accurately shows the true lighting.
Update December 17, 2011
The lamps (using painted 4 and 5 watt CFLs, which I talk about and show here) are on to serve as an illumination reference, to help show how much the shutters have reduced the sun light illumination
level. Additional info about CFL specs and the color temperature of the light they produce, is discussed here and here is an article named CFL Facts and Myths, well worth reading. The total shutters effect is quite pleasing and the reduction in heat gain is considerable. Anyone
who has been to Europe knows that exterior window shutters are in wide spread use. Too bad we're not as comitted
to conserve energy to do the same, in the U.S.!
 Update August 9, 2009
The beauty of "shuttered" sun light. With the porch window shutter (left in the picture) closed, the room takes on a
relaxing glow, even though it was a hot sunny 98F (36.9C) degrees outside today. A significant change in the enviornment
and improving the energy efficiency of the room(s) to say the least.
The next project is to do something about the second floor windows, above these windows, which were replaced with Anderson
400 series double glazed units about ten years ago, as the original windows were completely cooked by years of the sun exposure.
They felt like balsa wood. Currently, we use sliver mylar auto windshield sun shades, cut to size and fitted between the screen
and window, which makes it easy to remove and replace them for open window ventilation. It helps considerably, but the
look certainly isn't what we want. (same problem with the shed dormer windows during the summer and the large
amount of radiant heat reflected by the white roof, which is stopped by foil faced 1" foam panels behind the storm windows)
Because there isn't enough room for fully functional shutters on the second floor windows and they are flush mounted, I am
thinking about Bahama style shutters, to be used only in the summer. We'll see.
Update November 10, 2010
Now that fall is here and temperatures have fallen, the shutters are now opened to allow the sun to enter the living
room and add warmth to the house, both downstairs and up stairs, where the silver mylar panels have now been removed from
the second floor windows. They certainly were of significant value, during this years extremely hot and sunny summer, along
with our new Split System Ductless Air Conditioning Systems, as discussed here.
The sun light, now desireable, adds a significant amount of heat to the
south facing living room (the lace curtains are pulled back in this picture) and upstairs bedroom. The heat gain typically
holds the house at 58 degrees on a 20 degree sunny day. While baseboard electric heaters are visible, they are back-up heat,
as we heat with a wood stove (located in the basement), as we have for the past 28 years. At an average of 1 cord of wood per
heating season, our total heating cost is $200 per season.
And finally...
I close this web page, showing a window from one of my favorite Virginia homes, Thomas Jeffererson's Monticello, which I have been visiting since 1973 when I moved to Virginia. It has served as my benchmark (along with Oatlands), for
striving to make my repairs and renovation efforts with as much skill and care as I can perform, or afford to pay for
highly skilled help when I must have precision work done. I hope you can do the same and I wish you good luck with your
own restoration efforts... and don't think it may be taking you too long. It took me 9 years to finish the 20 windows and
frames in our house, but there is no question that it was worth it. Our old windows never fail to bring a smile to our
faces, when we pause to look at them, or show them to visitors... who can't believe their age and how well they work.
Installing an Anderson Insert Window System Webpage
(windows that couldn't be saved or had other issues and had to be replaced)
The Paine House Webpage
(carriage garage doors, split system ductless air conditioner
systems and our wood heating installation)
Rod's BMW 528e Support Webpage
(detailed and illustrated maintenance and modifications
to a BMWCCA Concours award wining 1983 BMW 528e)
Copyright 2009 - 2013 by Rod Paine. ALL RIGHTS RESERVED |
||||||||||||||||||||||||||||||