|
|
 |
 Maintenance tips, comments and links about
performing various types of maintenance.
(click this link to go to this update
location)
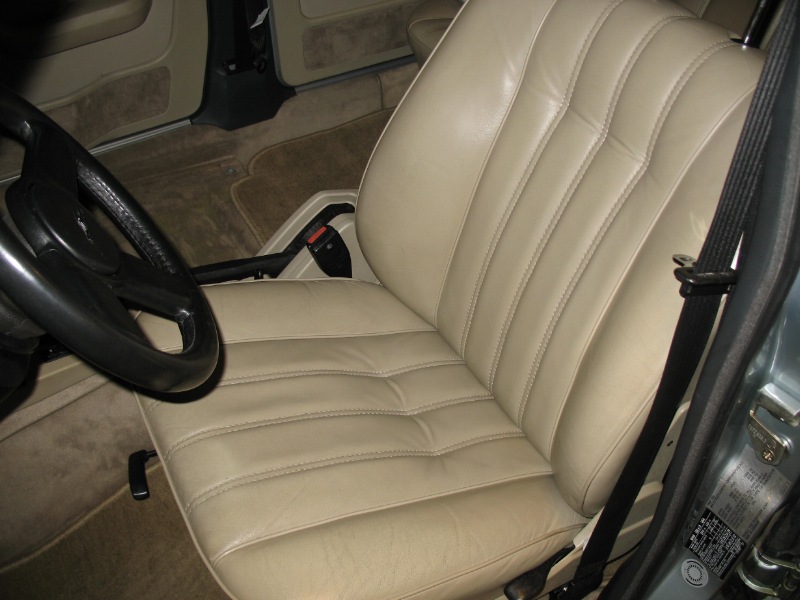
Swap the seats and help minimize wear
Reducing the wear that our drivers seat experiences
can be accomplished by swapping the passenger and drivers seats during their lifetime with us. Here is some info on making
the swap. This is the third time on my E28 and along with proper cleaning and treatment, it's why my 30 year old
(as of Oct. 2012) leather seats still look great.
After removing the seats from your E28, try to put
them somewhere that will make it easier for you to work on them. Remove the plastic trim panels, keeping track of which screw
goes where, as they are different lengths. Also note the plastic pins on the backside of the panels. They go into the holes
provided for them in the metal control brackets. Take a second to look at these and save yourself some trouble when you put
it all back together.
You have to remove four items from each side of the
seat, to permit the cushions to be swapped. The two #4 Phillips screws are also locked with red thread locking compound, not
indicated in my picture. Remove the Phillips screws first and then the seatback, making it easier to disassemble the seat
cushion controls.
Remove the 13mm bolt next.
With the 13mm bolt removed, use an old screwdriver
or suitable piece of metal to pry off the lever arm and its shaft from its socket. It is not hard to do, it is retained by
a simple split ring, as shown below.
Once the shaft is removed, you can access the C ring and remove it from the plastic bushing,
allowing the whole control assembly to now be removed.
Update Jan. 1, 2007 -
With everything removed, you can swap the cushions
and put everything back together. Take your time, it is easy to make a mistake and get turned around in terms of what control
goes on what seat cushion side. The bar with the bent ends used to release the seat back adjustment, must go back in so it
is oriented with the bar facing down toward the floor (away from the seat bottom) at about a 30 degree angle toward the seat
front, with reference to the seat bottom. Don't forget to reconnect the big rubber band, that holds the bar in the up position
and also keeps the bar from rattling.
Update August 5, 2010
Make sure that the bar under the seat is positioned as shown below, looking at
it underneath from behind the seat. The bar is tilted down about 30 degrees toward the front of the seat as shown, making
sure that its ends are fully engaged. And don't forget to install the rubber band.
With the seats back together, it's a good time to
clean and treat them, while they're easy to get to. When remounting them back in the car, if some of the holes in the brackets
don't want to match up with the holes in the floor, release the seat track lever to allow the seat track rails to be repositioned
over the holes. With all the handling of swapping the seat cushions, it's easy for the tracks to slip a bit and no longer
be in parallel with each other.

The drivers seat is now back in original position,
moved from the passenger seat location where it was placed in early 1995. The move from one location to another continues
to minimize seat cushion wear, as can be seen. Proper cleaning and longterm use of Zymol Treat has played a major role
in maintaining the leather condition. I've seen 5 year old BMW leather seats that don't look as good, or are as supple as
these 30 year old seats!
Update August 27, 2012
There are many products available for maintaining
the leather upholstery in your E28 and there is also no shortage of opinions on which product works best, including my opinion
about Zymol products. Since I have been using Zymol
for the past 30 years on my 528e since the day I took delivery of it, new, I have a significant amount of experience with
the Zymol products performance, to say the least.
Here are opinions from others, including a response
from the Zymol Technical department, responding to my question about the use of new technology care products on my 30
year old leather and Zymol Treat use on the new generation leather upholstery in current automobiles.
First, here is the discussion about leather upholstery
care and products, at MyE28.com, where I am a member. This discussion represents a lot of opinions and experience, so do take some time to review it.
Second, here is my request for info from Zymol and
their response...
Please review the discussion at <http://www.mye28.com/viewtopic.php?t=108006> and assist me, as best as you can, to provide correct information about the use of the Zymol Treat product on leather
products manufactured 20-30 years ago, versus the use of new technology products to care for leather auto interiors of this
age.
Thank you,
Rod Paine
------------------------------------------------------------------
Date: Mon, 20 Aug 2012 15:35:14 -0400
From: Zymol Technical <zymoltech@zymol.com>
Subject: Re: Leather Treatment Information
To: Rod Paine <xxxx>
Cc: <info@emmonscoachworks.com>
Rod,
We have experienced almost everything when it comes to leather. From original
leather trim on a 1937 12 cylinder Cadillac Limo to BMW Water Buffalo to new vinyl clad on a MB 300c.
The problem is always the same. Most products re-introduce solvents to soften
older leather, which ultimately weakens the hide by accelerating leather upholstery and trim drying and aging.
Arresting the aging of leather is the secret!
Our Zymol Treat uses spun coconut oil and amino acid rich beef collagen (connective
tissue proteins and fats) to feed nutrients back into the older leathers since the entire process of producing leather is
denaturing the hide. Then Lemon seed (a biocide) and cold extracted banana oils soften the leather and aloe vera extract provides
a shield against losing moisture and exposure to sunlight.
This feeding takes place through the release of trapped
solvents and the restoration of original hide moisture but there is a BIG price to pay....if you don't like the smell of leather
DO NOT use Treat.
The resultant leather odor is overt!!
Dave
(Andrew David Molera, with assistance from Chuck Bennett)
------------------------------------------------------------------
Date: Tue, 21 Aug 2012 17:04:29 -0400
To: Zymol Technical <zymoltech@zymol.com>
From: Rod Paine <xxxx>
Subject: Re: Leather Treatment Information
Dave,
Thank you. I will send a link to your input once I have modified my web page.
On a related note, could you give me your opinion as to what is causing the cracking of leather seats dyed with Leatherique,
as shown <http://home.insightbb.com/~todd.kenyon/leather.htm> here, by a fellow owner of a classic BMW, Todd Kenyon, as shown at the bottom of his web page. Could Zymol Treat help
with this problem, or is it too late or perhaps should not be used in such cases? I've had several people ask me about this.
Thanks, Dave
Best regards,
-Rod
------------------------------------------------------------------
Rod,
Zymol Treat was created to help leather stay alive.
I don't recommend Treat for Vinyl and Urethane coated leather.
We have a product "Leather Conditioner" for plasticized new leather.
Dave
Update Oct. 13, 2009
Gummi Pflege and maintaining rubber weatherstrip
and seal components...
I am continually surprized by the number of people
who have never heard of "Gummi-Pflege", originally sold by BMW to protect and maintain the rubber weatherstripping. I've been
using it on my 528e since new, which has kept all the rubber in like new condition, as shown above. Here's a suggestion for
applying Gummi to areas you can't normally get to, because of the container design.
The original BMW Gummi-Pflege on the left which is
no longer available and Gummi Pflege from 1Z on the right which is currently available from sources (updated
10/13/09) like DriveWerks.
Carefully pry the sponge applicator cap off the bottle,
by prying between the base the sponge is attached to and the top of the bottle neck lip. Don't pry on the sponge!
Once the cap starts to come out, you can remove it
with your fingers. There is a flange sort of ridge at the cap base which helps hold the cap in the bottle neck, so if you
cock the cap while pulling it out it'll be a bit easier to remove.
Now you can dip Q-Tips into the liquid and apply it
to rubber components that are not easy to get to with a capped bottle, such as the rubber boot housing the wires for the door
electrics, as shown here. A rubber component that needs to be preserved, but is often totally overlooked.
To reseal the bottle, I use a proper size cork available
at most hardware stores.
The sponge applicator can be placed on top of the
cork and the cap will fit over it, keeping everything together for later use.
Door doesn't latch without additional force. Rattles.
Check to see if the plastic cap on the door latch
is missing or broken. A missing cap usually requires that you have to slam the door to get it to latch properly. The
door may also rattle once closed, when going over rough roads. The cap in the picture is an original brown color,
current replacements are light gray.

Modified jack pad for lifting the E28 at its
side lift points.

|
| PROTECH side lift jack pad |
Update March 31, 2011
You can modify a PROTECH (another new link 3/31/11, clear your cache
if you don't see it... you also have to click on the picture or the pad model name #1006 or #1007 to see its size!)
side lift jack pad, as I show below, to fit our E28 lift points and minimize potential damage and scratches. I simply cut
one with a small hack saw, as shown, to fit. Make sure you position the jack head as shown below, so that it clears the metal
lip and doesn't come in contact with it and bend it! Keep this jack pad in your trunk, so it can be used if you find yourself
in a garage somewhere, getting repairs you didn't expect.


|
| - CLICK ON THE PICTURE TO EXPAND IT - |
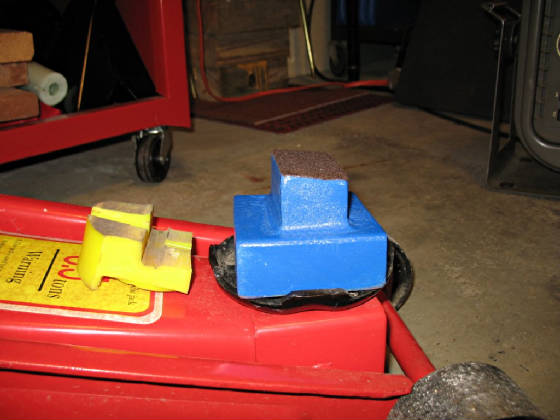
I've since had some aluminum blocks sand cast from
a wooden pattern I made, to use these as my lift/jacking point blocks while using the EZcarlift, as shown here.
Update July 13, 2007 -
Looking for a good knee pad, that is bigger than the typical small gardening
style? Take a look at this one, which I have been using and appreciate. They are firm and they haven't collapsed over time after a year
of use on my concrete garage floor.
- Checking disc rotor and wheel runout
- Replacing the upper and lower control
arms with 750i bushings in the upper arms, steering linkage replacement, tie-rod lube and alignment
- A link to a picture by Philo showing
his blue polyurethane bushing failure, plus another failure on another E28
- What no or improper suspension preloading
does to a control arm bushing!
- Noisy sway bar link joint to link nut
connection due to not tightening to the proper torque value!
|
 |
|
|
|
|
|
 |

