Maintenance tips, comments and links about
performing various types of maintenance.
This page last revised November 12, 2013
Using the EZcarlift -
Some tips on using this lift system with your
E28... this product and additional info is available here. Additional pictures of the EZcarlift with various model BMW's on the lift is here.
Update October 15, 2012
Boytcho Manev has sent a recent Email to all EZcarlift owners, detailing
the design, function and limitations of the product. This was necessary because some owners have misused the product. I have
created a .pdf version of Boytcho's original Email on the subject, which is available here.
Update
February 27, 2012 -
Muscle Cars on the Radio interviewed Boytcho Manev, the designer and builder of the EZcarlift and two owner/users of the product, including me, on
February 25, 2012. You can listen or download the MP3 format show from here. There may be additional interview material over the next several months, that I'll be particpating in.
My EZcarlift arrived Friday, November 30, 2007. Thankfully, a
fellow BMW friend (John in VA @ MyE28.com) had stopped by to visit, when the 125lb box arrived and my 95lb FedEx lady driver
needed a hand or two. We hauled it out to the back patio to unpack... it was packed very well, indeed.
I have been looking at various vehicle lift systems for several years,
but my problem always comes down to the small size of my garage (22'-6''L x 13'-0'W x 9'-8''H) which can't even support
a single post lift. (which have major access limitations of their own)
|
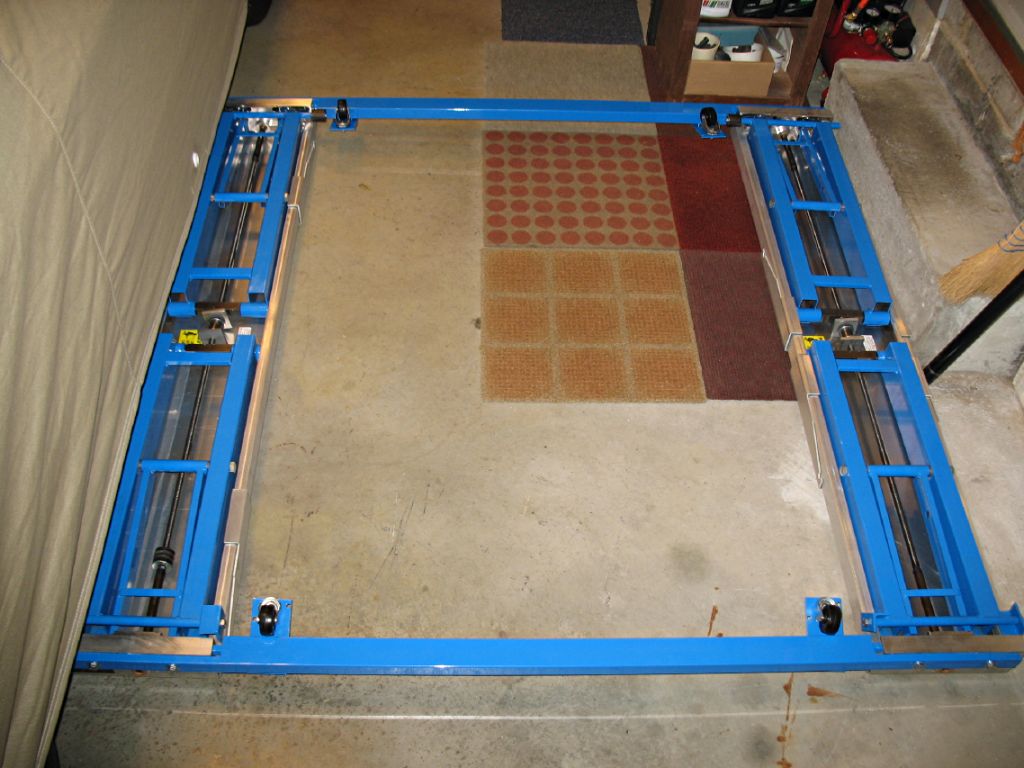
| This is the bottom side of the lift platforms, showing their screw jack rods. |
As compact as the EZcarlift is, it still barely
fits the width of my widest available floor area, because of the side door entry steps, as seen on the right, with the car
(covered) on the left. The lift is upside down with the bottom structure shown.
Before you install the spacer bars, the supplied lube
has to be added to the gear boxes...
New caster wheel brackets arrived the next day, as
an upgrade... these allow you to drive over the blue spacer bars without damage, since you can position the EZcarlift with
one lift platform under the car's center and the other platform to the left or right of the car and drive over the blue
center spacer arms without hurting them. Really! This solves serious space constraints if you have a small, single car garage,
or a limited width 1-1/2 car garage area, such as mine which I show above.
 As I indicated earlier, I've been experimenting
with lift block configurations for the E28 lift points and have finalized what I am going to use with the EZcarlift,
shown above, as well as use with most floor jacks with a popular size 4-inch lift cup. These are going to be sand
cast in aluminum by a friend, so I'll finally have something other than wooden blocks that have to be replaced over time,
as nothing decent is available for the E28 lift points. Sounds like a potential product opportunity for EZcarlift, doesn't
it.
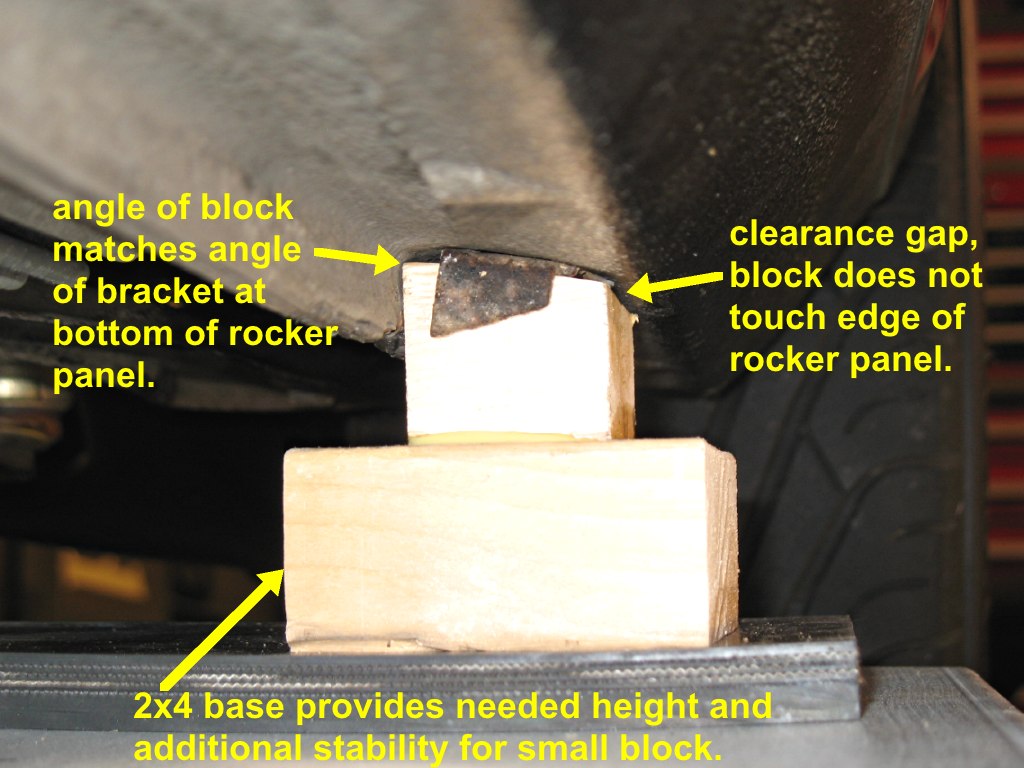 This lift block provides enough clearance such that
nothing will be damaged, including the rocker panels which typically fall victim to damage caused by raising the car at these
points, with a piece of wood or some such thing that doesn't do the job without damage. Take a look at the all too common
damage to E28s jacked up by people who don't understand what they are doing... damaged and bent pinch weld seams, bulging
and/or bent rocker panels at the lift points because the piece of wood, hocky puck or whatever, came in contact with the bottom
of the rocker panel outer edge, damaging it and now typically with lots of rust evident. No, thank you. I'll keep the wooden
prototypes in a small bag in the trunk, in case I need them while traveling.
 Here the actual aluminum block is in place, shown
at the left front lifting/jacking point. The castings maintained their pattern dimensions, and only required a touch-up
at the sanding station to remove surface imperfections, after sand casting. The slight convex shape of the bottom, allows
the block to pivot slightly on the lift rubber pads, to adjust for differences between jacking point positions and
angles on different BMWs. This is important since it appears quite a few jacking points have been damaged by improper lifting...
on the E28s I've had on my lift, anyway.
The cast aluminum blocks were fabricated and
delivered, by my longtime friend, William Elliott, of the Black Penny in Millwood, VA, who used one of his support services
metal works firms to produce these for me. His Christmas present to me. Greatly appreciated, Bill, thank you! It pays
to have good friends with good contacts, doesn't it.
I had several extra blocks cast, to use to replace
my modified PROTECH poly floor jack pads, as shown above and one to be sent to Boytcho Manev at EZcarlift, to serve as an
example pattern for his potential use in fabricating these lifting blocks for future use by other E28 owners who purchase
the EZcarlift.
Here the new cast aluminum lift point blocks are in
place and the lift is set to its maximum deck height of 26 inches. The unit is very solid and works with a minimum
pro quality variable speed 3/8-inch drill motor with a minimum 6 amp. rating. I am using a Bosch 1/2-inch variable speed 1199VSR
drill motor, which works very well. EZcarlift has put together a list of tested drill motors, which is available here.
My opinion is that this lift is an excellent product
and certainly is going to serve my underside maintenance and modifications needs, within the confines of my limited size garage...
as well as being portable to assist others.
A modification has been made to the rocker panel lift
brackets and the aluminum lift blocks, to speed placement of the lift under the rocker panel lift brackets, while using the
lift blocks and high strength Velcro strips. Use Velcro Industrial Strength Heavy Duty Adhesive, product number 90199, two
each 4"x2" (100mmx50mm) strips.
First, the bottom face of the lift bracket is cleaned
with solvent to provide a clean surface for the Velcro strip. Yes... I have yet to refinish the rocker panels, which I have
not yet gotten to. I am going to use the DupliColor black pickup truck bed coating, brushed on after masking. It will most
closely approximate the original dimpled black factory finish, based on my experiments with various paints, to date.
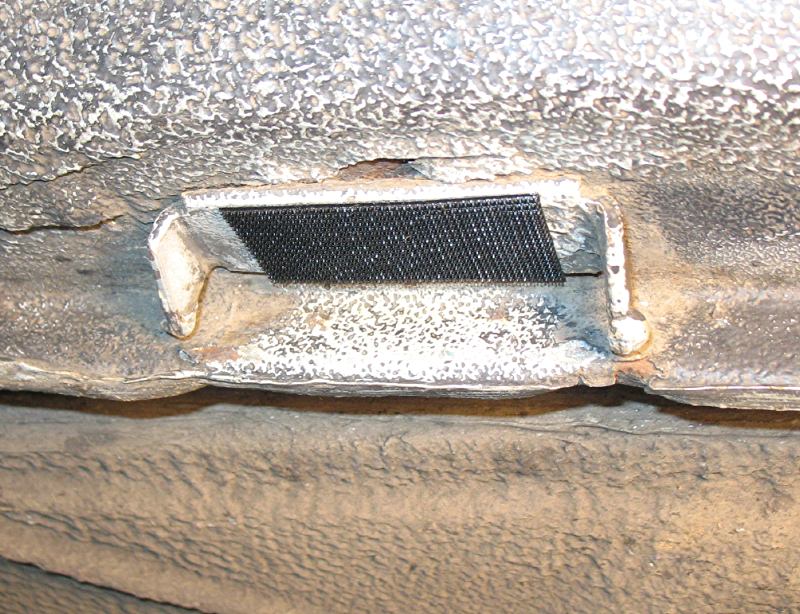 The Velcro "Hook" side of the two-part Velcro product
is cut to an appropriate size and pressed in place, centered on the bracket face. The "Hook" pattern is used since it will
not attract stuff as quickly as the "Loop" (furry) part will, if it was placed here on the car. The "Loop" side stays in the
garage, protected from attracting junk on its surface.
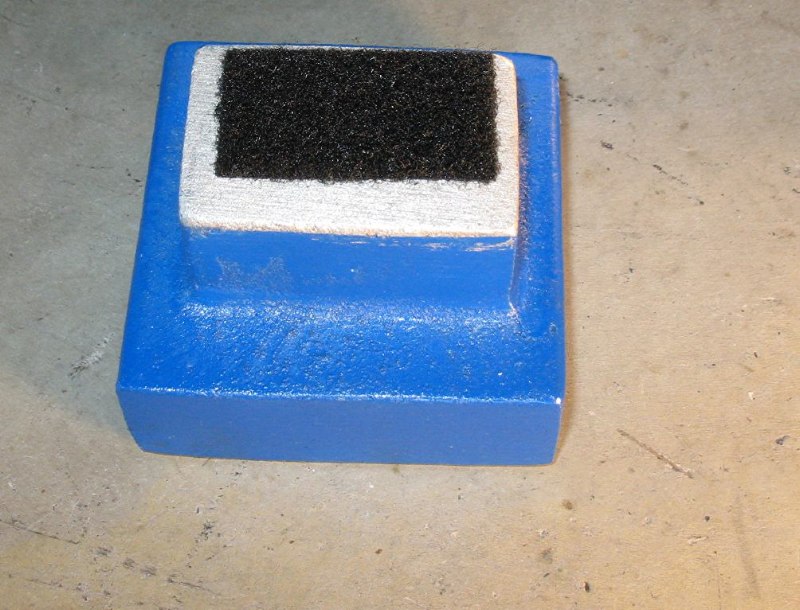 The "Loop" (furry) side of the Velcro product is attached
to the lifting face of the lifting blocks that I use. It's easier to cut the "Loop" strip and center it on the "Hook" strip
that is already in place on the rocker panel bracket. Then remove the protective face from the adhesive "Loop" backing and
carefully position the block up against the adhesive "Loop" backing. Putting the "Loop" on the block and then placing it up
against the lift bracket "Hook" strip that is already installed will result in a imperfect match between the strips. Much
better to put the strips together, after the "Hook" side is in place and then positioning the lifting block to the
"Loop" adhesive side, resulting in a perfect alignment between the two Velcro parts and the lifting block position
in the bracket. I've labeled my lifting blocks, RF, RR, LF, LR to insure they go back where they were originally installed
with the Velcro.
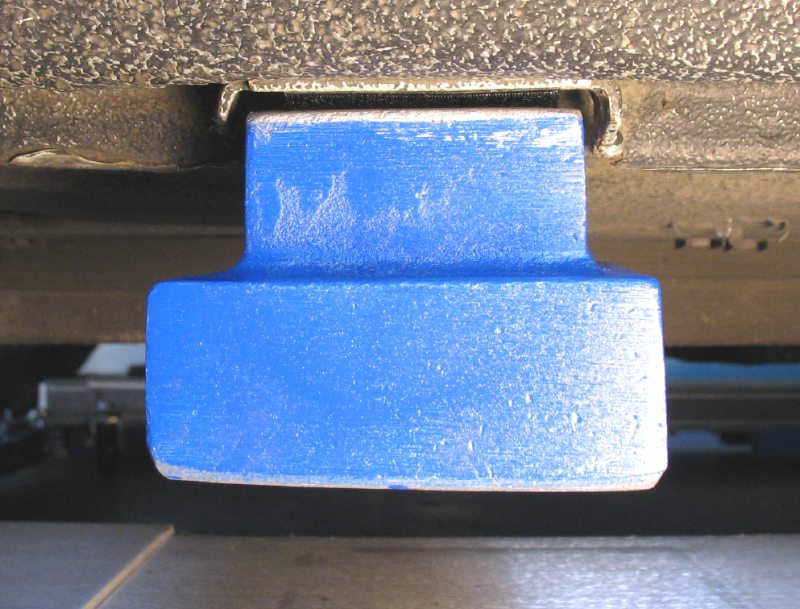 My lifting blocks are now easily attached to
the rocker panel lifting pad via the Velcro interface, which securly holds the blocks while I position the lift rubber lifting
pads on the lift under the blocks, then raise the lift. I will be fabricating the same type of arrangement for our 2002 VW
Golf TDI and the 2008 Honda Fit, which have nearly identical lift point configurations. In fact, a minor modification
to the face of my BMW lifting blocks, will allow the blocks to also be used on the VW and Honda. The Chevy 4x4 pickup
truck is lifted directly at the frame rails. Wooden blocks are used for other vehicles, brought over by friends to use the
lift.
If you are simply using wooden blocks, I see no reason why the Velcro wouldn't
also work to position them, given you seal and paint the wood where the Velcro strip adhesive backing would be attached.
Update November 12, 2013
 New lift blocks made from 1x3 inch steel stock
measuring 2-1/2 inch long by 3 inches wide with a 5/8 inch wide by 3/8 inch deep groove milled in the stock. This size
fits within the areas provided on our cars and supports lifting our 2008 Honda Fit Sport and our two MKIV VW Golf
TDI vehicles, which has the same kind of lift tab that is shown below in the close-up picture of the Honda Fit lifting
tab. Quite a few newer vehicles appear to have this kind of lifting tab. This lift block size also fits all common floor
jack cup sizes, too. They replace wooden blocks that I was previously using, that have since cracked, in spite of bracing
with a carriage through bolt.
 
 A view of the underside of the frontend shows considerable
room to work in... compared to the picture of me replacing front end parts on an earlier web page. Sure wish I had this lift back when I was struggling with replacing control arms, swapping differentials and many
other underside tasks!
I should also note that you can remove the idler end spacer bracket (one of the
blue bars). The "idler" end is the end of the lift that is not where the drill motor is attached for lifting. The drill motor
is attached to what is called the "driven" end. Removing the "idler" end spacer bracket allows for greater clear
space to work on things such as the exhaust system, for example. In the picture above, the front spacer "idler" bracket would
be removed by first raising the lift a small amount that allows the castor wheels to just clear the floor, then remove the
bracket and then raise the car to the desired height. You now have clear access to the exhaust system from the exhaust
manifold to the flange joint behind the catalytic converter, allowing this whole section to be dropped. The lift is perfectly
safe with the idler end spacer removed, according to my discussions with Boytcho Manev.
And, of course, the lift can be turned 90 degrees
for other lifting arrangements, which I am presently experimenting with.
Update Feb. 15, 2008
I received the optional set of four Moving Casters,
two with brakes and two with the wheel position locks, as discussed with Boytcho last week. I want to be able to easily move
the car from one side to the other, without taking it out of the garage, so I can work on either the left or right side of
the car.
The first thing you need to do is to lubricate the caster wheels by injecting
grease into the two grease zerks on each wheel assy., as shown below.
With the casters lubricated, install them with the
brake versions on one side of the lift and the position lock unit on the other side of the lift. If the lift is fully up,
you'll have to lower it a bit to have clear access to the pin mounting holes, as shown below. Make sure the position locks
are facing toward the outside of the car, as shown below. If they aren't facing the correct way, reverse their position from
front to back.
With the brakes on the brake casters fully on and
the position casters set toward the direction you intend to move the car, lower the car until the lift feet are off the floor
about 1/2-inch and the casters are now supporting the car, as shown below.
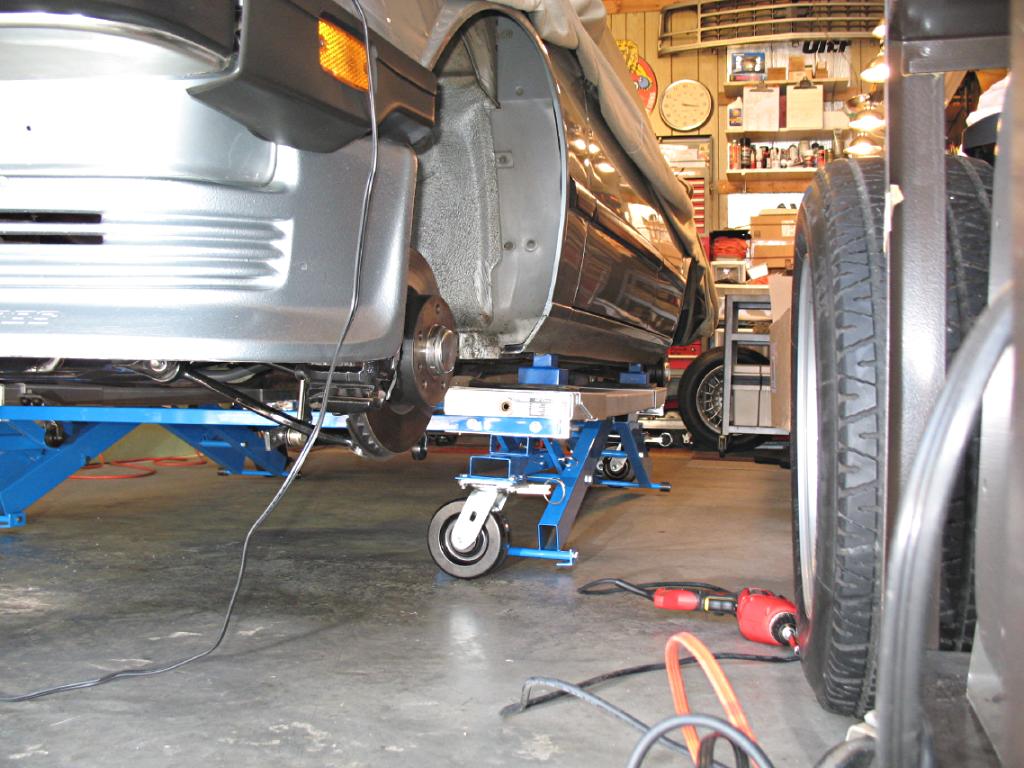
|
| Lift shown lowered to use casters for moving the vehicle. |
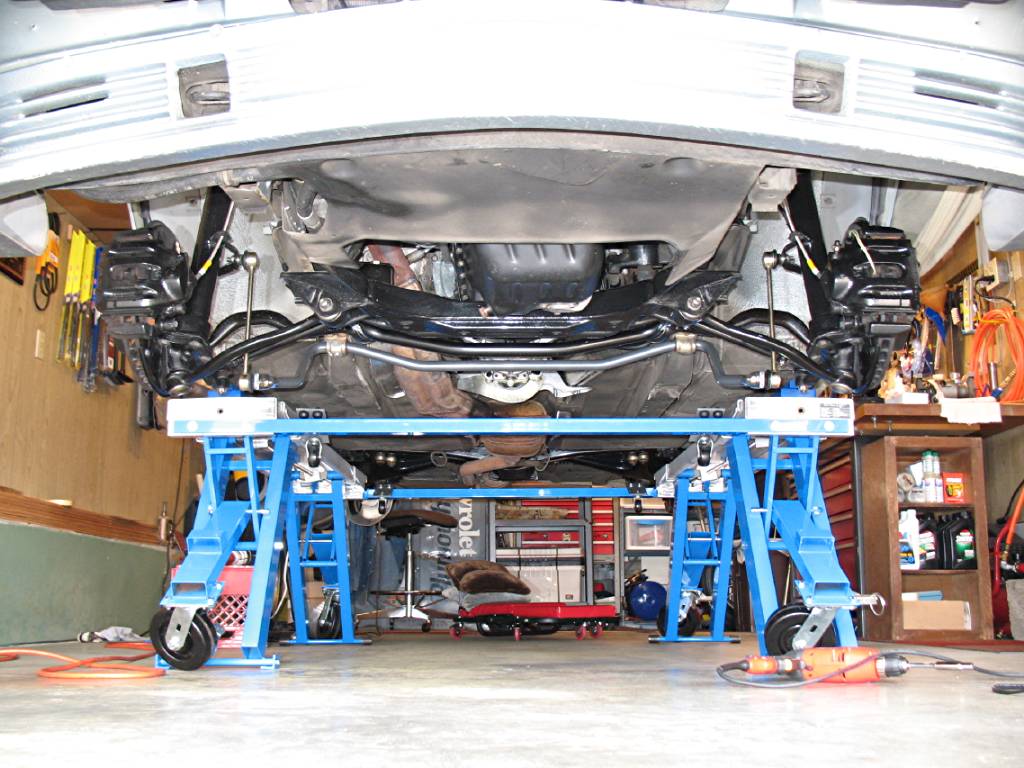
|
| Lift shown repositioned and raised, with casters hanging from their pins. |
You can now unlock the braked castors and move
the car. If you pre-position the brake castors to point in the direction you want to move the car, it will move easier. If
you don't remember or understand how casters swivel (the wheel arms tilt back in the opposite direction of wheel travel),
based on their direction of travel, simply roll one of them on the floor before you mount it. Depending on the smoothness
of your floor and how level it is, will determine how much force is required to move it. My floor is smooth and level and
my wife can move the car simply by leaning on it, so be careful and make sure you can stop its movement.
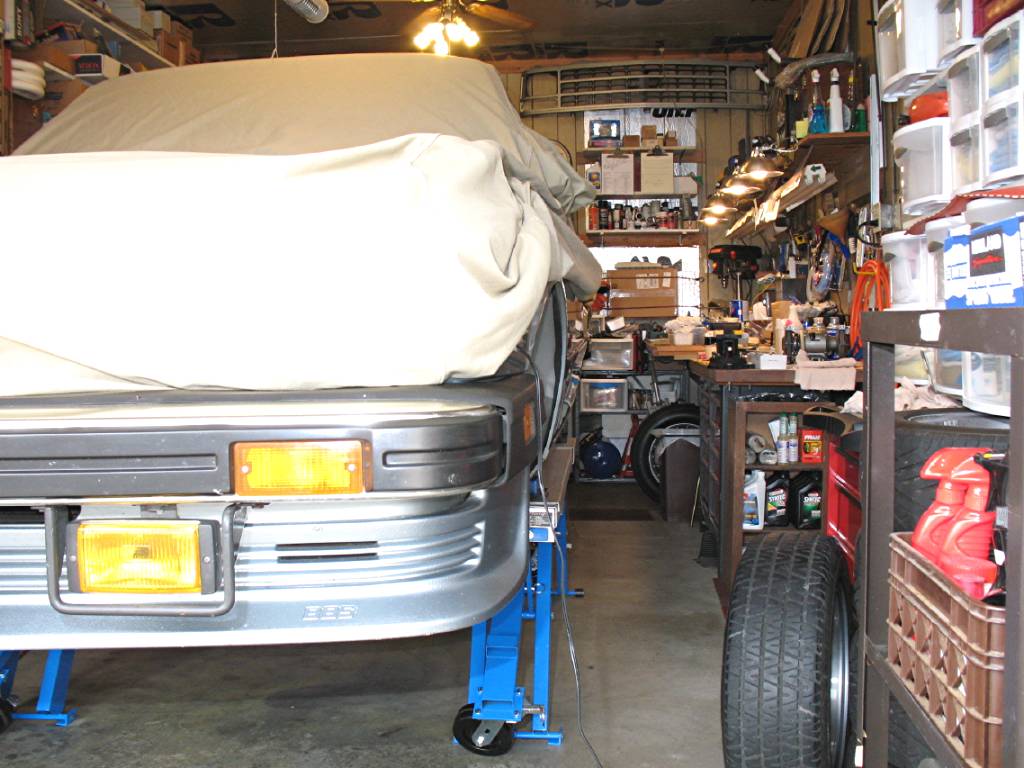
|
| Lift positioned for minimum clearance on drivers side of the vehicle. |
It is now very easy to work on one side or the other
of my BMW, in my one and a half car garage. As shown above, the car has been moved closer to the workbenches on
the drivers side, to maximize working space on the passenger side, as shown below.
|
| Vehicle positioned for maximum working space on the passenger side. |
Do the casters have to come off to use the lift? No,
but its maximum height will be limited by the caster mounting pins, which you must not allow to come in contact with the legs.
On my lift the top of the platforms is 24-inches above the floor and with my lift point blocks, the bottom of the rocker panel
is 27-1/2 inches above the floor, with good clearance for the caster mounting pin, as shown above. I can certainly live
with the lift being only 2-inches lower with the casters on. If not, it's a simple task to pull the mounting pins and remove
the casters, so that I can raise the lift to its full lift height.
UPDATE Feb. 6, 2009
In my space challanged garage, I am unable to stand
the lift up, fully assembled, and lean it against the wall somewhere. I have to disassemble the lift, which only takes about
5 minutes, and store it as individual pieces. First, I have to get the car out of the way and one of the great design features
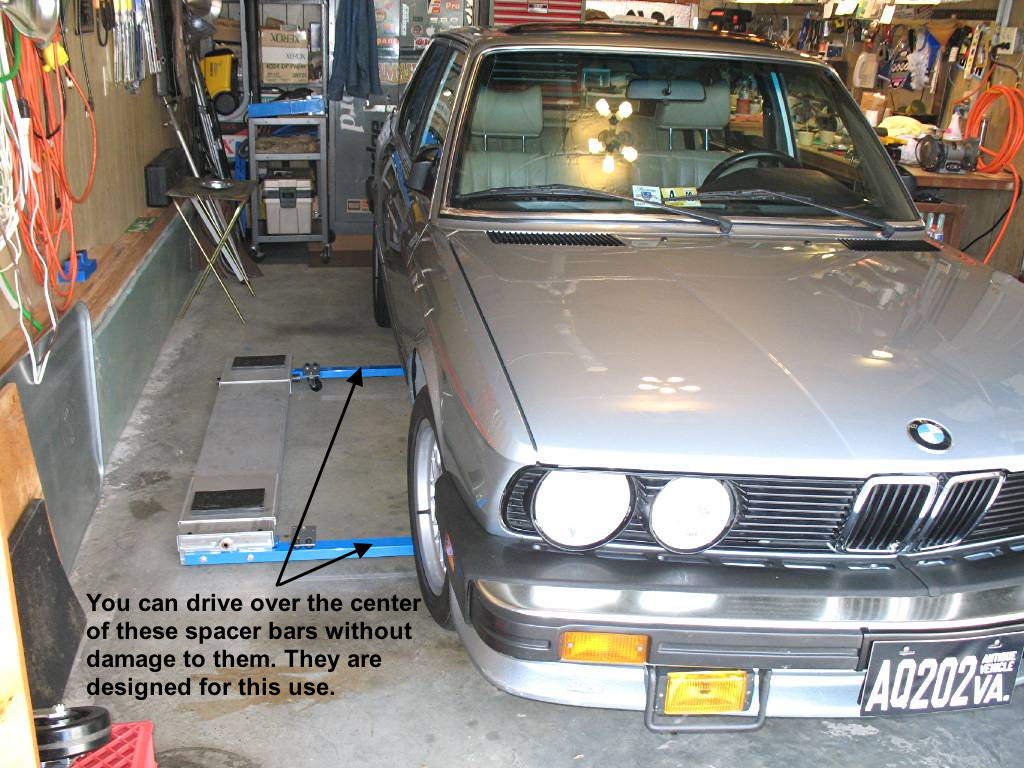
of the EZcarlift is that you can drive over the spacer bars, without fear of damaging them. Really!
That is the purpose of the small pivoting plate that
holds the small casters... the plate pivots and allows the spacer bars to rest on the floor when you drive over them. Move
the lift so that one of the platforms is under the center of the car (check for clearance, especially the exhaust components),
with the other platform along side the car. Simply drive over the spacer bars as shown below... slowly!
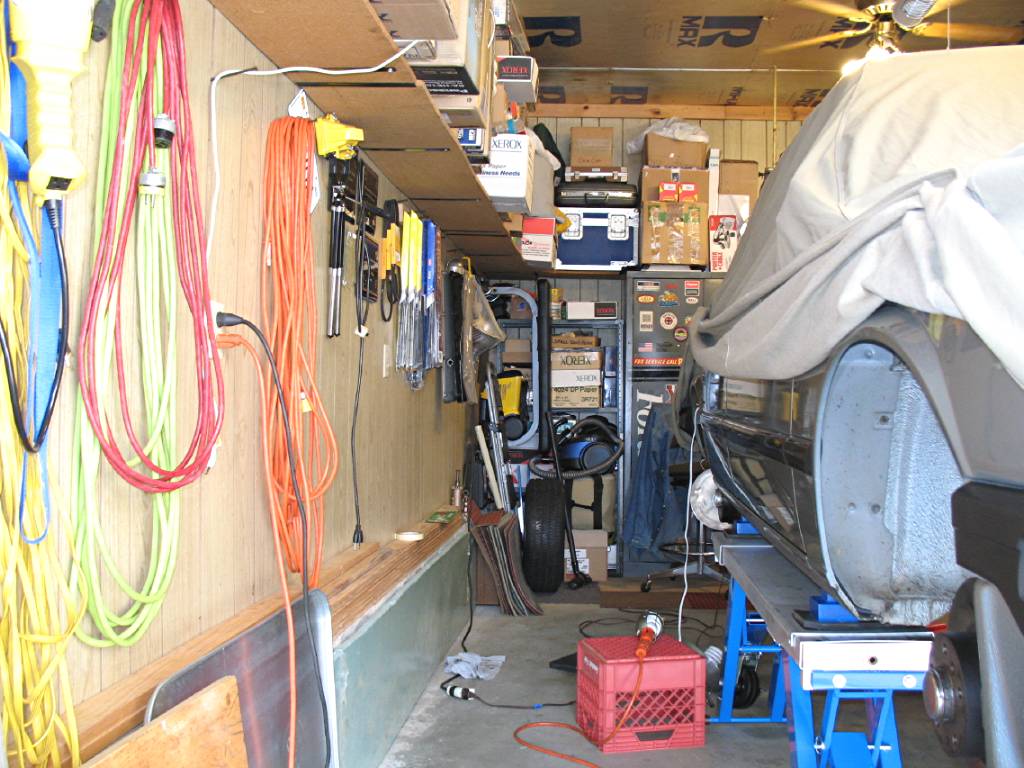
Currently, this is how I now store the lift, because during the winter I have
had other vehicles in my heated garage for short periods. Simply storing the lift under the car greatly simplifies moving
other cars on to the lift. When the lift is not in use for longer periods, I break it down and store it as shown below, at
the bottom of this web page.
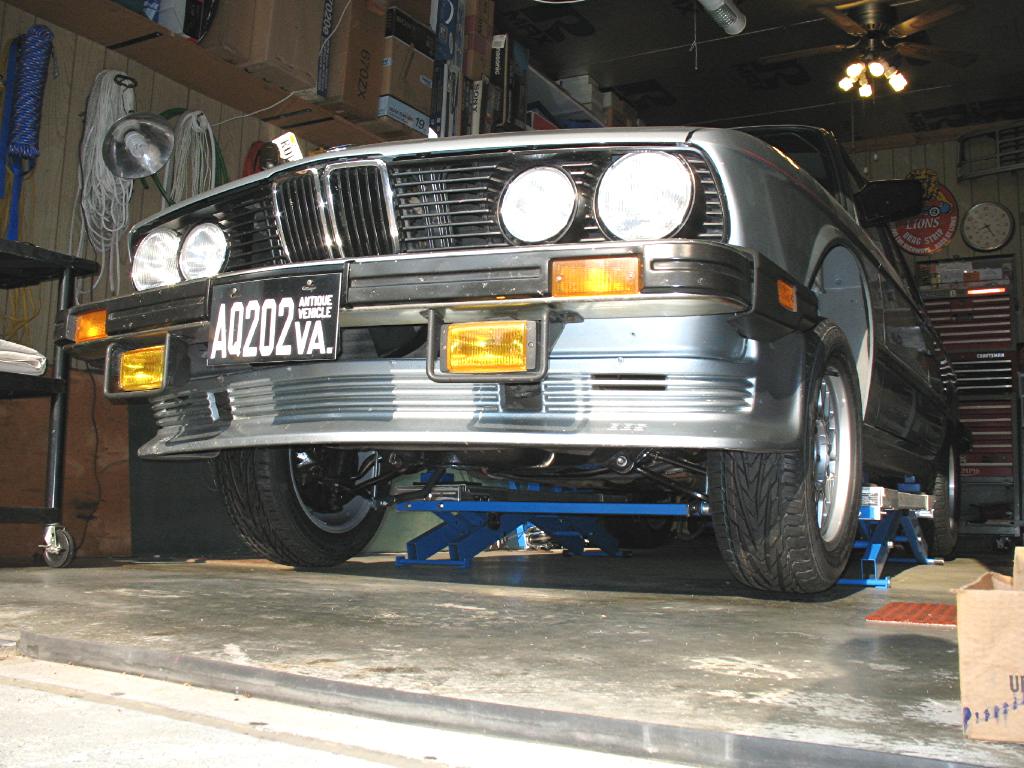
Here, the lift is raised to position the tires about
one-inch off the floor, which greatly assists when rotating tires, or removing the wheels for the installation of new tires,
as shown here. For many years, I've always removed the wheels when having new tires installed, rather than leave the car somewhere
and hope it is not damaged during the tire changing work, lifting the car or when it is placed back in the parking lot. Too
many of us have had some painful experiences, during such processes.
The lift allows me to remove all wheels and put them in the back of my truck
for delivery to my tire service, without need to install four different wheels, or have enough jack stands to support all
four corners, if I want to accomplish the same task without the lift. UPDATE -
I now use the TireVan service who comes to my garage with their Hunter 9700 system, as local shops appear to no longer
have highly qualified tire balance technicians and don't have a Hunter 9700 system to compensate. Seasoned E28 owners
know how sensitive our cars are in terms of accurate tire ballance... and I've had it with poor quality tire balance
services and the time and money it has cost me, running around trying to get quality work done.
January 7, 2012 Another Update -
Had a call from Boytcho Manev last night (EZCarlift inventor), just to catch
up on various things and his product is doing very well with now over 1,000 units in service. He's still looking for a good
distributor in Europe, but shipping direct in the meantime. Great to here he is doing well, since I am an earlier adopter
of the EZCarlift, which has lifted more vehicles then I can remember, over the nearly 5 years I've been using it. Certainly
a proven product, IMO and direct experience with the product, including using it at a few other locations, outside of my garage.
Try that with the typical shop car lift!
The following pictures show the breakdown of the EZcarlift,
how I've labeled it for easy reassembly and how I store mine, in my small garage.
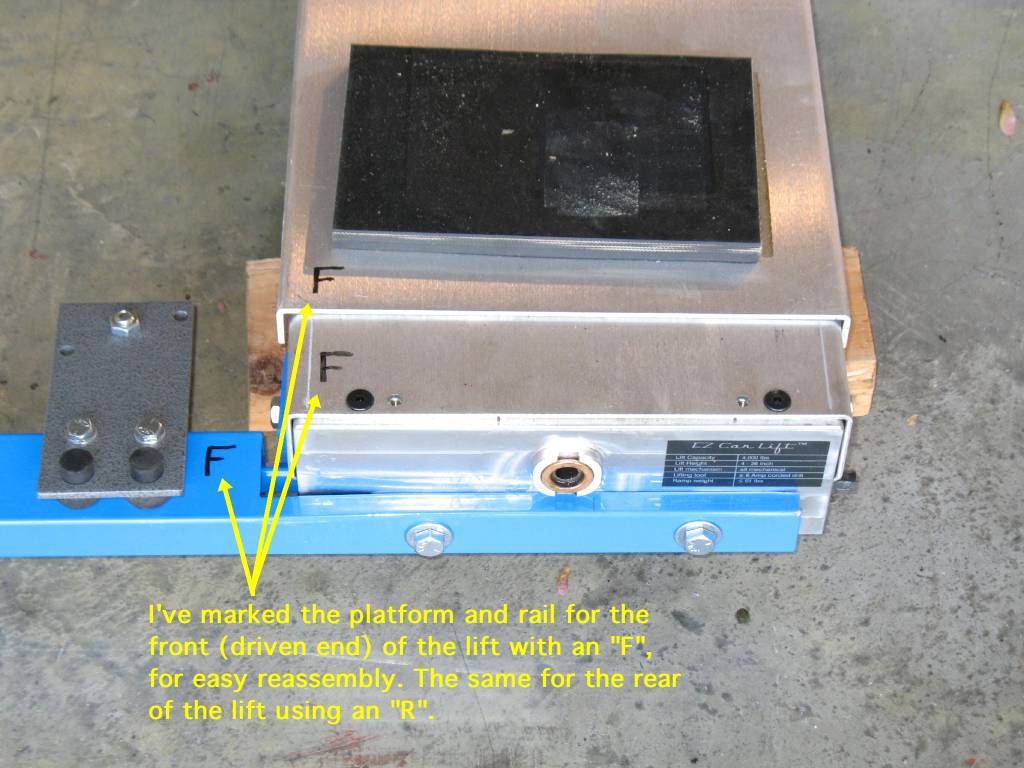
In addition to marking the ends of the platforms with
a marking pen (above), use a pair of 2x4 pieces of wood to support the platform at the end you are dissassembling or assembling,
to elevate the spacer bars above the floor, so they aren't constrained by the weight of the platform ends which they are attached
to. When storing the lift components, put the mounting hardware back on the platform ends, to prevent it from being misplaced.
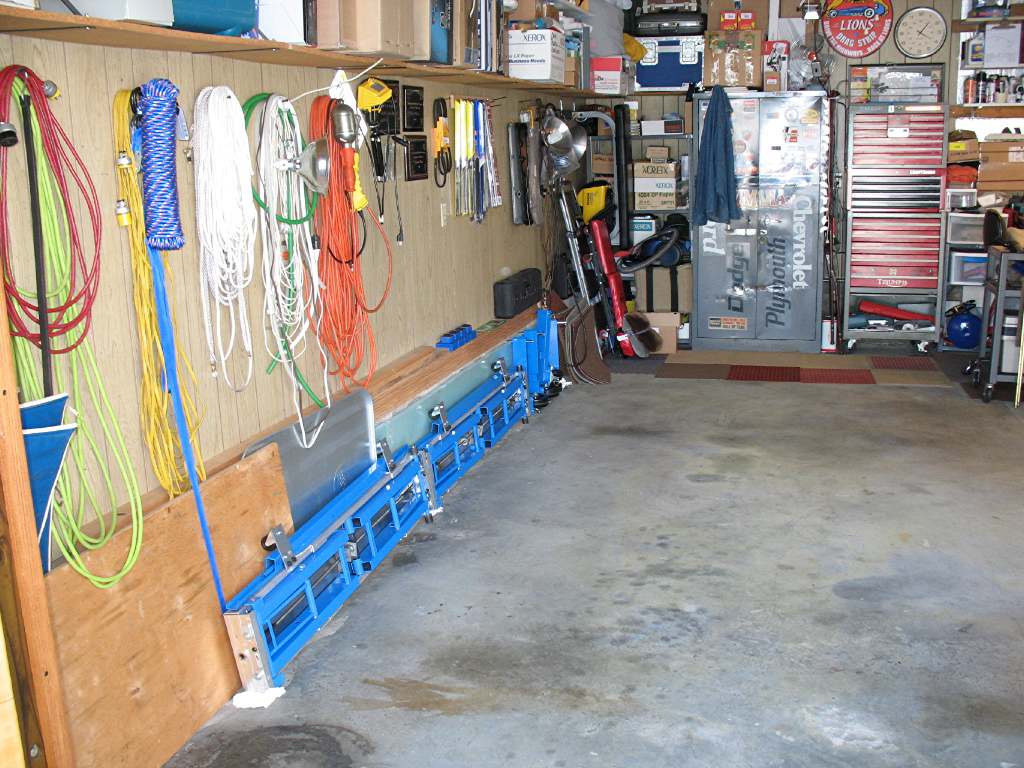
The platforms are positioned with the platform side
toward the wall so that they lean into the wall when layed on their sides. The spacer bars can be seen layed on top of the
platforms and the dolly wheels placed so they also lean into the wall.
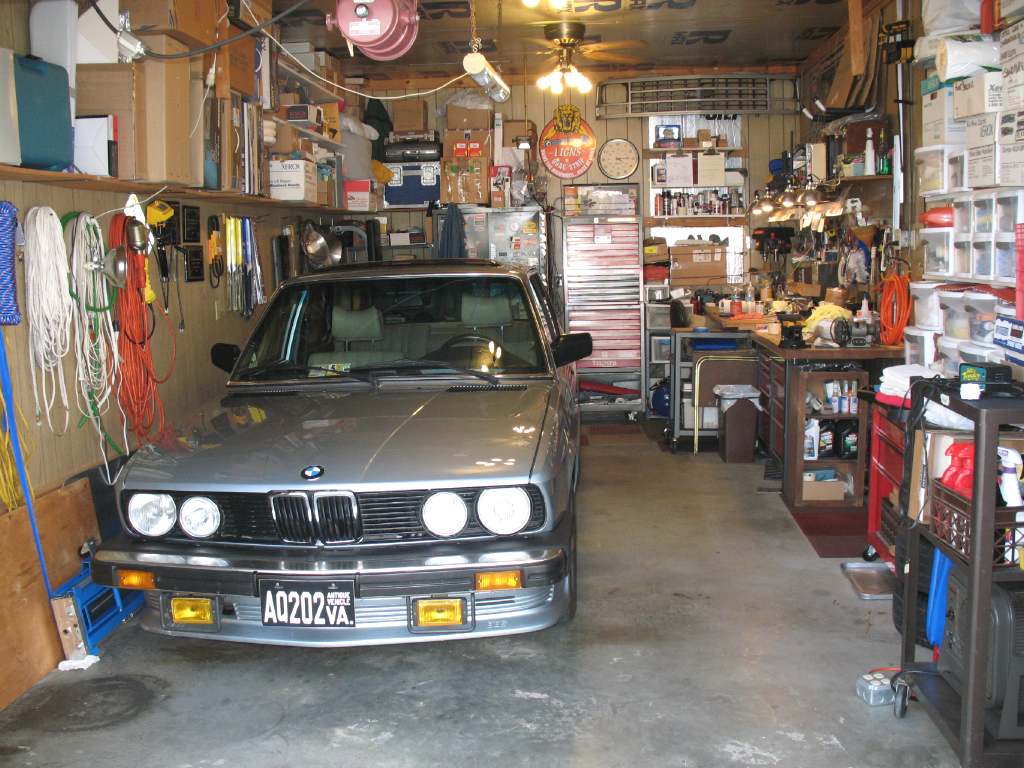
This is how the car is normally positioned, since it allows easy access to the drivers side
and the engine is facing the garage doors, which provides ample light when open during the day.

You can see that the EZcarlift takes little space
and is well out of the way for parking the car. If you have questions or comments, please contact me via email.
Internet resource links, big brakes (750i) upgrade, anti-sway
bar mods, 16-inch wheels, Euro headlights, ECU chips and tests.
|

